| | Craftsman Trail Rig |  |
|
+8SebastianAlbrecht mrshaft696 biggasmowers CraftsmanQuad19 Crazy_Carl MightyRaze AllisKidD21 mowerjunkie03 12 posters |
|
| Author | Message |
|---|
mowerjunkie03
Member

Join date : 2018-10-29
Posts : 342
 |  Subject: Re: Craftsman Trail Rig Subject: Re: Craftsman Trail Rig  December 31st 2018, 11:31 am December 31st 2018, 11:31 am | |
| Crazy_Carl I always make my own pulleys if I have the parts. Pulleys and hubs are nost that cheap. This would have cost me $20 if I had bought it. | |
|
  | |
mowerjunkie03
Member


Age : 20
Join date : 2018-10-29
Points : 2593
Posts : 342
Location : Burnt Ranch, California
 |  Subject: Re: Craftsman Trail Rig Subject: Re: Craftsman Trail Rig  December 31st 2018, 11:34 am December 31st 2018, 11:34 am | |
| SebastianAlbrecht Ya it's pretty easy. Cut the the hub out of the pullye you want and the pulley of of the hub you want and just weld it up.
Thanks that bumber has been a huge hit. | |
|
  | |
mowerjunkie03
Member


Age : 20
Join date : 2018-10-29
Points : 2593
Posts : 342
Location : Burnt Ranch, California
 |  Subject: Re: Craftsman Trail Rig Subject: Re: Craftsman Trail Rig  January 1st 2019, 12:56 pm January 1st 2019, 12:56 pm | |
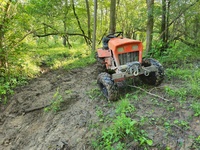
| I been pretty busy lately but I redid the font end on this thing. I'll try to explain it as best as possible. 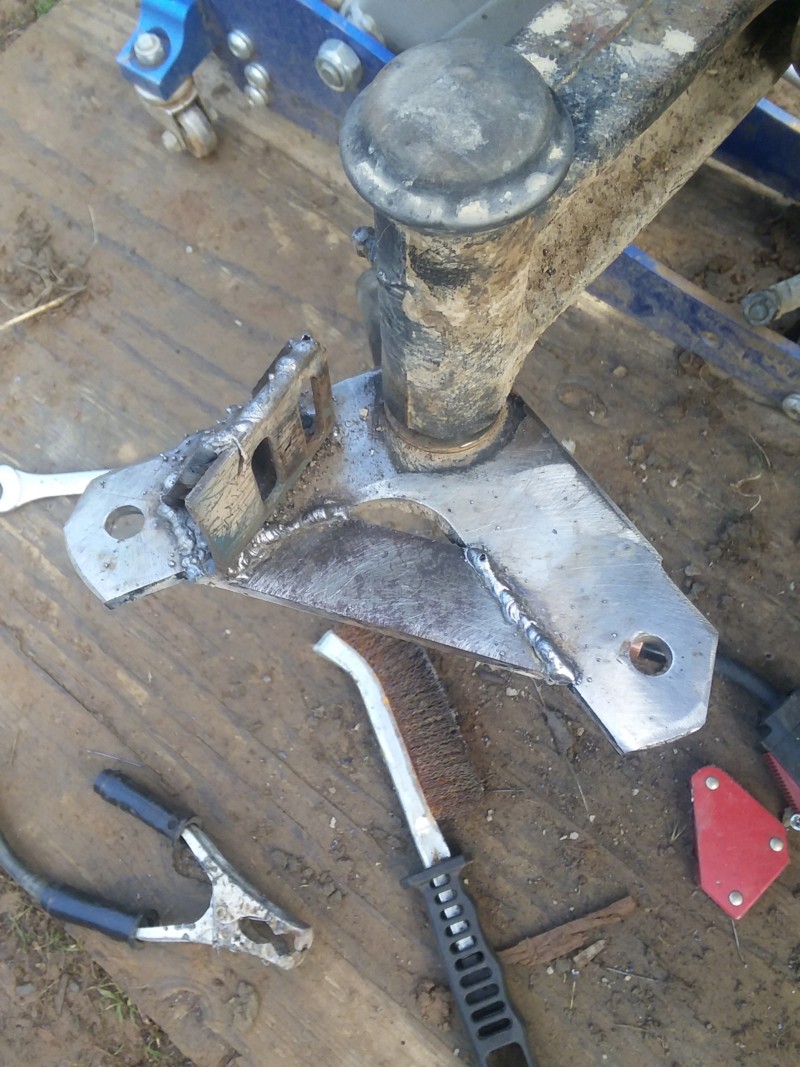 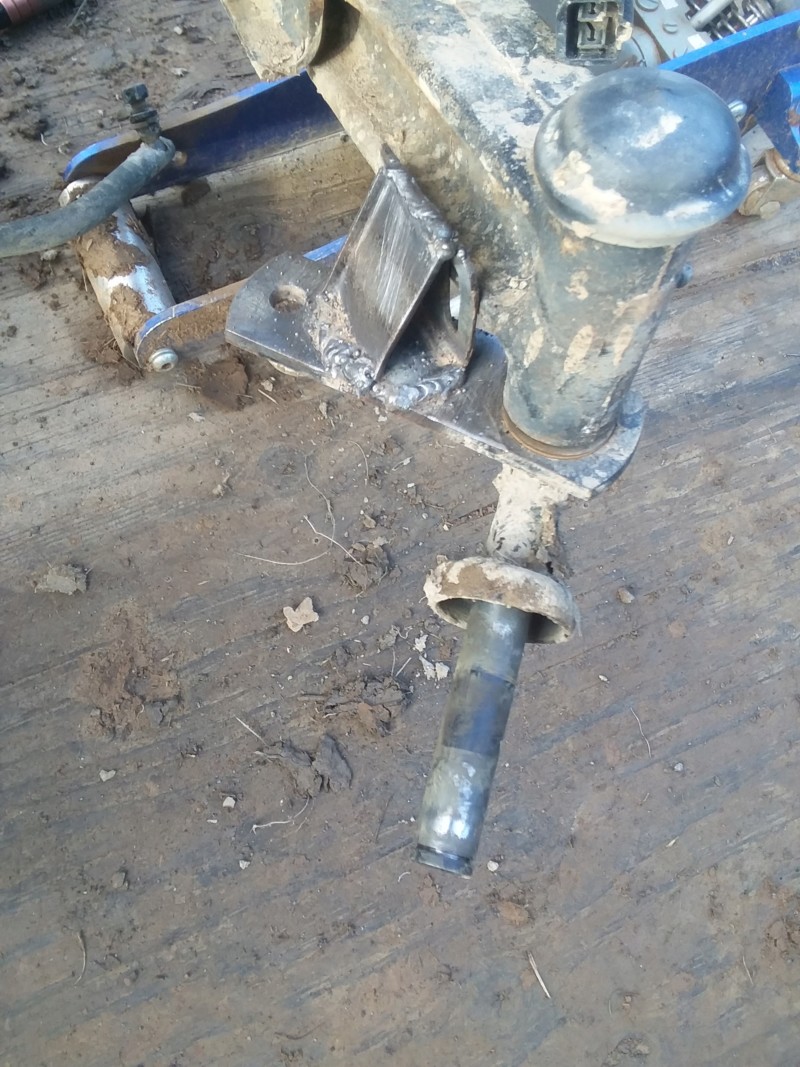 I reinforced my spindles and made new, much stronger steering bump stops. No more sideways tires! | |
|
  | |
mowerjunkie03
Member


Age : 20
Join date : 2018-10-29
Points : 2593
Posts : 342
Location : Burnt Ranch, California
 |  Subject: Re: Craftsman Trail Rig Subject: Re: Craftsman Trail Rig  January 1st 2019, 12:58 pm January 1st 2019, 12:58 pm | |
| 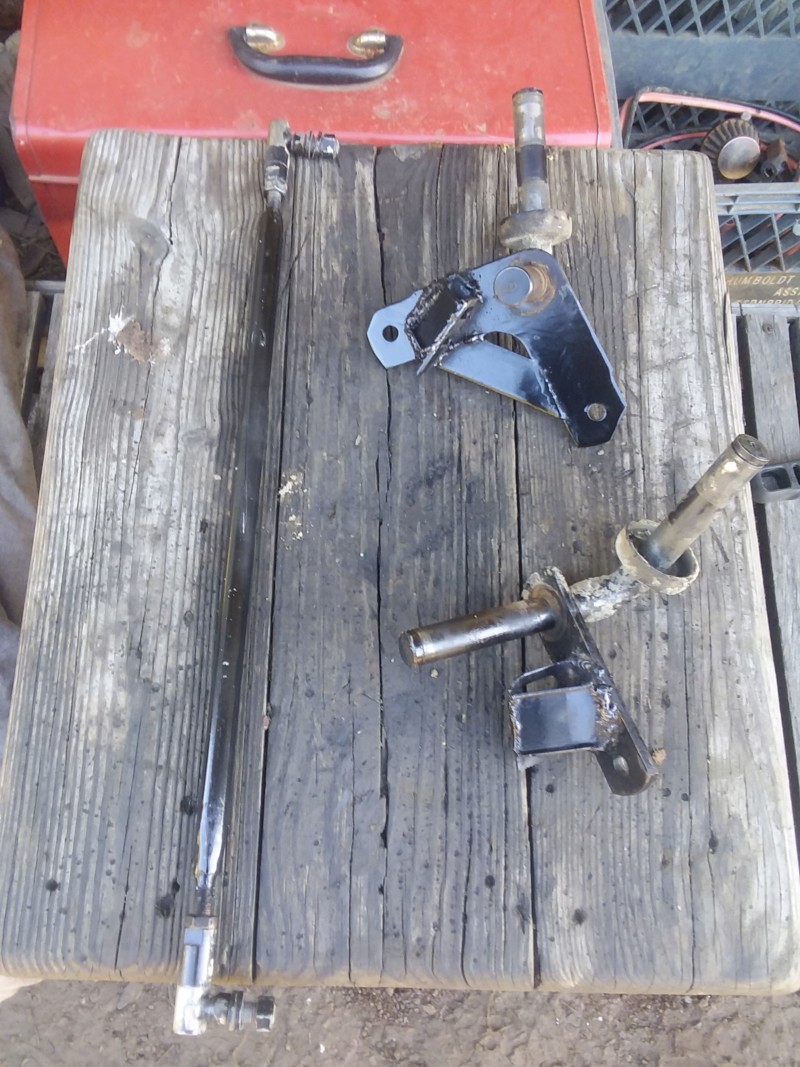 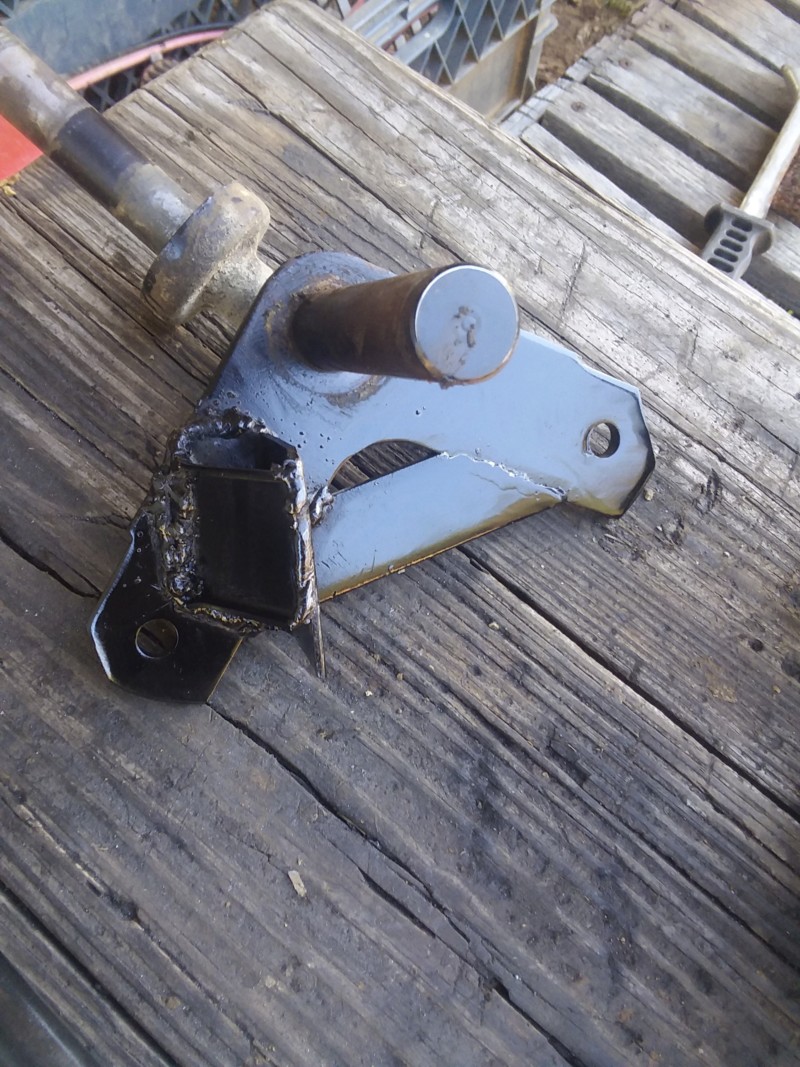 I also reinforced my tie rod by sleeving it with a piece of pipe. Then I painted evrything and reinstalled it. | |
|
  | |
mowerjunkie03
Member


Age : 20
Join date : 2018-10-29
Points : 2593
Posts : 342
Location : Burnt Ranch, California
 |  Subject: Re: Craftsman Trail Rig Subject: Re: Craftsman Trail Rig  January 1st 2019, 1:02 pm January 1st 2019, 1:02 pm | |
|  Finally I welded in some thin pieces of metal between the front axle and the mount. This reduced alot of my steering play and bump steer. I'm really happy with this front end fix for now. I still need to work on the steering but this will do for now. | |
|
  | |
AllisKidD21
Moderator

2020 Build-Off Entrant
2020 Build-Off Entrant
1st Place Build-Off 2019
1st Place Build-Off Winner 2019
Age : 25
Join date : 2016-07-10
Points : 8584
Posts : 5190
Location : Ontario Canada
 |  Subject: Re: Craftsman Trail Rig Subject: Re: Craftsman Trail Rig  January 1st 2019, 1:39 pm January 1st 2019, 1:39 pm | |
| Ooh, nice reinforcement job! Always better to brace stuff like that before breaking or bending it, haha. One suggestion I may make is adding a piece of flatstock where the spindle makes a bend like so: 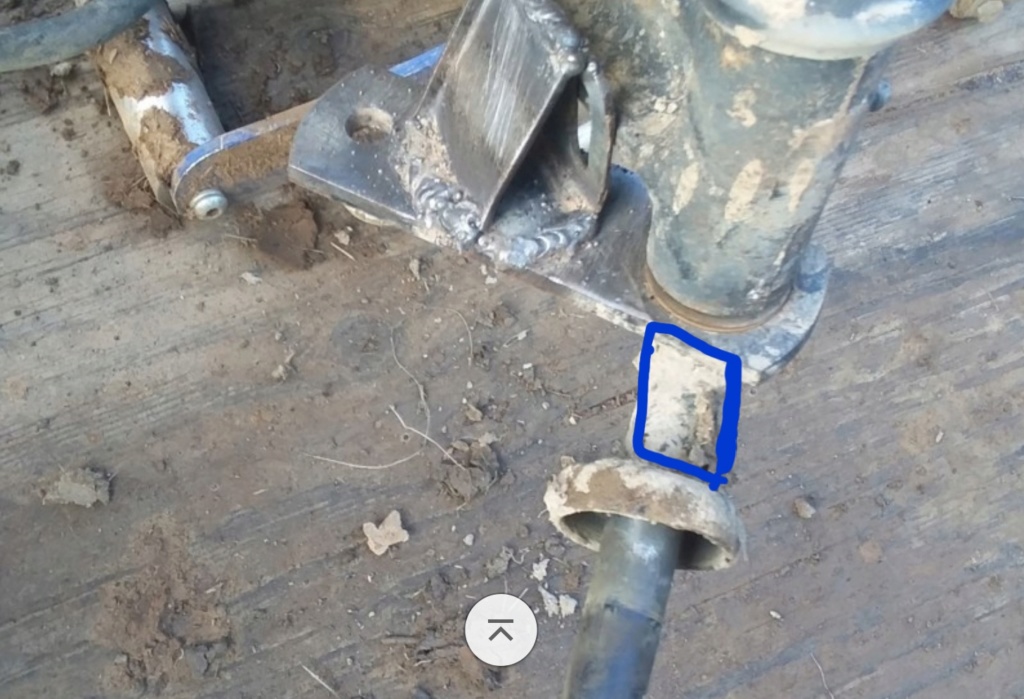 Might be a good idea, just to keep them from bending. Either way great job!  "This'll either wake you up or put you to sleep forever!"- Red Green "Whatever you do you should do right, even if it's something wrong." - Hank Hill - MTD Off-Road Build
- Ford LT 110 Off-Road Build
- Craftsman GT 6000 Off-Road Build
- Sears LT11 Rat Rod Build *2019 Build-Off Winner!* Garden Tractor Collection: Allis B-110 x2, 710, 716, & 410 - Wheel Horse 655, 953 & 500 Special - Case 444 - Bolens Versamatic, G10 & 1668 Diesel Swapped - Cub 106, 124 & 1000/149 Frankentractor - Ford 120, LGT 125 & 145 - White 1650 Yard Boss - Moto Mower 710-100 | |
|
  | |
Crazy_Carl
Veteran Member


2018 Build-Off Entrant
2018 Build-Off Entrant
2024 Build-Off Entrant
2024 Build-Off Entrant
Age : 35
Join date : 2017-10-30
Points : 5330
Posts : 2561
Location : Rochester, New York
 |  Subject: Re: Craftsman Trail Rig Subject: Re: Craftsman Trail Rig  January 1st 2019, 2:31 pm January 1st 2019, 2:31 pm | |
| That's a good idea to put a sleeve over the tie rod before it bends. | |
|
  | |
mowerjunkie03
Member


Age : 20
Join date : 2018-10-29
Points : 2593
Posts : 342
Location : Burnt Ranch, California
 |  Subject: Re: Craftsman Trail Rig Subject: Re: Craftsman Trail Rig  January 1st 2019, 2:58 pm January 1st 2019, 2:58 pm | |
| Thanks AllisKid I think I'll take your advise. My welder is kinda crappy so I don't know how much penetration I'll be able to get on the spindles but I'll try. | |
|
  | |
mowerjunkie03
Member


Age : 20
Join date : 2018-10-29
Points : 2593
Posts : 342
Location : Burnt Ranch, California
 |  Subject: Re: Craftsman Trail Rig Subject: Re: Craftsman Trail Rig  January 1st 2019, 3:01 pm January 1st 2019, 3:01 pm | |
| Crazy_Carl
Ya I figure it's easier now then after it's bent. I almost threw away the whole thing and bought heim joints but I am tired of spending money and this should be fine for now. | |
|
  | |
AllisKidD21
Moderator


2020 Build-Off Entrant
2020 Build-Off Entrant
1st Place Build-Off 2019
1st Place Build-Off Winner 2019
Age : 25
Join date : 2016-07-10
Points : 8584
Posts : 5190
Location : Ontario Canada
 |  Subject: Re: Craftsman Trail Rig Subject: Re: Craftsman Trail Rig  January 1st 2019, 3:59 pm January 1st 2019, 3:59 pm | |
| - mowerjunkie03 wrote:
- Thanks AllisKid I think I'll take your advise. My welder is kinda crappy so I don't know how much penetration I'll be able to get on the spindles but I'll try.
Sounds good! Also just so you know if you hit the Multi Quote button you can quote two people at the same time. That way you don't have to make two different posts   "This'll either wake you up or put you to sleep forever!"- Red Green "Whatever you do you should do right, even if it's something wrong." - Hank Hill - MTD Off-Road Build
- Ford LT 110 Off-Road Build
- Craftsman GT 6000 Off-Road Build
- Sears LT11 Rat Rod Build *2019 Build-Off Winner!* Garden Tractor Collection: Allis B-110 x2, 710, 716, & 410 - Wheel Horse 655, 953 & 500 Special - Case 444 - Bolens Versamatic, G10 & 1668 Diesel Swapped - Cub 106, 124 & 1000/149 Frankentractor - Ford 120, LGT 125 & 145 - White 1650 Yard Boss - Moto Mower 710-100 | |
|
  | |
mowerjunkie03
Member


Age : 20
Join date : 2018-10-29
Points : 2593
Posts : 342
Location : Burnt Ranch, California
 |  Subject: Re: Craftsman Trail Rig Subject: Re: Craftsman Trail Rig  January 1st 2019, 10:22 pm January 1st 2019, 10:22 pm | |
| - AllisKidD21 wrote:
- mowerjunkie03 wrote:
- Thanks AllisKid I think I'll take your advise. My welder is kinda crappy so I don't know how much penetration I'll be able to get on the spindles but I'll try.
Sounds good! Also just so you know if you hit the Multi Quote button you can quote two people at the same time. That way you don't have to make two different posts [smiley]https://2img.net/u/2812/37/66/46/smiles/2731072446.gif[/smiley] Oh thanks but I'm doing all this on my phone through the Topic It mobile app and it doesn't have the same capabilities. I also can't change the title of threads. | |
|
  | |
mowerjunkie03
Member


Age : 20
Join date : 2018-10-29
Points : 2593
Posts : 342
Location : Burnt Ranch, California
 |  Subject: Re: Craftsman Trail Rig Subject: Re: Craftsman Trail Rig  February 12th 2019, 7:27 pm February 12th 2019, 7:27 pm | |
| I haven't been getting that much work done becuase I haven't had power for 4 days but I did get 14 inches of snow at my house so I took this thing out. It did pretty well but then the belt started slipping and I'm pretty sure I burnt it up a little so It's time for a new belt and some faster pulleys too. Here's a couple pics for ya! 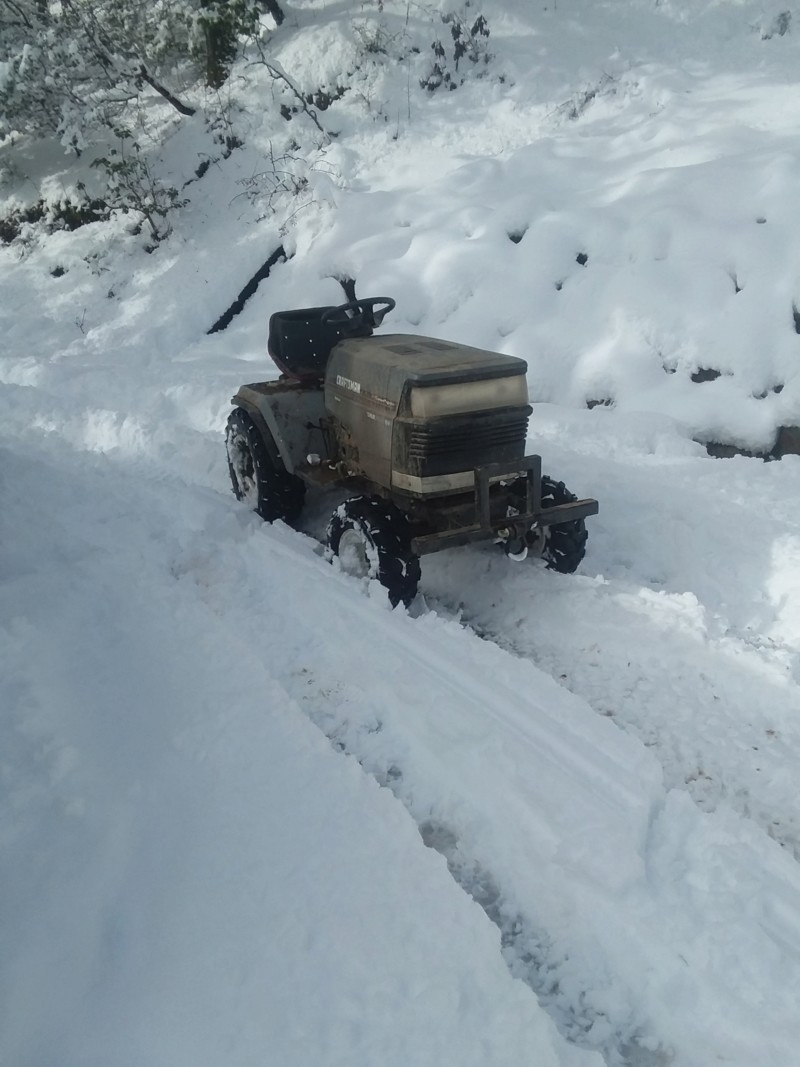 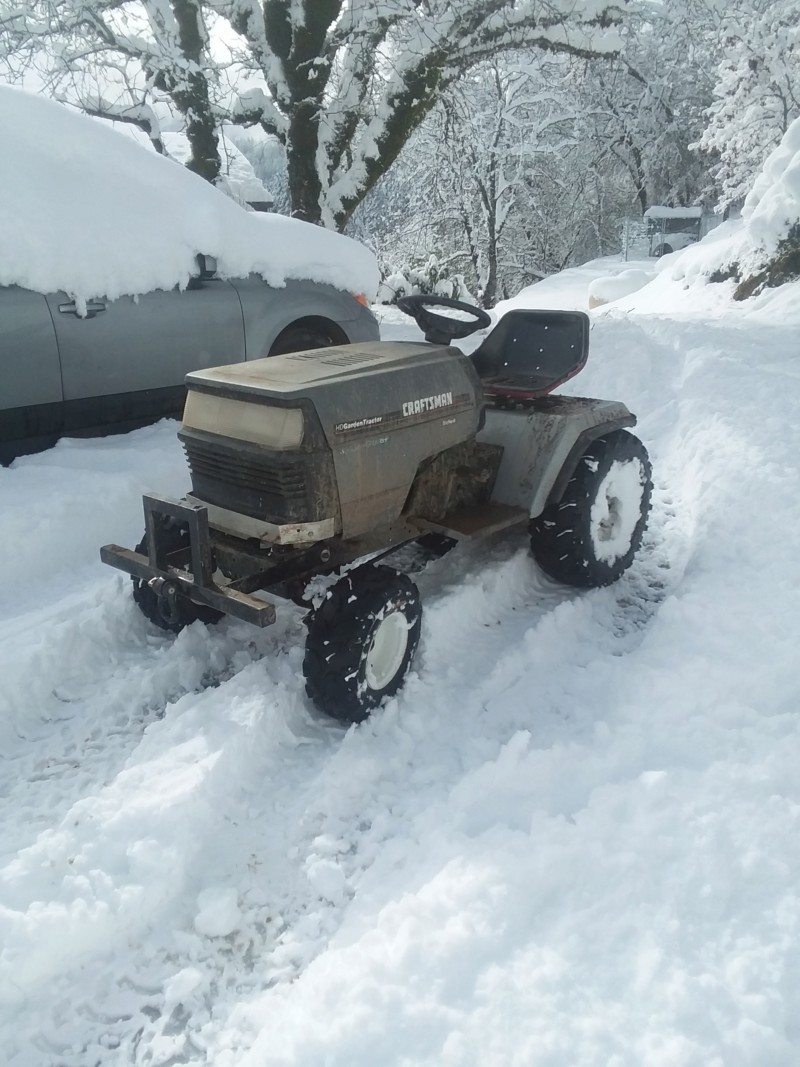 | |
|
  | |
| The author of this message was banned from the forum - See the message |
SebastianAlbrecht
Veteran Member

Age : 23
Join date : 2018-02-27
Points : 3843
Posts : 1299
 |  Subject: Re: Craftsman Trail Rig Subject: Re: Craftsman Trail Rig  February 12th 2019, 10:20 pm February 12th 2019, 10:20 pm | |
| LOL. now I'm sure U R the guy from instagram... since I saw your vid yesterday..... | |
|
  | |
mowerjunkie03
Member


Age : 20
Join date : 2018-10-29
Points : 2593
Posts : 342
Location : Burnt Ranch, California
 |  Subject: Re: Craftsman Trail Rig Subject: Re: Craftsman Trail Rig  February 13th 2019, 1:05 pm February 13th 2019, 1:05 pm | |
| - SebastianAlbrecht wrote:
- LOL. now I'm sure U R the guy from instagram... since I saw your vid yesterday.....
Yup I was gonna put the vid on here but I couldn't figure out how. | |
|
  | |
Double W Cross Ranch
Veteran Member

2018 Build-Off Finalist
2018 Build-Off Finalist
Age : 20
Join date : 2017-06-09
Points : 5489
Posts : 2640
Location : Literally Nowhere, Texas
 |  Subject: Re: Craftsman Trail Rig Subject: Re: Craftsman Trail Rig  February 13th 2019, 3:33 pm February 13th 2019, 3:33 pm | |
| - SebastianAlbrecht wrote:
- LOL. now I'm sure U R the guy from instagram... since I saw your vid yesterday.....
LOL yep I've been thinking that too!! | |
|
  | |
| The author of this message was banned from the forum - See the message |
SebastianAlbrecht
Veteran Member

Age : 23
Join date : 2018-02-27
Points : 3843
Posts : 1299
 |  Subject: Re: Craftsman Trail Rig Subject: Re: Craftsman Trail Rig  February 13th 2019, 10:38 pm February 13th 2019, 10:38 pm | |
| - mowerjunkie03 wrote:
- SebastianAlbrecht wrote:
- LOL. now I'm sure U R the guy from instagram... since I saw your vid yesterday.....
Yup I was gonna put the vid on here but I couldn't figure out how. ATLTF is a bit complicated in part Pics and Vids.... Pics with SERVIMG, Vids with YOUTUBE... | |
|
  | |
mowerjunkie03
Member


Age : 20
Join date : 2018-10-29
Points : 2593
Posts : 342
Location : Burnt Ranch, California
 |  Subject: Re: Craftsman Trail Rig Subject: Re: Craftsman Trail Rig  April 28th 2019, 4:14 pm April 28th 2019, 4:14 pm | |
| Been awhile since I have worked on this rig when I took the front tires off to put them on the rally I moved the axle back the stock position. I was just having problems with the axle flopping around alot and the brackets bending. The tear down on this has begun! 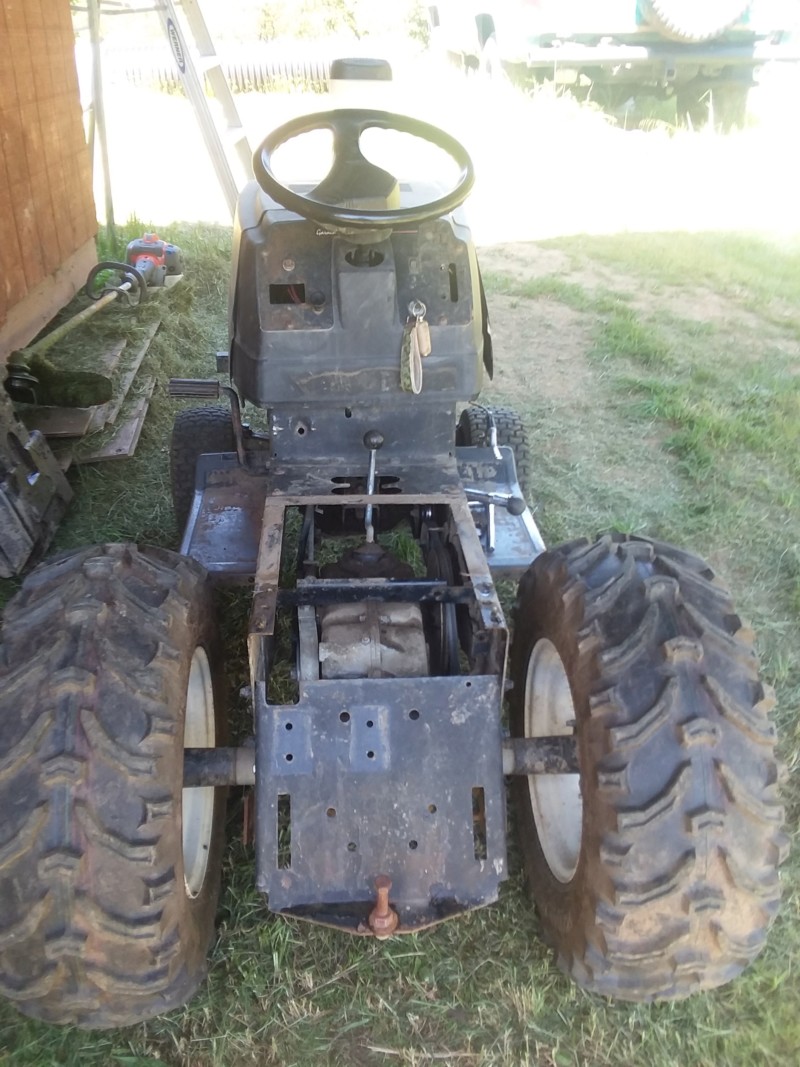 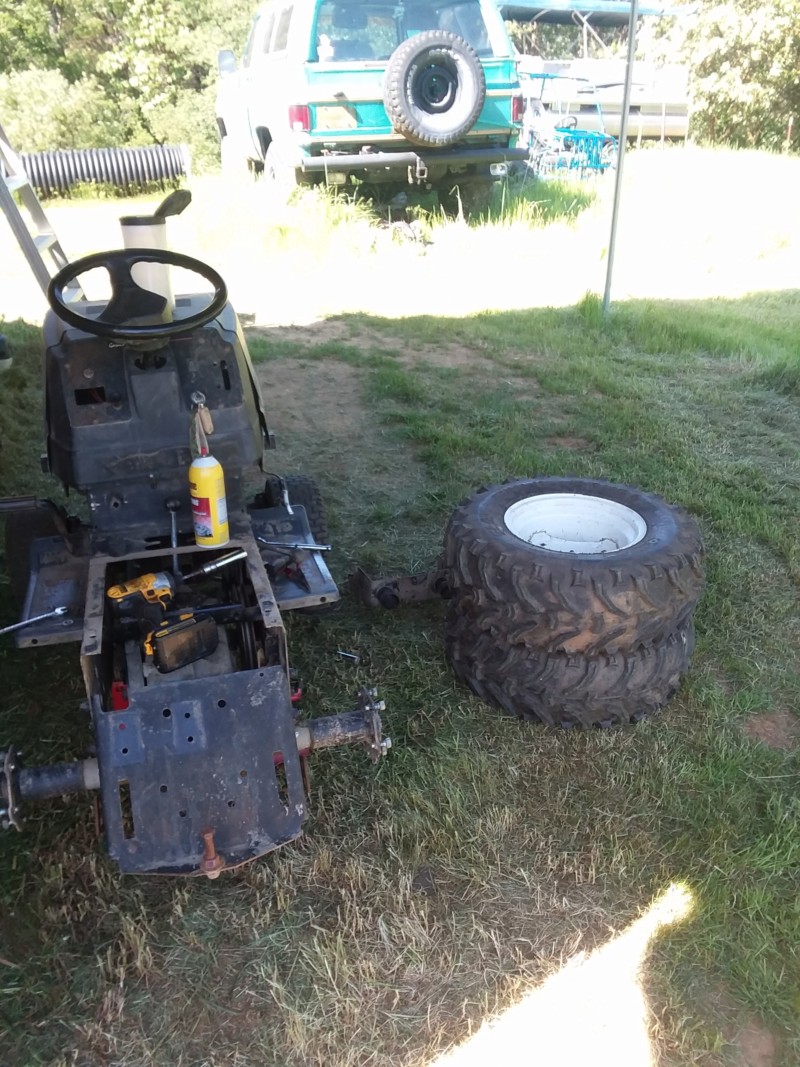 Not sure how far the modifications are gonna go on this but the first order of business is locking the trans. I got the 633a out and cleaned up a bit. The hubs had plenty of anti-seize on them and came off easily as well as the pulley. The brake drum on the other hand put up a hell of a fight and I bent the crap out of my puller but it came off. I'm just about to open her up but 633a guys should hang around this thread because I'm gonna have some questions. Thanks! | |
|
  | |
prancstaman
Veteran Member


Join date : 2015-02-02
Points : 5093
Posts : 1412
Location : Cleveland,Ohio
 |  Subject: Re: Craftsman Trail Rig Subject: Re: Craftsman Trail Rig  April 28th 2019, 7:49 pm April 28th 2019, 7:49 pm | |
| You mentioned earlier something about your welder. What kind of welder do you have? | |
|
  | |
mowerjunkie03
Member


Age : 20
Join date : 2018-10-29
Points : 2593
Posts : 342
Location : Burnt Ranch, California
 |  Subject: Re: Craftsman Trail Rig Subject: Re: Craftsman Trail Rig  April 29th 2019, 2:29 am April 29th 2019, 2:29 am | |
| - prancstaman wrote:
- You mentioned earlier something about your welder. What kind of welder do you have?
I have a $100 Chicago Electric 125 flux welder. Usually does alright but anything over an 1/8 and it's useless. | |
|
  | |
mowerjunkie03
Member


Age : 20
Join date : 2018-10-29
Points : 2593
Posts : 342
Location : Burnt Ranch, California
 |  Subject: Re: Craftsman Trail Rig Subject: Re: Craftsman Trail Rig  April 29th 2019, 2:38 am April 29th 2019, 2:38 am | |
| Okay I got 633a opened up today and I must say it looks pretty good in there. Hardly any where on the gears and that was a tiny bit of water in there so alittle surface rust on a couple of the gears but not bad at all. 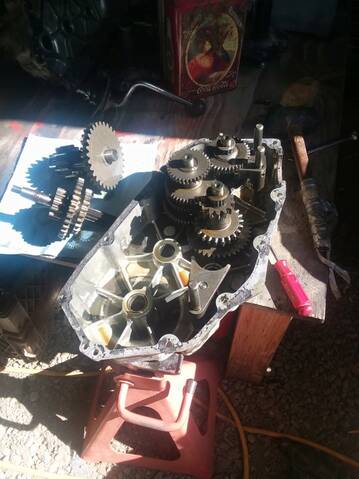 I did alittle research on locker techniques and I realised that I wouldn't have much success welding those gears with my welder so I looked into the gear flip technique. Lawn Gone Tractor Shop did a recent video with a YouTuber called Black River Customs. They pulled apart a 633a and he explained how if you have a 4 bolt diff carrier the gear flip is not the best idea but luckily mine is the newer, 6 bolt diff carrier with 6 pinion gears. I was able to flip two of the gears and lock it up good and tight! 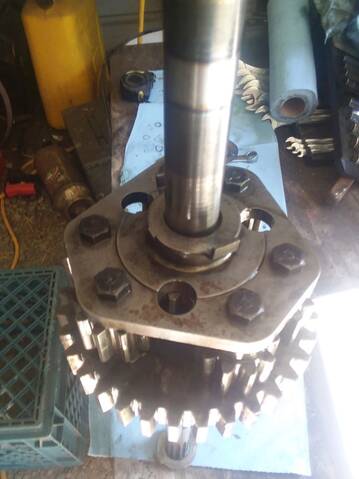 I just need a gasket and one for the shifter boot and then this thing is ready to go back together. I am gonna buy a gasket because I want the best seal possible on this. Does anyone know of a better site then searspartsdirect.com for getting these gaskets? For both of them its about 18 bucks. Also how much oil do these need? Also should I replace the seals even if they aren't leaking? I know people usually replace them on Saburbans but this tractor is alot newer Thanks! | |
|
  | |
NorthportTroller
Member

Age : 51
Join date : 2019-04-29
Points : 2072
Posts : 35
Location : KING OF PRUSSIA, PA
 | |
  | |
prancstaman
Veteran Member


Join date : 2015-02-02
Points : 5093
Posts : 1412
Location : Cleveland,Ohio
 |  Subject: Re: Craftsman Trail Rig Subject: Re: Craftsman Trail Rig  April 29th 2019, 8:19 pm April 29th 2019, 8:19 pm | |
| - mowerjunkie03 wrote:
- prancstaman wrote:
- You mentioned earlier something about your welder. What kind of welder do you have?
I have a $100 Chicago Electric 125 flux welder. Usually does alright but anything over an 1/8 and it's useless. I got the 90 amp one, it's older, and is weaker. If you haven't figured it out yet, don't buy the Harbor Freight gassless wire, or the Hobart gassless wire either. Buy the Lincoln Electric wire from Home Depot. Just a little bit more in cost but works way better. Torch tips you can get from Harbor Freight, they match the welder and work OK. Match up the parts of the welder (torch tips, wire feed wheel) with the size wire you buy. You can't mix this up because the wire will not feed right then. The cheapest setup would be the .035 wire, .035 torch tips, .035 wire feed wheel inside the welder (the size is written on the wheel, pull it out to see and the correct size faces up). There is no difference in welding with .030 and .035 wire, but the .035 wire is a little cheaper. I usually buy the 10 lb spools for around $70, which is cheaper then 10 1lb spools for $140. My 90 amp welder can weld 3/16 plate steel in a single pass and have done it with success. Yours should do it too if not thicker since it is more amps. There is technique to welding, especially with these cheap welders. The techniques for these cheap welders are different compared to a better brand with more power output. The prep of the part to be welded is all the same (cleaning to bare metal, beveling), but the settings on the welder will be different. I weld alot of 1/8 plate steel with mine. Just point and shoot does not work. After prepping the part, I clean my helmet. If you can't see the metal melting then it won't work. If you have an auto darkening helmet, the dial on the side should be on 9 or 10, you won't need it any higher which is for higher amp welding Like 150 amp or higher. The clear plastic covering over the shaded glass should be cleaned, an easy way is to polish it with toothpaste rubbed with a clean rag and rinse off. The actual tinted glass or auto darkening glass should be cleaned with a rag only. Set up the welder now. For plate steel the switch should be set to max setting. As for the speed, I never go faster then 5 for anything. This is the key to good heat penetration with these cheap welders and that is with the wire speed. The wire speed does not effect the welding amp output whatsoever. They are 2 separate components inside the welder. So. The idea is to slow down the wire speed to the slowest speed while still having a continuous weld. If the ark of the weld stops and starts continuously then the speed is too slow. I usually set mine at 3 to 4 mainly with most of the welding I do. The theory is, The ark is the heat zone, the longer the ark stays in one spot, the hotter and deeper the penetration will be. So no rushing in the movement of the hands and gun. Move slow. You need to see real close too, to see what is happening. You need to see the metal melting, wire going into the metal, and the metal filling up the gap to move forward. Oh, clean torch tips matter,which is the part where the wire goes through the torch tip, the hole in the tip. Tight connections matter too. Need a good connection on the components of the welder for it to work right. Give it a try and let me know how it goes. | |
|
  | |
mowerjunkie03
Member


Age : 20
Join date : 2018-10-29
Points : 2593
Posts : 342
Location : Burnt Ranch, California
 |  Subject: Re: Craftsman Trail Rig Subject: Re: Craftsman Trail Rig  April 29th 2019, 8:54 pm April 29th 2019, 8:54 pm | |
| Thanks for all the tips prancstaman. I think alot of my issues with this welder is caused by the lack of gas and very cheap wire. I usually get a 2lb spool of Fourney .030 flux core and I think it just welds like crap. As for the speed I usually run it at 1 on the wire speed. I move at about the speed of oxi-acetaline welding. Lol. When I upgrade I will definitely get a better brand welder that takes shielding gas and can run .035. Thanks again for the tips! | |
|
  | |
diddie
Member

2022 Build-Off Entrant
2022 Build-Off Entrant
Age : 57
Join date : 2016-10-02
Points : 3427
Posts : 411
Location : Indiana
 |  Subject: Re: Craftsman Trail Rig Subject: Re: Craftsman Trail Rig  April 29th 2019, 9:49 pm April 29th 2019, 9:49 pm | |
| if you know the part number for the gasket you can search it on ebay i find alot of mower parts that way at a lot cheaper price | |
|
  | |
prancstaman
Veteran Member


Join date : 2015-02-02
Points : 5093
Posts : 1412
Location : Cleveland,Ohio
 |  Subject: Re: Craftsman Trail Rig Subject: Re: Craftsman Trail Rig  April 29th 2019, 10:51 pm April 29th 2019, 10:51 pm | |
| You have the speed at 1,wow. Too slow. Explains alot. Yah, need to turn the speed up a bit. Must be sputtering off and on quite a bit. OK. To give you a better idea on the settings, here is what I use. Sheet metal (body panel stuff)- minimum amp setting, speed 3, spot welding only. Sheet metal (10 gauge, exhaust pipe)- minimum amp setting, speed 4, continuous and spot welding. Plate steel (1/16 thick)- maximum amp setting, speed 3, continuous welding only. Plate steel (1/8 thick) maximum amp setting, speed 4, continuous welding only. Anything thicker- maximum amp setting, speed 5, continuous welding.
Spot welding means- weld a section for around 1 second and stop. This heats up the metal and welds it together but doesn't give it a chance to blow a hole through it because you stop and the metal cools. The gap would hold the puddle of metal for only so long before it just falls out and leaves a hole. On thin and thick sheet metal mainly.
Continuous welding means- start welding at a spot and continue to weld over a distance to the end of the area to weld,
Sounds like you have the right hand movement, just the wrong settings on the welder. | |
|
  | |
mowerjunkie03
Member


Age : 20
Join date : 2018-10-29
Points : 2593
Posts : 342
Location : Burnt Ranch, California
 |  Subject: Re: Craftsman Trail Rig Subject: Re: Craftsman Trail Rig  April 30th 2019, 11:15 pm April 30th 2019, 11:15 pm | |
| Well thats interesting because I used to run it around 3 for any thick stuff but my welds were always pretty cold and did not melt the base metal well.(This may be caused by poor prep work. Sometimes I get lazy about that.) I posted some pics on Instagram when I reinforced my spindles and a few people mentioned that I should turn my wire speed down and slow down. I've actually had alot of success welding like that. I need to experiment some more with it though. I feel like the low quality of the welder affects how much heat it can put down. I have seen way better come from a Lincoln 110. But I know a mower modder on Instagram who runs his Chicago 125 at one as well. | |
|
  | |
Sponsored content
 | |
  | |
| | Craftsman Trail Rig |  |
|


