|
| | MUT: Murray Utility Tractor |  |
|
+16mh434 Rustbucket Garage diddie mistavp05 CraftsmanQuad19 Double W Cross Ranch darkside0914 RichieRichOverdrive SebastianAlbrecht Creepycrawler MatthewD prancstaman Crazy_Carl AllisKidD21 MightyRaze TourMax 20 posters | |
| Author | Message |
|---|
TourMax
Member

Join date : 2018-10-06
Posts : 438
 | |   | | TourMax
Member

Join date : 2018-10-06
Points : 2722
Posts : 438
 |  Subject: Re: MUT: Murray Utility Tractor Subject: Re: MUT: Murray Utility Tractor  Sat 19 Jan 2019, 8:23 am Sat 19 Jan 2019, 8:23 am | |
| Now considering moving the shifter back to the steering column plinth. It means an extra bellcrank and rod, which I am somewhat skeptical of. It means another possible point for slop and play in the linkage... | |
|   | | TourMax
Member

Join date : 2018-10-06
Points : 2722
Posts : 438
 |  Subject: Re: MUT: Murray Utility Tractor Subject: Re: MUT: Murray Utility Tractor  Sat 19 Jan 2019, 2:16 pm Sat 19 Jan 2019, 2:16 pm | |
| Work has begun on the console mounted shifter. It’s going on the rh side. So far, I have the lever and transverse torque rod done. The rod is 3/4 stock, machined for a 6205 bearing on each end. I’m about to build an arm for the torque tube to tranfer the shifter motion 90 degrees, down to the deck via a connecting rod. That rod will connect to a bellcrank that will change the direction another 90 degrees, headed back to a shift lever on the transmission. All the pivots are nearinga or heim ends. The connecting rods are 1/2” cold rolled steel. Should work pretty smoothly. Next is to wait for the new shift keys to show up, which I think os part of my “hard shifting” problem. Pics when I get closer to being done.  | |
|   | | prancstaman
Veteran Member


Join date : 2015-02-02
Points : 5093
Posts : 1412
Location : Cleveland,Ohio
 |  Subject: Re: MUT: Murray Utility Tractor Subject: Re: MUT: Murray Utility Tractor  Sat 19 Jan 2019, 8:16 pm Sat 19 Jan 2019, 8:16 pm | |
| It would be pretty sweet to put a ratchet shifter in all that. Just for the added option of smackin it into gear when it don't want to go.  | |
|   | | TourMax
Member

Join date : 2018-10-06
Points : 2722
Posts : 438
 |  Subject: Re: MUT: Murray Utility Tractor Subject: Re: MUT: Murray Utility Tractor  Sat 19 Jan 2019, 9:01 pm Sat 19 Jan 2019, 9:01 pm | |
| Ah what the heck. Heres a few teasers. Shaft, bearings and housings:  Shot of the bearings in thier housings:  How it will be oriented in the tractor:  What you will see when it’s done:  The bearing housings still need to be drilled and tapped for the mounting bolts. The RH side will bolt from the inside, the LH housing will be bolt from the outside. It’s done this way so I can remove the RH side housing and pull the shaft out of the column if I ever need to repair it or get it out of the way to work on something else. It also means no bolt heads on the outside of the bearing housing to interfere with the shifter arm. The shifter goes on the stub end sticking out. The lever goes on the opposite side inside the instrument column. Later den the road I’ll build a sheet metal housing for the shifter to clean up the looks and incorporate a numbered gear indicator scale.  | |
|   | | TourMax
Member

Join date : 2018-10-06
Points : 2722
Posts : 438
 |  Subject: Re: MUT: Murray Utility Tractor Subject: Re: MUT: Murray Utility Tractor  Sun 20 Jan 2019, 8:31 pm Sun 20 Jan 2019, 8:31 pm | |
| Shifter and torque rod are done:  You can see the fitting where the link rod lever will go on the LH side. It’s just slid on the torque rod for now. Once I get the linkage geometry figured out, it will get pinned in place. Same with the shifter, except that will get a through bolt instead of a pin. Here’s a few pics of roughly where the gears should end up. Reverse: 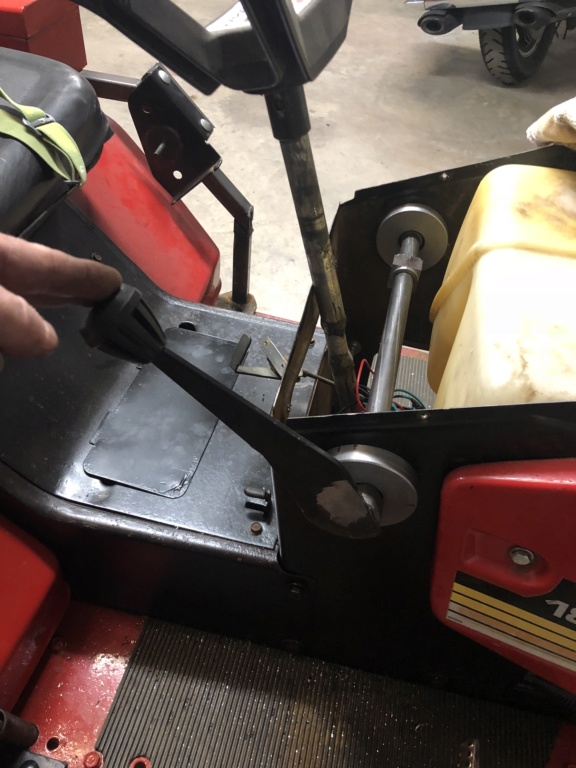 Neutral: 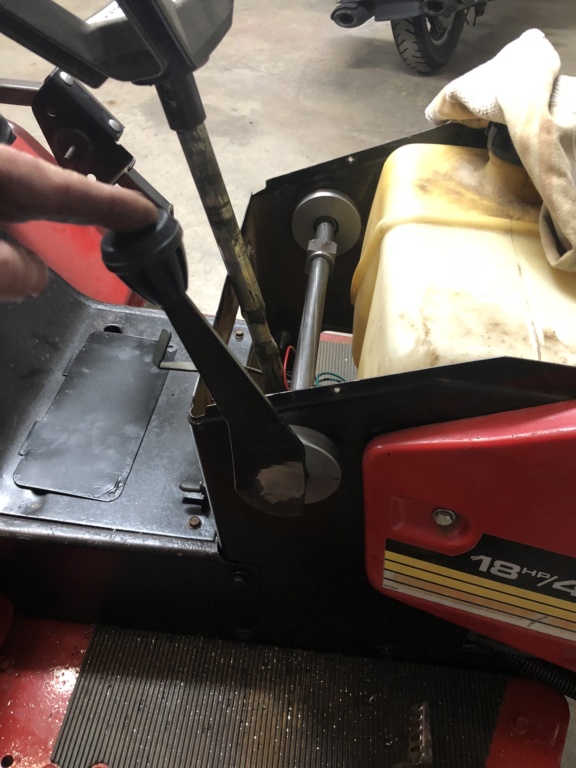 5th:  Feels rock solid and moves smooth as butta! Not a hint of play or binding. The precision fit and bearings are working just as I expected.  | |
|   | | TourMax
Member

Join date : 2018-10-06
Points : 2722
Posts : 438
 |  Subject: Re: MUT: Murray Utility Tractor Subject: Re: MUT: Murray Utility Tractor  Mon 21 Jan 2019, 9:03 pm Mon 21 Jan 2019, 9:03 pm | |
| Not much done today. Had to go to physio in the AM and when I got home I pulled the lathe apart to do some cleaning and make some needed adjustments. She’s back to cutting smooth and strong again, so now it’s full steam ahead again! I did start making the bearing housing for the lower bellcrank though.   But now it’s time to knock it off for the night.  | |
|   | | TourMax
Member

Join date : 2018-10-06
Points : 2722
Posts : 438
 |  Subject: Re: MUT: Murray Utility Tractor Subject: Re: MUT: Murray Utility Tractor  Wed 23 Jan 2019, 6:50 am Wed 23 Jan 2019, 6:50 am | |
| Working on the bellcrank mount and then:   FARK!!!  When I calm down and can stand to look at it again, I can see it’s been cracked for a long time, likely long before I bought it and it finally had propegated out to where is just let go. Its and old lathe (1950’s) so parts like this are hard to find. Ebay has nothing, or anywhere I find one they want stupid money. I need to get up and running again somehow so I decide To make a soild plinth mount for the QCTP. I’ll loose the coumpound capability, but it will also be much more rigid. Lots of people use these for that exact reason. I “jack-arse” a way to machine my plinth by clamping my tooling in the milling attachment:  It worked well enough as long as I keep my cuts light. Eventually: 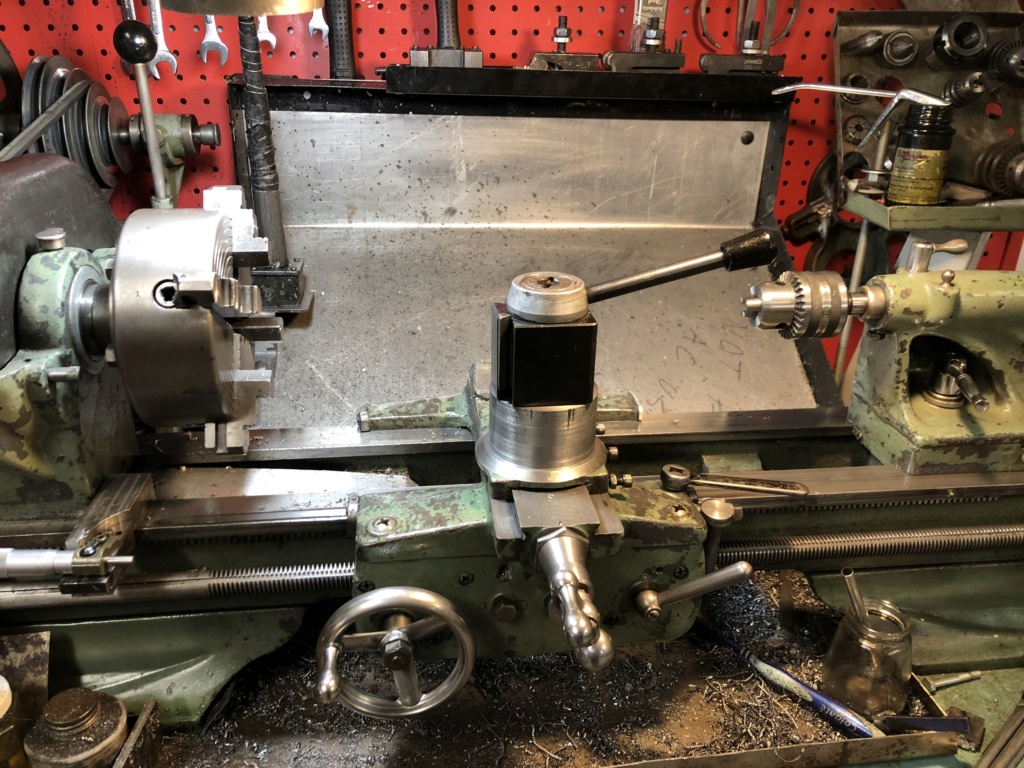 Money! I still have to drill and tap the center hole to bolt down the QCTP, but that’s easy enough. The plinth will let me continue using the lathe while I figure out what to do for a compound slide. I’m leaning towards buying a dovetail and T-slot cutter and just make it myself... | |
|   | | TourMax
Member

Join date : 2018-10-06
Points : 2722
Posts : 438
 |  Subject: Re: MUT: Murray Utility Tractor Subject: Re: MUT: Murray Utility Tractor  Sat 26 Jan 2019, 8:34 pm Sat 26 Jan 2019, 8:34 pm | |
| No pics, but today I got the upper pivot and lever done as well as started on the bell crank. Everything got all buggered up and I had to move the throttle mount to the left and down. and the choke has to move to the other side of the column. While I had the trhottle out to cut the slot and move the mounting holes, I took the opportunity to drill out the sheet metal screw holes and mig a couple 1/4” nuts to the back of the bracket. No more sheet metal screws to strip out anymore! Hopefully tomorrow I’ll be able to get the lower bell crank done and maybe even the transmission arm/lever. The rods are easy peasy. Just cut to length and screw them in to the joint ends. Now if only my new shift keys would show up....  | |
|   | | TourMax
Member

Join date : 2018-10-06
Points : 2722
Posts : 438
 |  Subject: Re: MUT: Murray Utility Tractor Subject: Re: MUT: Murray Utility Tractor  Sun 27 Jan 2019, 3:26 pm Sun 27 Jan 2019, 3:26 pm | |
| Built the arm for the transaxle shift shaft today. The original was a pressed piece of steel. Lord knows what composition steel as it feels even softer than mild steel. It also had to sit on a machined square at the top of the shaft that was less than 1/4” in depth. The end result was a loose and sloppy fit, and 25 years of use (abuse?) wasn’t helping. Alrighty. We can do better than that cheap arrangement and give the shifter a nice, quality feel at the same time. First, cut a piece of 1/4” 1018, then drill and file to a slight press fit on the top of the shaft:  Thats better, but still doomed to wear and eventually go loose and sloppy if all it has to grab and support it is that tiny machined portion at the top of the shaft. Side loads will eventually wobble it out again. So I grab a piece of 3/4” round and mill out the center to just barely slip fit over the round lower part of the shifter shaft and weld ‘er up:   Very nice! The shift shaft has a rubber “seal” (grommet might be more accurate) and a lock ring to hold it in place:  I tossed the stupid one way ring and sized the spacer to put about 0.002” compression on the seal. Just enough to keep it snug without putting it in a pinch. Slip the hole thing on to the shaft and:  Rock solid! Now, instead of the tiny machined square at the top of the shaft trying to support everything as well as transfer side loads, it just has to take the rotational torque from the linkage. The welded “collar” takes all the weight bearing loads as well as keeping it all aligned. Essentially, it’s like the arm went from less than a 1/4” loading surface to just shy of 1”. Strong as heck and not a hint of any movement besides shifting motion. Another plus is now the tiny 1/4” NF bolt only has to keep the shift arm from slipping up off the machined square instead of trying to hold the whole mess together and fight the side loads. That little bolt is now much, much happier! It’s actually so bloody strong, I can pick the transmission up by it (don’t ask me why I know that! Lol!). Now to finish the last arm on the forward bell crank and see how my contraption works....  | |
|   | | | The author of this message was banned from the forum - See the message | SebastianAlbrecht
Veteran Member

Age : 23
Join date : 2018-02-27
Points : 3843
Posts : 1299
 |  Subject: Re: MUT: Murray Utility Tractor Subject: Re: MUT: Murray Utility Tractor  Sun 27 Jan 2019, 5:42 pm Sun 27 Jan 2019, 5:42 pm | |
| LOL U make urself lots of work and build urself 1 of those arms, I have 1 of them lying around somewhere in my excessive junk hoard... | |
|   | | AllisKidD21
Moderator


2020 Build-Off Entrant
2020 Build-Off Entrant
1st Place Build-Off 2019
1st Place Build-Off Winner 2019
Age : 25
Join date : 2016-07-10
Points : 8584
Posts : 5190
Location : Ontario Canada
 |  Subject: Re: MUT: Murray Utility Tractor Subject: Re: MUT: Murray Utility Tractor  Sun 27 Jan 2019, 6:57 pm Sun 27 Jan 2019, 6:57 pm | |
| Actually, he made a new MUCH better one. Never a bad idea to improve things on our tractors, that is the idea here after all....
Great work as always!  "This'll either wake you up or put you to sleep forever!"- Red Green "Whatever you do you should do right, even if it's something wrong." - Hank Hill - MTD Off-Road Build
- Ford LT 110 Off-Road Build
- Craftsman GT 6000 Off-Road Build
- Sears LT11 Rat Rod Build *2019 Build-Off Winner!* Garden Tractor Collection: Allis B-110 x2, 710, 716, & 410 - Wheel Horse 655, 953 & 500 Special - Case 444 - Bolens Versamatic, G10 & 1668 Diesel Swapped - Cub 106, 124 & 1000/149 Frankentractor - Ford 120, LGT 125 & 145 - White 1650 Yard Boss - Moto Mower 710-100 | |
|   | | RichieRichOverdrive
Moderator


2018 Build-Off Entrant
2018 Build-Off Entrant
2024 Build-Off Entrant
2024 Build-Off Entrant
Age : 22
Join date : 2016-10-29
Points : 7211
Posts : 4013
Location : Lewisburg, KY
 |  Subject: Re: MUT: Murray Utility Tractor Subject: Re: MUT: Murray Utility Tractor  Sun 27 Jan 2019, 7:12 pm Sun 27 Jan 2019, 7:12 pm | |
| Sweet idea! I've not had issues with the stock cut square shafts, although the one i ground on my Mutt has a lot of slop. Can't wait to go back to the stock one. I also have a regular steel arm, so that may have helped it stay together. | |
|   | | TourMax
Member

Join date : 2018-10-06
Points : 2722
Posts : 438
 | |   | | TourMax
Member

Join date : 2018-10-06
Points : 2722
Posts : 438
 |  Subject: Re: MUT: Murray Utility Tractor Subject: Re: MUT: Murray Utility Tractor  Sun 27 Jan 2019, 8:22 pm Sun 27 Jan 2019, 8:22 pm | |
| - SebastianAlbrecht wrote:
- LOL U make urself lots of work and build urself 1 of those arms, I have 1 of them lying around somewhere in my excessive junk hoard...
I didnt need another one, I needed a better one. Every spot where even a few thou of play exists is multipied a couple dozen times when it makes its way to your shift hand. Result: sloppy, vague shifting and just a general feeling of cheapness and cost cutting. Part of my reason for building this is to make the shift feel solid and satisfying. This setup is stronger than anything that ever came from Murray and shifts solid and accurate. If I’m going to build something, I’m going to build it RIGHT. Not what’s the easiest and cheapest way out. That kind of thing I’ll leave to box store brands that guys buy to cut the grass and throw away when it breaks. By the time I’m done with this rig, there won’t be a shaft or control left that isn’t be a precision fit and riding in sealed bearings. Nor will there be one sheet metal screw or one way push clip. I can’t stand low quality junk. Which is, arguably, every ride on lawn tractor out there. So it’s be satisfied with what it is, or do something about it. If you’re happy with stock parts, thats cool too. Your rig, your choice. Me? I have the will, the tools and the skills to make something better, so I choose to do something about it.  | |
|   | | RichieRichOverdrive
Moderator


2018 Build-Off Entrant
2018 Build-Off Entrant
2024 Build-Off Entrant
2024 Build-Off Entrant
Age : 22
Join date : 2016-10-29
Points : 7211
Posts : 4013
Location : Lewisburg, KY
 |  Subject: Re: MUT: Murray Utility Tractor Subject: Re: MUT: Murray Utility Tractor  Sun 27 Jan 2019, 8:53 pm Sun 27 Jan 2019, 8:53 pm | |
| Ew, you're keeping the bentonite in there? Gross. Peerless even got away from that and went to regular grease in the 820s after figuring out how worthless it is.
Also most of the case bolts have room for a nut on the bottom, why not just get longer bolts and do that? | |
|   | | TourMax
Member

Join date : 2018-10-06
Points : 2722
Posts : 438
 |  Subject: Re: MUT: Murray Utility Tractor Subject: Re: MUT: Murray Utility Tractor  Mon 28 Jan 2019, 2:25 am Mon 28 Jan 2019, 2:25 am | |
| - RichieRichOverdrive wrote:
- Ew, you're keeping the bentonite in there? Gross. Peerless even got away from that and went to regular grease in the 820s after figuring out how worthless it is.
Also most of the case bolts have room for a nut on the bottom, why not just get longer bolts and do that? Nope. The 820 was never spec’d for anything besides Bentonite. If you read up on it, you will know why. Underneath the Bentonite in my box is factory fresh gears and bearings. It’s a very high pressure grease, perfect for the extremely high gear face pressure loading and shear forces of straight cut gears. Its extremely high temp grease, perfect for a straight cut box that sees little to no cooling airflow. And as an added bonus, it doesn’t leak when it liquifies and it’s impervious to water. If you open a box and the bentonite is balled up in the corner and not protecting the box, then its been contaminated by something and needs to be changed out. Bentonite is literally “fill for life”. If you choose to put something else in there, thats cool. Your rig, your choice. I’m keeping what’s called for in there and what’s protected it perfectly for the last 29 years in an environment thats eats steel alive in months. I use helicoils because many of the holes are blind. Not only that, as I mentoned earlier, theres a right way to do things and...well, the...*ahem*...”other” way. Helicoils are a simple job to do and puts it back stronger than factory. It also means no jerking around with different types of fasteners. Nothing worse than trying to work on something thats been “jack-assed” together by the last guy...  | |
|   | | prancstaman
Veteran Member


Join date : 2015-02-02
Points : 5093
Posts : 1412
Location : Cleveland,Ohio
 |  Subject: Re: MUT: Murray Utility Tractor Subject: Re: MUT: Murray Utility Tractor  Mon 28 Jan 2019, 6:21 pm Mon 28 Jan 2019, 6:21 pm | |
| I think the shifter setup is pretty cool. It won't even think to miss a shift or get hung up. Great job! | |
|   | | TourMax
Member

Join date : 2018-10-06
Points : 2722
Posts : 438
 |  Subject: Re: MUT: Murray Utility Tractor Subject: Re: MUT: Murray Utility Tractor  Tue 29 Jan 2019, 5:16 am Tue 29 Jan 2019, 5:16 am | |
| Had the MUT out for a test ride around the driveway after putting it back together. Works pretty good! The transaxle is still a little “ratchet-y”, even with the shift detents rounded over a little more. My chewed up shift keys are no doubt a big part of that. With the engine off, if shifts easily, with engine on, it hangs fairly hard in a gear. Even with the clutch “in” the transaxle pulley still creeps a little bit, just enough to load the internals and have the buggered shift keys hang up. New keys will fix that, even though the shift linkage is so solid you can still “bang” it through the gears with the bad keys. The shifter throw is much smaller than it was with the “floor shifter”. Not a surprise, as I designed the linkage ratios to be that way. But what it has shown me is that I need a “reverse lock-out” method. Because the shift throw is so short, it’s easy to overrun neutral when going from forward to reverse (or vice versa). Not good for shift keys or the transaxle in general. Thats an easy fix though. Just a spring loaded pin on the shifter and a stop in the right spot beside the shift lever and it’s good to go. A small lever or pull knob on the shifter and you will be able to go past the lock-out when you need to. Whole thing will be hidden by the shifter housing I’m going to build to hold the lighted shift indicator/pointer. Easy peasy lemon squeezey. 
Last edited by TourMax on Tue 29 Jan 2019, 11:38 am; edited 1 time in total | |
|   | | | The author of this message was banned from the forum - See the message | SebastianAlbrecht
Veteran Member

Age : 23
Join date : 2018-02-27
Points : 3843
Posts : 1299
 |  Subject: Re: MUT: Murray Utility Tractor Subject: Re: MUT: Murray Utility Tractor  Tue 29 Jan 2019, 5:46 am Tue 29 Jan 2019, 5:46 am | |
| - TourMax wrote:
- Had the MUT out for a test ride around the driveway after putting it back together.
Works oretty good! The transaxle is still a little “ratchet-y”, even with the shift detents rounded over a little more. My chewed up shift keys are no doubt a big part of that. With the engine off, if shifts easiely, with engine on, it hangs fairly hard in a gear. Even with the clutch “in” the transaxle pulley still creeps a little bit, just enough to load the internals and have the buggered shift keys hang up. New keys will fix that, even though the shift linkage is so solid you can still “bang” it through the gears with the bad keys.
The shifter throw is much smaller than it was with the “floor shifter”. Not a surprise, as I designed the linkage ratios to be that way. But what it has shown me is that I need a “reverse lock-out” method.
Because the shift throw is so short, it’s easy to overrun neutral when going from forward to reverse (or vice versa). Not good for shift keys or the transaxle in general.
Thats an easy fix though. Just a sping loaded pin on the shifter and a stop in the right spot beside the shift lever and it’s good to go. A small lever or pull knob on the shifter and you will be able to go past the lock-out when you need to. Whole thing will be hidden by the shifter housing I’m going to build to hold the lighted shift indicator/pointer.
Easy peasy lemon squeezey.
 I have the same problems all the time with my MTD.... just hitting reverse when I want to go in N and that's not too nice for my rebuilt MST..... | |
|   | | Double W Cross Ranch
Veteran Member


2018 Build-Off Finalist
2018 Build-Off Finalist
Age : 20
Join date : 2017-06-09
Points : 5489
Posts : 2640
Location : Literally Nowhere, Texas
 | |   | | TourMax
Member

Join date : 2018-10-06
Points : 2722
Posts : 438
 |  Subject: Re: MUT: Murray Utility Tractor Subject: Re: MUT: Murray Utility Tractor  Thu 31 Jan 2019, 6:22 pm Thu 31 Jan 2019, 6:22 pm | |
| Been meaning to mount this on the MUT for a while:  Will probably paint the bottle red to match the tractor in the near future. Having it mounted is enough for now. I’ve had a rideon catch on fire before and I was lucky enough to be able to put it out before much more than a few wires got crisp. I also had a tennant once burn a craftsman gt5000 to the ground. Explaination was they couldnt get to water to put it out so they let it burn. It was so bad, even the aluminum transaxle case was a puddle on the ground. I was not happy that day....especially because I knew it happened because he wouldn’t clean grass clippings off the deck like I had told him so many times before...  Then, since my shifter keys showed up, I pulled the transaxle in prep for changing them tomorrow. While it was out, I decided to degrease it, wire brush it and give it a shot of “lipstick”:  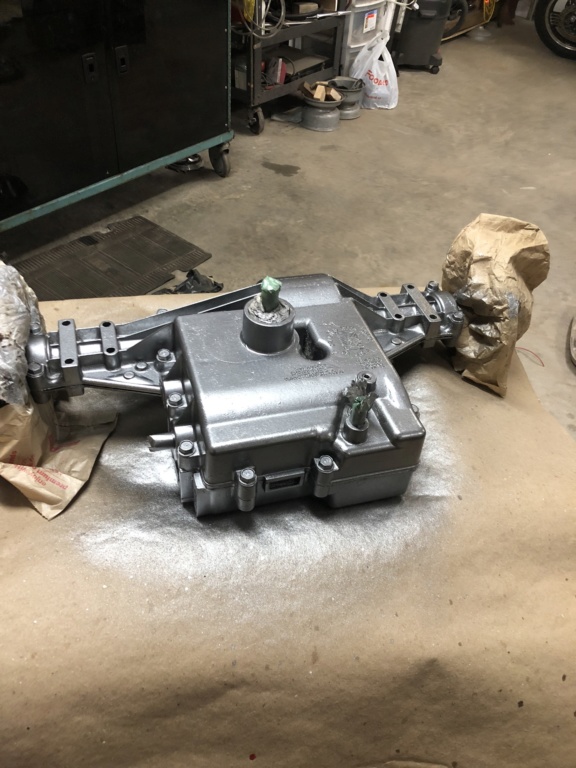 Not bad. At least it will look half decent for a while! Lol! Tomorrow, split the case and change out the shift keys. Unfortunately, the seller sent me three 792123A keys and one 7921180A key. So I’ll change the 3 worst ones and split the case one more time when the 4th finally arrives. That will likely wait for spring, as the next time I split the cases I’m removing all the old bentonite and putting a fresh bottle of Bentonite back in. The transaxle will go together with a silcone sealing that time, as it should be the last time I see the internals of this box ever again.  | |
|   | | TourMax
Member

Join date : 2018-10-06
Points : 2722
Posts : 438
 |  Subject: Re: MUT: Murray Utility Tractor Subject: Re: MUT: Murray Utility Tractor  Fri 01 Feb 2019, 8:59 am Fri 01 Feb 2019, 8:59 am | |
| Job done:   Looks pretty good in there! Only problem is, it makes everything else look like crap! Lol! The rest of the chassis will get paint this summer, so no worries. Now every single bolt hole is heli-coiled. The final few stripped out, so it’s now done for good. Also, when I got it, there were only two forward mounting bolts, one per side. The other two holes had already been stripped out and the bolts were long gone. So, I heli-coiled those as well. And just for good measure, I drilled out the other two (threads were ready to give up the ghost anyways) and heli-coiled those.  Just for the heck of it, I sanded and polished the data plate as well. I just couldn’t resist it. Lol! Dug up a couple 5/16 bolts to replace the two missing front mount bolts and now it’s all back to as solid as it can be. Now theres no worries about any of the bolts on the transaxle stripping out. No more concerns about anything losing it’s torque setting or dropping a mounting bolt somewhere. Just for the heck of it, I also started painting the engine shrouds. Just small parts for now, but the old girl is starting to turn the corner!  | |
|   | | Double W Cross Ranch
Veteran Member


2018 Build-Off Finalist
2018 Build-Off Finalist
Age : 20
Join date : 2017-06-09
Points : 5489
Posts : 2640
Location : Literally Nowhere, Texas
 |  Subject: Re: MUT: Murray Utility Tractor Subject: Re: MUT: Murray Utility Tractor  Fri 01 Feb 2019, 10:39 am Fri 01 Feb 2019, 10:39 am | |
| That's a clean looking tranny! This rig is so complex and awesome I forget everything you've done to it. You should make a walk around video! | |
|   | | TourMax
Member

Join date : 2018-10-06
Points : 2722
Posts : 438
 |  Subject: Re: MUT: Murray Utility Tractor Subject: Re: MUT: Murray Utility Tractor  Fri 01 Feb 2019, 11:36 am Fri 01 Feb 2019, 11:36 am | |
| Had thd MUT out to plow the driveway today. Shifting is pretty good! Reverse is an easy find, but all you need to do for R is just pull rearward as far as it will go. Neutral is still a little tricky from reverse. It sticks in R a bit and then “pops” forward when it finally lets go. It’s manageable, but I think I need to ease over the shift shaft fan peak a little more to make it a smoother smoother transition. 1-5 are easy. Nice light click in and out of each. 1st sticks a tiny bit on upshift, but not too objectionable. Little more work there with the file should fix that up too. 5th is actually usable now. Where it would buck and kick before, now it will take full throttle as long as you want. 5th won’t get much use for me, except to travel to the neighbors driveways to help plow them out. The shifter handle arm is a touch too loose on the shifter torque shaft. I machined it to be a tight slip fit on the shaft itself, but the through bolt hole ended up a tiny bit out of round in the shaft itself. That lets the handle rotate a smidge before the bolt snugs up. It results in a loose/play feeling in the mechanism, which only makes getting from R to N even harder to manage accurately. I can fix it easy enough, but I’m going to put some thought into maybe designing an attachment scheme that might be a bit more solid. A splined connection would be ideal, I’m just not sure I want to go through the misery of cutting internal and external splines on such a small part. My steering joint popped off at the axle steering arm. Not a surprise as I knew the joint was worn. It stays on under steering loads, ut only takes the lightest of upward knocks to pop the rod off the ball. I think I’m just going to do away with the cheap/pressed ball and socket design and use a couple big eye ends. I was saving them to make a 3 point rear hitch, but steering safely trumps a 3 point... 
Last edited by TourMax on Fri 01 Feb 2019, 3:06 pm; edited 1 time in total | |
|   | | | The author of this message was banned from the forum - See the message | SebastianAlbrecht
Veteran Member

Age : 23
Join date : 2018-02-27
Points : 3843
Posts : 1299
 | |   | | Sponsored content
 | |   | | | | MUT: Murray Utility Tractor |  |
|
Similar topics |  |
|
| | Permissions in this forum: | You cannot reply to topics in this forum
| |
| |
| | Who is online? | In total there are 21 users online :: 1 Registered, 0 Hidden and 20 Guests MightyRazeMost users ever online was 412 on Sat 07 Jan 2023, 6:59 am |
|


