|
| | MUT: Murray Utility Tractor |  |
|
+16mh434 Rustbucket Garage diddie mistavp05 CraftsmanQuad19 Double W Cross Ranch darkside0914 RichieRichOverdrive SebastianAlbrecht Creepycrawler MatthewD prancstaman Crazy_Carl AllisKidD21 MightyRaze TourMax 20 posters | |
| Author | Message |
|---|
TourMax
Member

Join date : 2018-10-06
Posts : 438
 |  Subject: Re: MUT: Murray Utility Tractor Subject: Re: MUT: Murray Utility Tractor  November 7th 2018, 7:56 pm November 7th 2018, 7:56 pm | |
| Well, so much for the clutch pedal. Just snapped my last 3/16" end mill. I'll have to order more and wait now.....  | |
|   | | TourMax
Member

Join date : 2018-10-06
Points : 2722
Posts : 438
 |  Subject: Re: MUT: Murray Utility Tractor Subject: Re: MUT: Murray Utility Tractor  November 7th 2018, 7:58 pm November 7th 2018, 7:58 pm | |
| - Crazy_Carl wrote:
- The foot thottle is really great for shifting on the fly. I don't know if you'll really need that. A dual throttle done right can be really complicated but judging from the amazing work on the brakes I know you can handle it. That toolbox was a great find. Reminds me of the ones on my Dad's diesel compact tractors.
I'm actually toying with a shifter idea. Basically, move the shifter from the center panel to the LH fender area and have a clutch lever on the shifter. Somewhat similar to Murray's older "shift on the go" system.... | |
|   | | Crazy_Carl
Veteran Member


2018 Build-Off Entrant
2018 Build-Off Entrant
2024 Build-Off Entrant
2024 Build-Off Entrant
Age : 35
Join date : 2017-10-30
Points : 5330
Posts : 2561
Location : Rochester, New York
 |  Subject: Re: MUT: Murray Utility Tractor Subject: Re: MUT: Murray Utility Tractor  November 9th 2018, 11:57 am November 9th 2018, 11:57 am | |
| It makes ergonomic sense to me to put the clutch right on the shifter. However, have you ever tried operating your clutch with your hand? Not so easy as using the foot. It takes some force to stretch that clutch spring. | |
|   | | TourMax
Member

Join date : 2018-10-06
Points : 2722
Posts : 438
 |  Subject: Re: MUT: Murray Utility Tractor Subject: Re: MUT: Murray Utility Tractor  November 9th 2018, 1:40 pm November 9th 2018, 1:40 pm | |
| - Crazy_Carl wrote:
- It makes ergonomic sense to me to put the clutch right on the shifter. However, have you ever tried operating your clutch with your hand? Not so easy as using the foot. It takes some force to stretch that clutch spring.
With the deck and bucket/plow/snowblower/3point controls, there’s too much stuff on the right already. I could get it in there, but it would be awful crowded and near inpossible to shift from forward to reverse while manipulating the impliment controls. No worries on the clutch control. I’ve built both mechanical and hydraulic hand clutches for harleys and race bike clutches. That little spring under the deck is not a problem. On the right only makes ergonomic sense because we’re in a “lh drive” environment. Anywhere there’s rh drive vehicles, you shift with your left hand. I’ve spent a lot of time in the UK and am used to it. Driving out of the UK and into other parts of Europe has you switching back and forth to/from LH/RH drive on the road. Makes no difference to me anymore... 
Last edited by TourMax on November 9th 2018, 2:49 pm; edited 1 time in total | |
|   | | TourMax
Member

Join date : 2018-10-06
Points : 2722
Posts : 438
 |  Subject: Re: MUT: Murray Utility Tractor Subject: Re: MUT: Murray Utility Tractor  November 9th 2018, 2:47 pm November 9th 2018, 2:47 pm | |
| Well. The LH wheel hub is proving to be at least TWICE the SOB the RH hub was to get off. Been a couple days of trying now and almost out of tricks. Heat, pressure, impact, etc. Nada. Not even a fraction of a MM. Last resort will be to pull the transaxle, remove the axle shaft and use the 20 ton press to remove the hub. One last trick before I have to go down that rabbit hole: I drilled two 1/8" holes opposite each other through the hub. One goes to the key stock, the other goes to the shaft opposite the key stock. Into both holes went a generous soaking of penetrating oil. Hopefully this allows it to loosen up the rusty death-grip both components have on each other. If not, out the transaxle comes.......  | |
|   | | | The author of this message was banned from the forum - See the message | SebastianAlbrecht
Veteran Member

Age : 23
Join date : 2018-02-27
Points : 3843
Posts : 1299
 |  Subject: Re: MUT: Murray Utility Tractor Subject: Re: MUT: Murray Utility Tractor  November 9th 2018, 6:56 pm November 9th 2018, 6:56 pm | |
| I would pull the 820 and rebuild it (Gear Oil instead of grease, new seals, maybe Doc Locking it) so you can be sure, your 820 will work well the next 205 years. Dor that, you also need to pull it, so you can remove the rust-welded hub then too. | |
|   | | TourMax
Member

Join date : 2018-10-06
Points : 2722
Posts : 438
 |  Subject: Re: MUT: Murray Utility Tractor Subject: Re: MUT: Murray Utility Tractor  November 9th 2018, 7:50 pm November 9th 2018, 7:50 pm | |
| Alrightythen, I'm officially PO'd with this thing!
SOB just broke a high quality 3 jaw puller. The same puller that broke the RH side loose.
I'm about to hang up trying to do the LH side brakes for a while.
I'm not pulling the 820 until the new shift shaft I ordered came in. It will get new keys at the same time and It goes back together with fresh Bentonite grease. It was designed for the Bentonite, so it gets Bentonite.
I'm now thinking I'm just going to move on to paint and finish. I need a little success here to keep me motivated. I can do the LH brake when I get around to pulling the transaxle. | |
|   | | MightyRaze
Administrator


2017 Build-Off Finalist
2017 Build-Off Finalist
2018 Build-Off Top 3 Winner
2018 Build-Off Top 3 Winner
2019 Build-Off Top 3 Winner
2019 Build-Off Top 3 Winner
2021 Winner of Winners
2021 Winner of Winners
1st Place Build-Off 2022
1st Place Build-Off Winner 2022
10,000 POSTS!
10,000 POSTS!
2024 Build-Off Entrant
2024 Build-Off Entrant
Age : 49
Join date : 2016-09-06
Points : 15660
Posts : 10979
Location : Oklahoma
 |  Subject: Re: MUT: Murray Utility Tractor Subject: Re: MUT: Murray Utility Tractor  November 9th 2018, 9:09 pm November 9th 2018, 9:09 pm | |
| The bentonite should be fine for your purpose. You are not trying to go super fast like many of us that need the oil conversion to not burn our stuff up. | |
|   | | TourMax
Member

Join date : 2018-10-06
Points : 2722
Posts : 438
 |  Subject: Re: MUT: Murray Utility Tractor Subject: Re: MUT: Murray Utility Tractor  November 10th 2018, 7:34 am November 10th 2018, 7:34 am | |
| Well, everyone is welcome to run whatever lubricant they want in thier gear. I have no desire to start a “bentonite vs XX oil” discussion, but I disagree with gear oil in a box designed to run bentonite. But like I said; everyone is free to run whatever lubricant they want. My dog’s not in that fight.... My transaxle will be rebuilt to a slightly different standard than most anyways. All the gears will be patterned for engagement, shimmed as required and a general “blueprinting” all around. Pattern and shim are especially important on straight cut gears like these. I suspect they will be fine “as is”, having already lasted 28-odd years is what is arguably one of the harshest environments you can toss a piece of equipment into (ie: homeowner maintenance = serious neglect). I’d like to do a backlash to make sure they don’t get into a heat/bind situ, but it seems tecumseh doesn't have specs for that to start with. Probably due to the lower level of QA given to such a “built to a price point” piece. Which is yet another reason why it’s getting a bentonite refill.  | |
|   | | Crazy_Carl
Veteran Member


2018 Build-Off Entrant
2018 Build-Off Entrant
2024 Build-Off Entrant
2024 Build-Off Entrant
Age : 35
Join date : 2017-10-30
Points : 5330
Posts : 2561
Location : Rochester, New York
 |  Subject: Re: MUT: Murray Utility Tractor Subject: Re: MUT: Murray Utility Tractor  November 11th 2018, 9:37 pm November 11th 2018, 9:37 pm | |
| I really had to "cook" my LH hub on Ol' Red with an oxy acetylene torch. I was so happy went it started to move.
bentonite grease really is a great lubricant for your application. | |
|   | | TourMax
Member

Join date : 2018-10-06
Points : 2722
Posts : 438
 |  Subject: Re: MUT: Murray Utility Tractor Subject: Re: MUT: Murray Utility Tractor  November 12th 2018, 5:23 pm November 12th 2018, 5:23 pm | |
| AH HA HA HA HA HA! 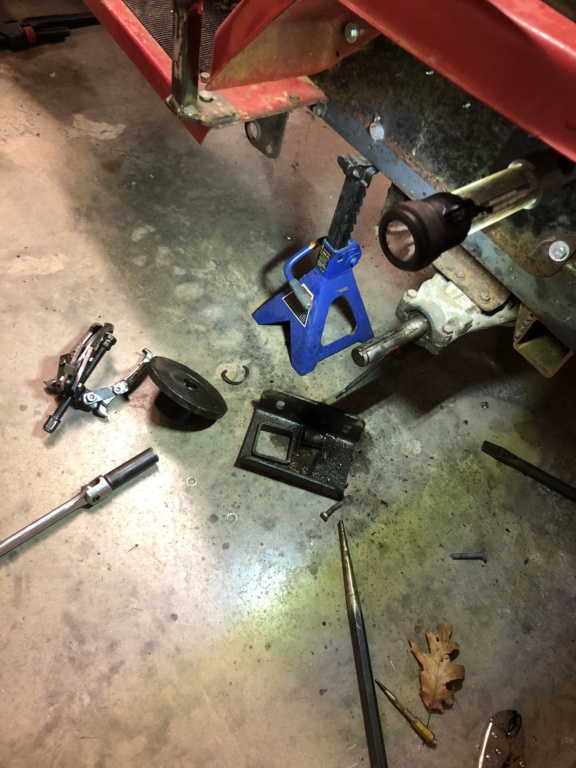 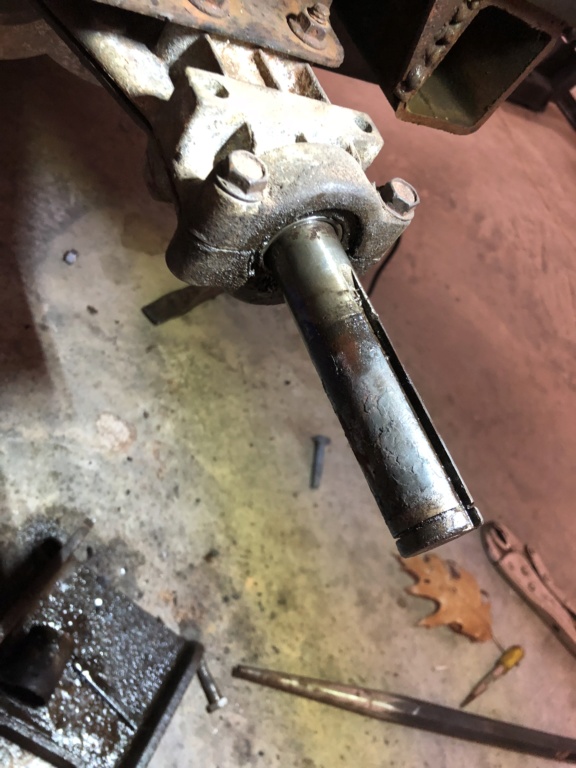 Take that you motherf.......umm, well, you know what I was going to say. I tried everything over the last 4 days. Lube, heat, force. I even drilled access holes in the hub, parafin wax, etc. You name it, i tried it. I finally resorted to heat again. Heat has fixed everything I've ever come up against, I couldn't believe it wasn't going to work this time. Then I cut off the spacer between the hub and case. It gets discarded anyways when I put the disc carrier on so it was expendable. With access to the back of the hub now, I was able to drive the axle key back and forth with a punch (more times than I could count!) until it finally came loose enough and I could remove it from the axle. Once the key was out I had reduced the total surface area enough that heat and the puller were able to move the hub. Once it started, i was able to keep it moving until it finally came free. Turns out the shaft inside the hub had corroded so badly it had “sloughed off” a layer of metal. Then corrosion got behind that as well. I love my province, but have always hated the way the environment here attacks steel so aggressively. After 28 years in the Maritime climate, the hub and axle had become enough of an “interference fit” there was no way it was going to come apart with normal means. Getting that key out gave me just enough reduction in friction that heat, oil and pressure was enough to get it to move. Even then, it still wasn't easy to get off. It required just as much force every time it popped and moved its fraction of an inch. In fact, it was so tight it sounded like a gunshot every time it moved. So much so that my neighbor came over to make sure everything was alright. Lol! But now its off, and that's all that matters. Now I can get on with building the rest of the Lh brake system. Of course, I had started another project when it looked like I was going to have to give up on the tractor:  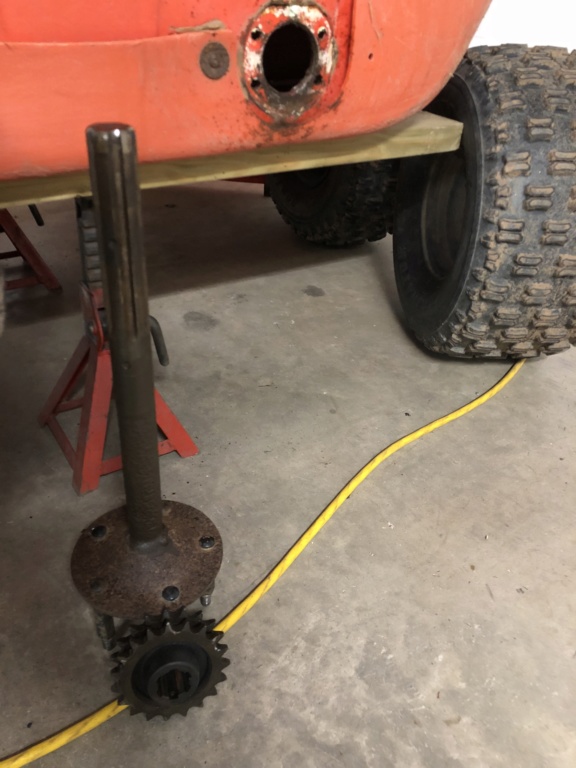 Needs bearing and seal replacements. Had the same issue with that axle and double sprocket I had with the tractor hub. That sprocket was NOT coming off, plus I had the added disadvantage of not being able to get a puller on it at all. I ended up getting it off, but not before I “mushroomed” the shaft end. I had to rework the shaft end with it still in the argo in order to get the sprocket off once it started moving. The end of the shaft also runs in an inner bearing so I’ll have to chuck the shaft up in the lathe and turn it back to the proper dimensions before it all goes back together. I can only hope the other sprockets aren’t as much a problem... yeah, right. Lol! | |
|   | | TourMax
Member

Join date : 2018-10-06
Points : 2722
Posts : 438
 |  Subject: Re: MUT: Murray Utility Tractor Subject: Re: MUT: Murray Utility Tractor  November 28th 2018, 6:23 am November 28th 2018, 6:23 am | |
| Well, I've had a "slow cranking" problem with the tractor since I bought it. The only things I haven't done are a new starter and de-carbon the heads. The starter I've had a part and it's checked out good, so I moved on to the heads. They needed to be done anyways. Briggs calls for a de-carboning every 100 running hours and I'm pretty sure this thing hasn't been apart since it was first closed up in 1992. The left head comes off easy and it's surprisingly clean. Looks like someone has had it off very recently, but reused the original head gasket. You can see where it's been bypassing compression to atmosphere at the bottom of the head. Well, that's not a good sign for my slow crank problem. But then; the right head. Oy Vey! I start pulling the head bolts, sort of on autopilot. It's a routine type task for me and I'm thinking about other things I need to do once I pull the head. I'm following the diagram and then I realize I've got more holes than I do bolts on the bench. The bolt holes all have that "shiny" look when you remove a bolt, so I figure I must have dropped one somewhere and keep going. I think to myself "it's here somewhere and I'll find it later". Goes fine until I get to the last head bolt. Solid. Frozen solid. Nothing works and I end up having no choice but to snap it off in the block. Grrrrr....... I pull the head off and discover the missing bolt isn't missing, it's been snapped off flush in the block! The PO obviously tried to pull the heads, snapped off the one bolt and got stopped dead by the second seized one. The head has huge amounts of carbon under it as well. So yeah; he tried to get it off, snapped off the first bolt, hit the second seized bolt and put it back together and sold it off. Dirty bastard..... There is also a little cylinder wall damage on the LH side. It looks like it sat with water/condensation in the cylinder and made a small rust spot on the very bottom of the bore up by the carbon ring. Just enough for you to feel it with your nail. It runs fine and doesn't smoke or burn oil, so i don't worry about it too much. It is just a yard tractor after all, its not like I'm driving it across country and have to rely on it to get me somewhere. So the rest of the day is spent drilling out the snapped off head bolts. I end up having to re-tap the bolt holes and I toss all the head bolts and stud both sides of the engine with grade 8 all thread. The heads get cleaned up and I drop them in the ultrasonic cleaner for 3 hours. They come out ultra-clean aluminum and the pistons/valves/deck get a good hand cleaning as well. It goes back together with new briggs head gaskets and spark plugs. The engine cranks great with the sparks out, but it's right back to the slow/hard crank with the plugs in. Runs great when you do get it started, but the starter will smoke if it doesn't catch on the first or second turn. So; starter is toast. Wonderful. I'll have to call around today and see if I can get the "high torque" version for the opposed twins. Oh well, at least that's the last thing to be done on the tractor for running gear. Shoudl be good for many years to come after the new starter......  | |
|   | | MightyRaze
Administrator


2017 Build-Off Finalist
2017 Build-Off Finalist
2018 Build-Off Top 3 Winner
2018 Build-Off Top 3 Winner
2019 Build-Off Top 3 Winner
2019 Build-Off Top 3 Winner
2021 Winner of Winners
2021 Winner of Winners
1st Place Build-Off 2022
1st Place Build-Off Winner 2022
10,000 POSTS!
10,000 POSTS!
2024 Build-Off Entrant
2024 Build-Off Entrant
Age : 49
Join date : 2016-09-06
Points : 15660
Posts : 10979
Location : Oklahoma
 | |   | | TourMax
Member

Join date : 2018-10-06
Points : 2722
Posts : 438
 | |   | | TourMax
Member

Join date : 2018-10-06
Points : 2722
Posts : 438
 |  Subject: Re: MUT: Murray Utility Tractor Subject: Re: MUT: Murray Utility Tractor  November 28th 2018, 11:28 am November 28th 2018, 11:28 am | |
| - MightyRaze wrote:
- Have you taken the starter apart yet? Sometimes the magnet inside slips out of place causing slow spin. Many are held in place by a thin piece of aluminum.
@prancstaman had a good writeup reconditioning these starters.
https://www.atltf.com/t5355-vari-drive-with-5-speed-transaxle#73999 Yup. Pulled it apart, cleaned it, reconditioned the commutator and reassembled. Brushes were in great shape, no play in the end bearings. Windings looked a little "brown" in some spots, indicating possible overheating. So replacement is in order. | |
|   | | MightyRaze
Administrator


2017 Build-Off Finalist
2017 Build-Off Finalist
2018 Build-Off Top 3 Winner
2018 Build-Off Top 3 Winner
2019 Build-Off Top 3 Winner
2019 Build-Off Top 3 Winner
2021 Winner of Winners
2021 Winner of Winners
1st Place Build-Off 2022
1st Place Build-Off Winner 2022
10,000 POSTS!
10,000 POSTS!
2024 Build-Off Entrant
2024 Build-Off Entrant
Age : 49
Join date : 2016-09-06
Points : 15660
Posts : 10979
Location : Oklahoma
 |  Subject: Re: MUT: Murray Utility Tractor Subject: Re: MUT: Murray Utility Tractor  November 28th 2018, 11:51 am November 28th 2018, 11:51 am | |
| Yeah if someone over cranked it burning it up. Would not hurt to get a new one. Murphy says it would fail when you would need it most! I've been pretty lucky with my starters, but they were not burned either. | |
|   | | TourMax
Member

Join date : 2018-10-06
Points : 2722
Posts : 438
 |  Subject: Re: MUT: Murray Utility Tractor Subject: Re: MUT: Murray Utility Tractor  December 3rd 2018, 1:31 pm December 3rd 2018, 1:31 pm | |
| New starter arrived today. I ordered the larger model with more cranking speed/torque. Popped it on the MUT and hit the starter. That cranky ol' Briggs damned near flew out of its mounts! Yep, the old starter was toasty. Only problem I ran into is the lower cylinder shroud retaining screw broke off. So I couldn't re-install the shroud as it was the only screw holding it on. That negatively effects engine cooling as it directs cooling air down and forward under the cylinder fins. Not too big an issue in the winter below 0c temps, but I’ll have to get it back on before summer roles around again. Only problem is I have to take the engine off the deck in order to get access to drill out the broken screw. Yeesh, nothing is ever easy.... Also installed the gas gauge/fuel cap glass: 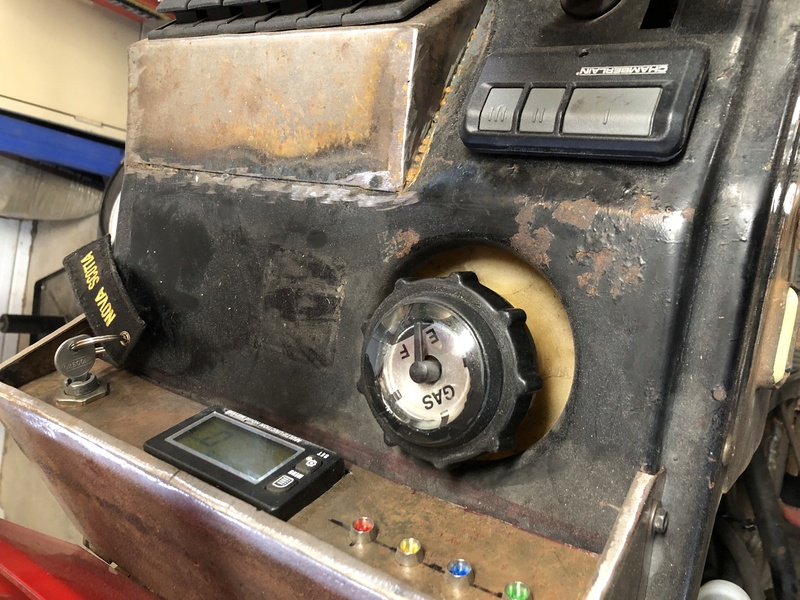  Small difference, but the little detail is worth the effort to me.  | |
|   | | TourMax
Member

Join date : 2018-10-06
Points : 2722
Posts : 438
 |  Subject: Re: MUT: Murray Utility Tractor Subject: Re: MUT: Murray Utility Tractor  January 7th 2019, 5:37 pm January 7th 2019, 5:37 pm | |
| Snowblower attachment wasn’t working quite like it should. Too much belt slip with heavy snow loads so it would bog down and clog at the worst times. Pretty much means I need to review my installation and make some adjustments. Translation: rebuild the drive system. Since it’s winter and I really didn't want to get into that, I dropped the blower and re-mounted the bucket attachment. Doesn’t break my heart too much to pull the snowblower. That manual engagement lever for the PTO whacks me in the leg when I try to look behind to back up, it hangs right over the throttle and makes it hard to get to and it just generally pisses me off. It also makes the tractor look more “lawn mower-ish” than “garden tractor-ish” too. I’ve got a plan for an electric PTO, which will also give me an extra shaft to mount an alternator like I've been wanting to. More on that later...still figuring that one out. But...a bucket isn’t the best option for moving snow in a residential driveway. No problem. The bucket is built on a plow and the bucket part is only bolted on:  I planned it that way so I could go back to a simple plow if needed and now that design is going to pay off. So a couple bolts later, the bucket is a plow again. But in my usual fashion, that wasn’t good enough for me. When I bought the plow, it was...ahem....”well used”: 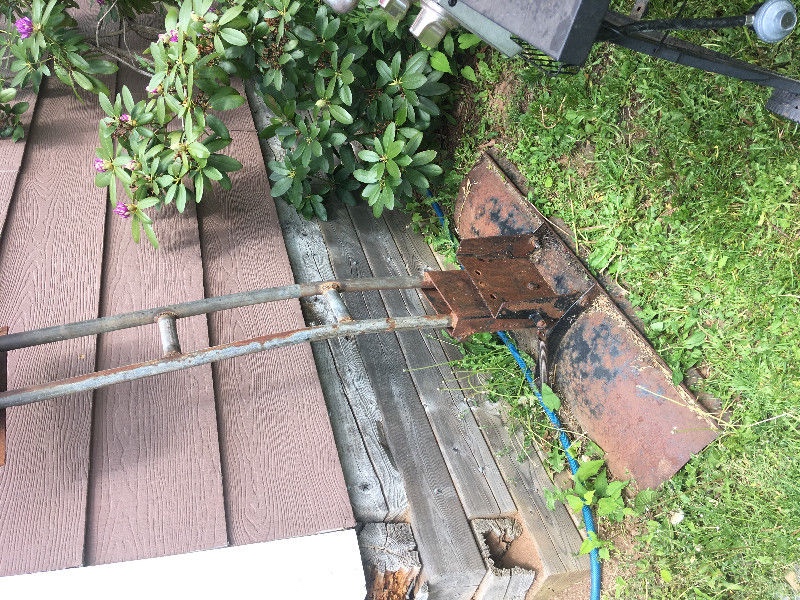 All the blade angle holes were worn seriously oval, the angle pin was bent and bodged on, the pivot had a comical amount of slop in it, the plow mount bolts were loose and floppy and it just looked like “poo” in general. I didn’t care much about all that because I was just going to bolt it all together solid and use it as a digging bucket/powered wheelbarrow. But a snow plow needs to have a trip edge and angle function, bolted together solid just wouldn’t do. So I blew it all apart and reamed all the holes back to round, oversized to 1.5” The blade tip hinge bolts were 1/2” and worn down to about 5/16”from decades of use. Those were tossed and it was all reamed to 1”. Then I turned out some 5/8” id bushings on the lathe and welded them in. A 5/8” cold rolled steel bar across the hinge points replaced the two separate bolts. Blade is now rock solid at the tip hinge and not a hint of wobble. Then I cut bushings for the angle pivot and the angle pin holes. Reamed those to 1” ID and welded them in to the top and bottom “shoes” for the blade angle mechanism. The original holes were in 1/4" plate. The new bushings are 1.5" in length, which gives the pins far more load bearing surface. That means far less wear on both the pins and bushings and just a more stable assembly all around. I finished off with a 1” dia shouldered bolt for the pivot point and welded up a 1” pin with T handle for the angle setting. A simple cotter pin sets the lock pin depth when engaged and a bracket above it keeps it from bouncing out when plowing, yet still leaving enough room to lift the pin to turn the blade. The original wear edge was so worn it was rounded on it's outside corners to about 3" inboard on each side. I just flipped it over and that gave me a fresh, straight, square edge on the bottom. You can hardly tell it's worn when looking at it now, you just don't visually notice it. But I may make a new one next year out of a piece of 1/4" flat stock. No particular reason why, mostly because of my OCD I guess. I finish the fab with a couple holders on the ends of the blade for some orange fiberglass marker “whips”. Then, I wire wheel the bejesus out of it all. The blade gets Tremclad “fire red”rust paint, the wear edge gets some semi-gloss black and everything else goes semi-gloss black well. The black is rattle can, the red is rolled on. I bought a gallon can of the Fire Red as I have lots of yard implements I'm going to paint Fire Red and rattle cans would get pretty expensive pretty quickly. I can also lay down a thicker coat of roll on paint faster than I can with a rattle can. So, two 12 hr days of grunt work and the plow looks super spiffy: 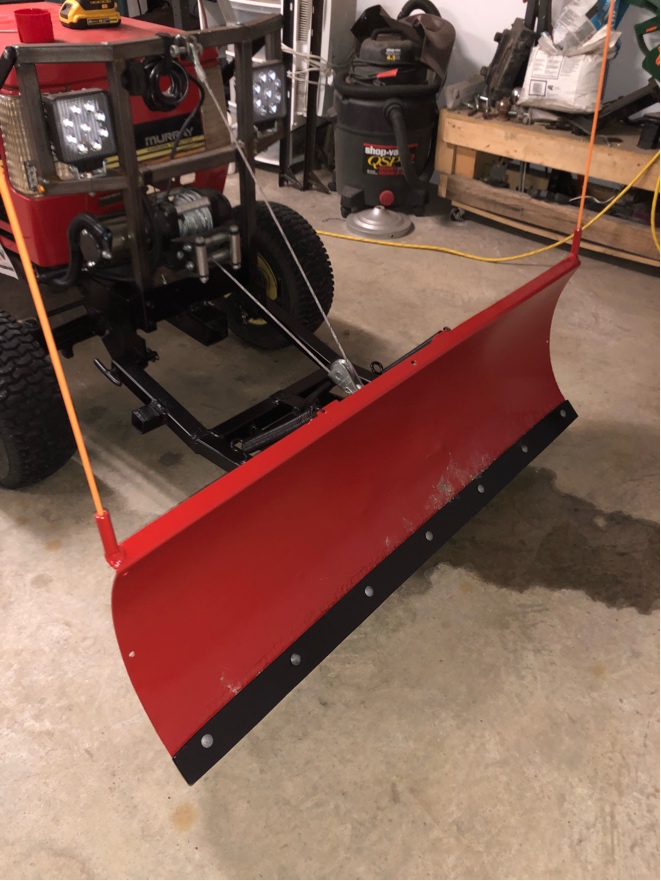 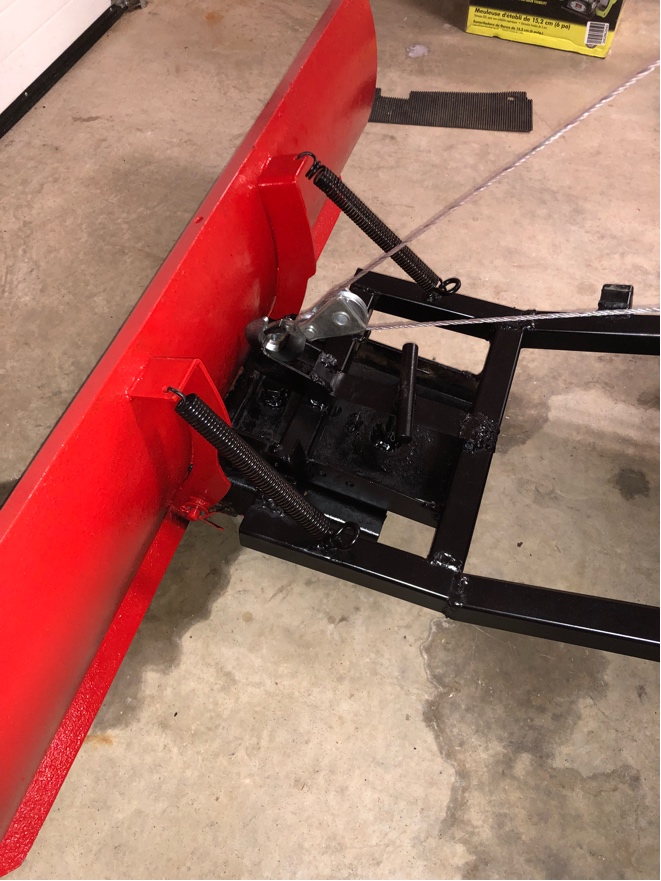 We got a few cm's of snow the next morning and it worked perfectly. Driveway was cleaned right down to asphalt, quick and easy. A driveway clears out pretty quickly when you’re making 48” passes! With the plow looked so good, the rest of the tractor was looking really shabby. Well, that started me off on repainting the whole tractor. The red parts are all going Tremclad “fire red” (Rustoleum for those south of 49) the black parts all go semigloss black. Body parts are all done in rattle can, in order to get an acceptable finish without a stupid amount of wet sanding and buffing. Rattle can just goes on slicker than roll on. Things like the ROPS and grill guard will also go semi-gloss black. The black parts all just get a clean up with sandpaper to knock the big rusties off and get it mostly smooth before getting shot with the rust paint. The oem stickers all get peeled off for reuse or reproduction. The fenders get a little bit more thorough sanding to smooth them before paint. The floorboards also get a quick sanding/smoothing. It’s a quick pass as they’re getting big rubber skid pads glued to them and will only end up getting beat up by boots and such in quick order. You can see the diff between old and new paint in a few of the following pics: 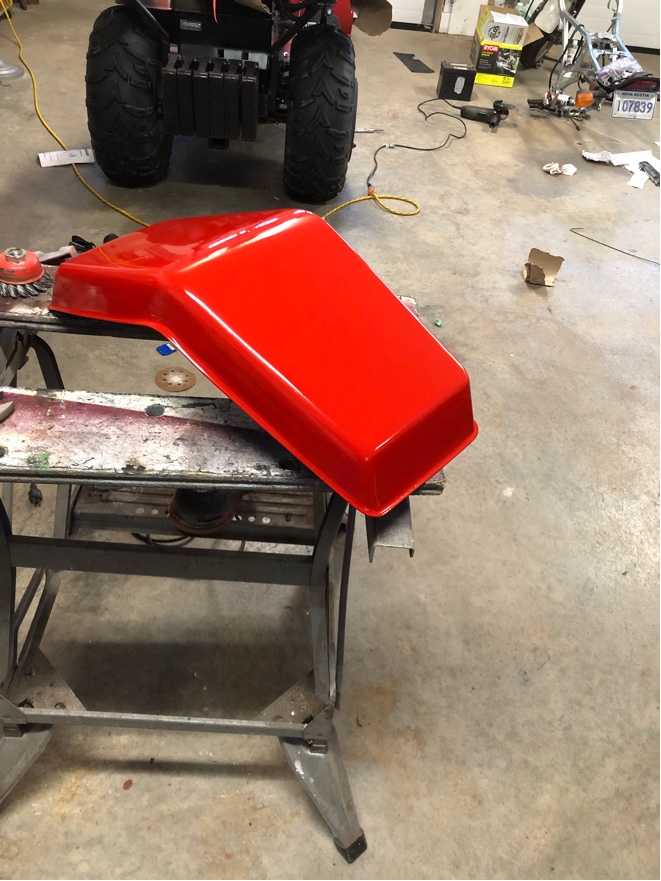 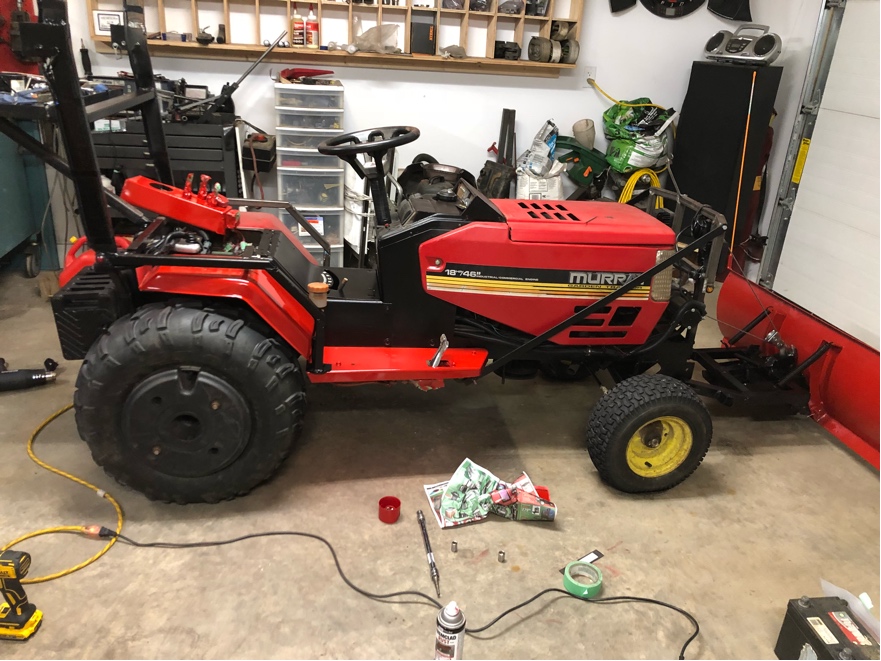 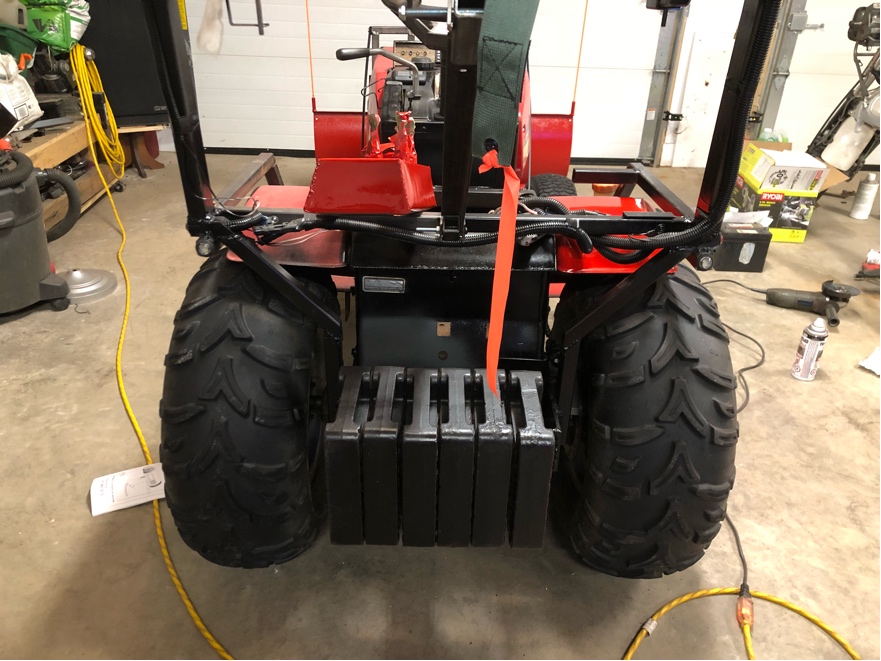 The hood and engine cowl are a different story. They are the main visual elements for color on this rig so those will wait to get proper body work to make them straight and clean. You can get away with it on small parts like floorboards or curved pieces like the fenders, but the hood is one big long flat surface and it has to be straight or you will notice it right away. Same with the cowling, if it's bent of misaligned you're going to notice it right away and it will make the whole thing look like crap. As you can see, they've taken lots of the abuse over the years and they've seen better days: 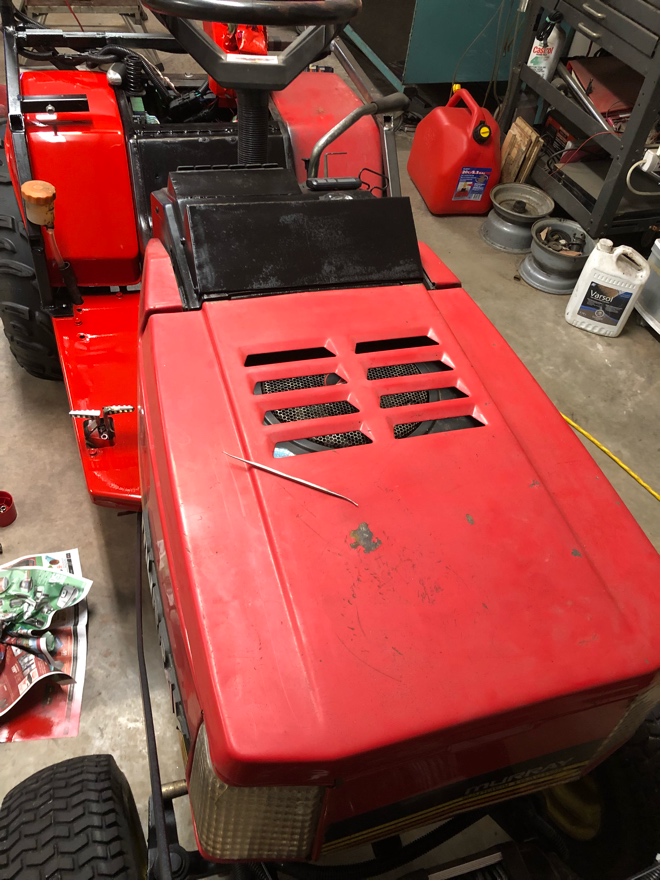 And that's after working them over the last year or so to get them back to something that at least resembles straight. It's going to take a lot more metal work and fill to get them right, but I'm in no rush to have it finished so I'll do it when I feel like it. Then they will get the same Tremclad Fire Red as the rest of the body panels. The cowl decals I will probably just have a local shop reproduce as they are faded and frazzeled on some edges. I can get them off in one piece no problem, i just don’t know if I want to put them back on as faded as they are. The wheels I’m actually considering painting yellow. Yeah I know: NOT JD YELLOW ON A MURRAY! But I think it goes with the orange and yellow scheme on the hood cowling pretty nicely. Factory was silver rims, but I’m thinking the yellow might actually look more “on point” with the color scheme...
Last edited by TourMax on January 8th 2019, 8:35 pm; edited 1 time in total | |
|   | | | The author of this message was banned from the forum - See the message | SebastianAlbrecht
Veteran Member

Age : 23
Join date : 2018-02-27
Points : 3843
Posts : 1299
 | |   | | TourMax
Member

Join date : 2018-10-06
Points : 2722
Posts : 438
 |  Subject: Re: MUT: Murray Utility Tractor Subject: Re: MUT: Murray Utility Tractor  January 9th 2019, 9:33 am January 9th 2019, 9:33 am | |
| Well. After nearly putting the g-d tractor in the ditch a couple times over the last couple days and hitting the house molding at the garage doors, I pitched a fit and finally did something about that stupid foot clutch arrangement: 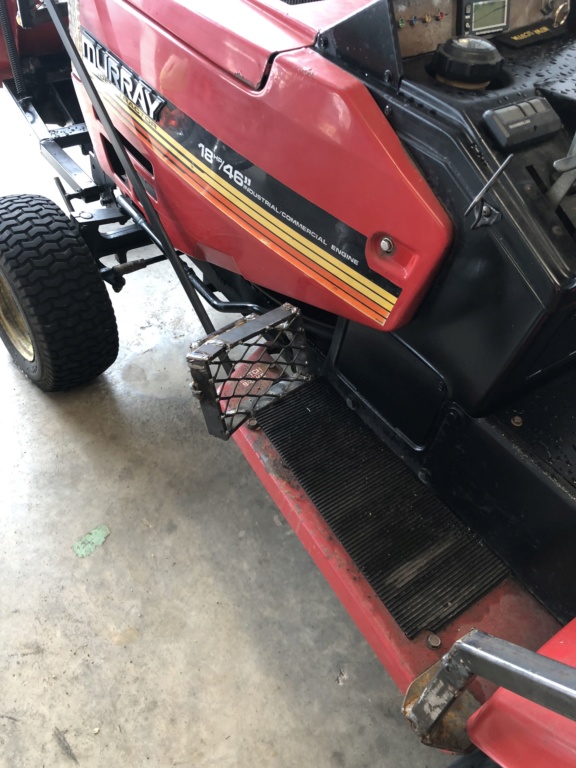 Where there used to be a slick metal rod, there is now a high traction foot pedal. It might be a little oversized and rough looking, but no way my wet boot will slip off it now! Looks a little “post apocalyptic”, but form always follows function. The expanded steel mesh is strong and high traction and I built the pedal with a "kick up" on the outside edge to add a little more in keeping your boot from sliding off it. The expanded steel mesh I used to make the pedal means there is no way it will clog up and become slippery with mud, snow, ice, etc. A little more metal work and some paint will clean it up and make it look better. It was always a long reach for me as well to get the clutch all the way down, even with the new drive belt. So I took this opportunity to put a "riser” on the pedal so I can get a good, easy, positive disengagement on the clutch without having to stretch my leg all the way out: 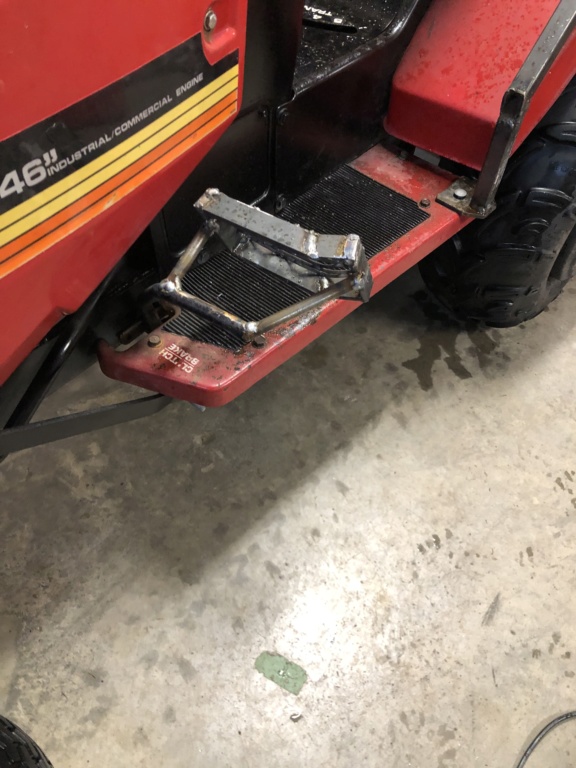 It's now much more comfortable to disengage the clutch and with the pedal "higher" easier to have some finer control over it. I just came in from plowing the driveway and it's raining cats and dogs at the same time. Not one problem with the clutch pedal or controlling the tractor close to objects. Highly successful modification! | |
|   | | MightyRaze
Administrator


2017 Build-Off Finalist
2017 Build-Off Finalist
2018 Build-Off Top 3 Winner
2018 Build-Off Top 3 Winner
2019 Build-Off Top 3 Winner
2019 Build-Off Top 3 Winner
2021 Winner of Winners
2021 Winner of Winners
1st Place Build-Off 2022
1st Place Build-Off Winner 2022
10,000 POSTS!
10,000 POSTS!
2024 Build-Off Entrant
2024 Build-Off Entrant
Age : 49
Join date : 2016-09-06
Points : 15660
Posts : 10979
Location : Oklahoma
 |  Subject: Re: MUT: Murray Utility Tractor Subject: Re: MUT: Murray Utility Tractor  January 9th 2019, 12:42 pm January 9th 2019, 12:42 pm | |
| Nice pedal. Like you said it will look better once painted. I personally think it looks great! I like the outer raised ridge to help keep your foot in place.  | |
|   | | Crazy_Carl
Veteran Member


2018 Build-Off Entrant
2018 Build-Off Entrant
2024 Build-Off Entrant
2024 Build-Off Entrant
Age : 35
Join date : 2017-10-30
Points : 5330
Posts : 2561
Location : Rochester, New York
 |  Subject: Re: MUT: Murray Utility Tractor Subject: Re: MUT: Murray Utility Tractor  January 9th 2019, 6:59 pm January 9th 2019, 6:59 pm | |
| Nice pedal! That would work really nice in greasy mud too. I might adapt this idea to Ol' Red's slippery gas pedal. | |
|   | | TourMax
Member

Join date : 2018-10-06
Points : 2722
Posts : 438
 |  Subject: Re: MUT: Murray Utility Tractor Subject: Re: MUT: Murray Utility Tractor  January 10th 2019, 11:34 am January 10th 2019, 11:34 am | |
| Tail lights: 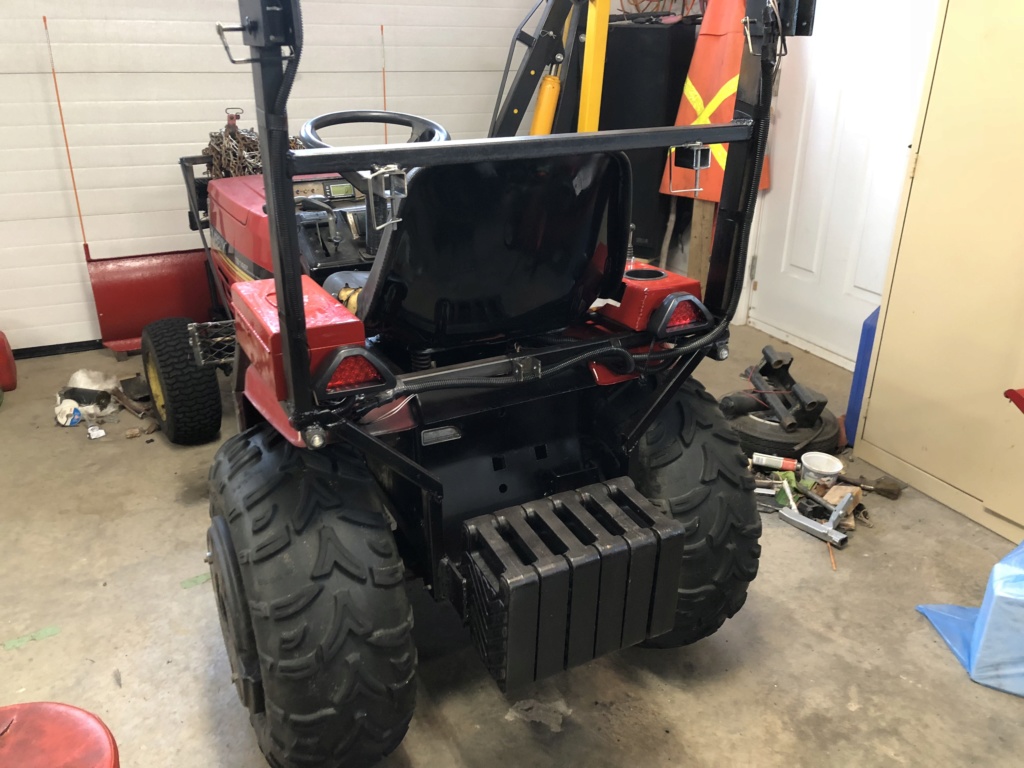 Temporarily slaved to a battery:  Not bad at all. They will get wired to the running lights since I have several options for forward facing headlights/worklights. They have a brake light function, but it’s a flashing brake light. I may wire a switch to the brake pedals for that, I may not. I just wanted a set of tail lights to go with the yellow flashers. I’ve got a couple neighbors that whip doen the street a little too fast for my liking and I want to be as visible as possible when it’s dark or snowing... | |
|   | | | The author of this message was banned from the forum - See the message | SebastianAlbrecht
Veteran Member

Age : 23
Join date : 2018-02-27
Points : 3843
Posts : 1299
 | |   | | CraftsmanQuad19
Veteran Member


2018 Build-Off Entrant
2018 Build-Off Entrant
2019 Build-Off Finalist
2019 Build-Off Finalist
Age : 24
Join date : 2016-04-12
Points : 5978
Posts : 2645
Location : Indiana
 |  Subject: Re: MUT: Murray Utility Tractor Subject: Re: MUT: Murray Utility Tractor  January 11th 2019, 6:40 pm January 11th 2019, 6:40 pm | |
| This thing is the true definition of a utility tractor. With all the attachments it looks a bit like a small kubota of sorts
This thing is bad to the bone! | |
|   | | TourMax
Member

Join date : 2018-10-06
Points : 2722
Posts : 438
 |  Subject: Re: MUT: Murray Utility Tractor Subject: Re: MUT: Murray Utility Tractor  January 11th 2019, 7:38 pm January 11th 2019, 7:38 pm | |
| Clutch pedal did its job today! Was plowing the driveway and had to put down the clutch while looking backwards. I instantly felt the raised edge and knew without having to look that I had my foot in the wrong spot. A quick slide of the foot and I had full contact and no slipping off a stupid clutch lever/bar at the wrong time. Yep, that will work. Big and ugly or not, I’m keeping it! A little grinding and a bit of paint and it will look good enough for me!  | |
|   | | Sponsored content
 | |   | | | | MUT: Murray Utility Tractor |  |
|
Similar topics |  |
|
| | Permissions in this forum: | You cannot reply to topics in this forum
| |
| |
| | Who is online? | In total there are 18 users online :: 0 Registered, 0 Hidden and 18 Guests
None
Most users ever online was 412 on January 7th 2023, 7:59 am
|
|


