| | Some sort of craftsman... and more! |  |
|
+12Crazy_Carl biggasmowers onebadLT4000 RichieRichOverdrive Lawren Wimberly mr.modified Doug MatthewD TheBeal CraftsmanQuad19 AllisKidD21 prancstaman 16 posters |
|
| Author | Message |
|---|
CraftsmanQuad19
Veteran Member

2018 Build-Off Entrant
2018 Build-Off Entrant
2019 Build-Off Finalist
2019 Build-Off Finalist
Join date : 2016-04-12
Posts : 2645
 |  Subject: Re: Some sort of craftsman... and more! Subject: Re: Some sort of craftsman... and more!  September 7th 2016, 8:23 pm September 7th 2016, 8:23 pm | |
| You're doing a peerless 700 to live axle correct? What if you were to mount your pillow blocks to the leaf springs from the snowmobile and have rear suspension? you would need a chain tensioner that is spring adjustable, but I think it could work.
Anyone else?? | |
|
  | |
TheBeal
Veteran Member


Age : 30
Join date : 2013-06-06
Points : 5714
Posts : 1402
Location : Central PA
 |  Subject: Re: Some sort of craftsman... and more! Subject: Re: Some sort of craftsman... and more!  September 8th 2016, 9:59 am September 8th 2016, 9:59 am | |
| Well, I kinda thought about using them on this, but they are too long.
I couldnt just mount the axle to them though, that would bend and stretch out the chain. Probably put some strain on the gearbox too.
With some sort of swing arm it might have worked though.
| |
|
  | |
TheBeal
Veteran Member


Age : 30
Join date : 2013-06-06
Points : 5714
Posts : 1402
Location : Central PA
 |  Subject: Re: Some sort of craftsman... and more! Subject: Re: Some sort of craftsman... and more!  September 9th 2016, 7:35 pm September 9th 2016, 7:35 pm | |
| Started tacking the frame together. And to think Im a certified welder... look at this hole! 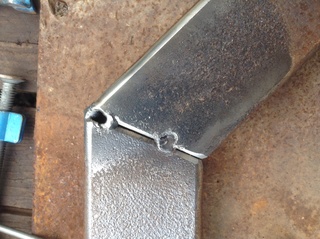 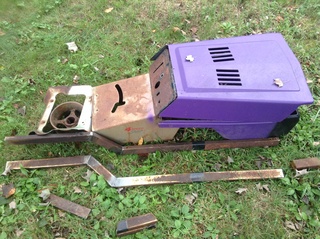 I think Im gona go ahead and weld these up. They look good to me. Anyone else? | |
|
  | |
prancstaman
Veteran Member

Join date : 2015-02-02
Points : 5093
Posts : 1412
Location : Cleveland,Ohio
 |  Subject: Re: Some sort of craftsman... and more! Subject: Re: Some sort of craftsman... and more!  September 9th 2016, 9:04 pm September 9th 2016, 9:04 pm | |
| I usually weld my frames up on a flat piece of plywood with the center marked out on it for measuring points. If anything needs spaced up or down I would use 2x4 pieces of wood. Works real good with an accuracy of about 1/16 of an inch out of wack. | |
|
  | |
prancstaman
Veteran Member


Join date : 2015-02-02
Points : 5093
Posts : 1412
Location : Cleveland,Ohio
 | |
  | |
TheBeal
Veteran Member


Age : 30
Join date : 2013-06-06
Points : 5714
Posts : 1402
Location : Central PA
 |  Subject: Re: Some sort of craftsman... and more! Subject: Re: Some sort of craftsman... and more!  September 9th 2016, 9:13 pm September 9th 2016, 9:13 pm | |
| I just c-clamped the pieces to a piece of plate I had. Im finding out how rusty I am with the welder... and the rods I have might be questionable. I got it all welded, but had a few booger welds so I ground those bastards out to lay down a nicer looking bead.
Ill probably make some sort of jig when I start putting in the cross members... I dont know, as long as its "close" no one would really notice ha! | |
|
  | |
MatthewD
Veteran Member


2015 Build-Off Entrant
2015 Build-Off Entrant
2016 Build-Off Entrant
2016 Build-Off Entrant
Age : 23
Join date : 2014-11-16
Points : 5750
Posts : 1993
Location : Northern Ireland
 | |
  | |
MatthewD
Veteran Member


2015 Build-Off Entrant
2015 Build-Off Entrant
2016 Build-Off Entrant
2016 Build-Off Entrant
Age : 23
Join date : 2014-11-16
Points : 5750
Posts : 1993
Location : Northern Ireland
 | |
  | |
TheBeal
Veteran Member


Age : 30
Join date : 2013-06-06
Points : 5714
Posts : 1402
Location : Central PA
 | |
  | |
MatthewD
Veteran Member


2015 Build-Off Entrant
2015 Build-Off Entrant
2016 Build-Off Entrant
2016 Build-Off Entrant
Age : 23
Join date : 2014-11-16
Points : 5750
Posts : 1993
Location : Northern Ireland
 | |
  | |
TheBeal
Veteran Member


Age : 30
Join date : 2013-06-06
Points : 5714
Posts : 1402
Location : Central PA
 |  Subject: Re: Some sort of craftsman... and more! Subject: Re: Some sort of craftsman... and more!  September 10th 2016, 8:14 pm September 10th 2016, 8:14 pm | |
| This one is specifically for metal, I dont think a wood blade will fit it. It is lacking in where you set the angle, it only has 3 marked on the plate... and Im not exactly sure where to line it up at anyways.  So I broke out a protractor and lined it up on the slot for the cutting wheel at 22.5*. Would like to someday make a more better way to set the angle on it, with a few more marks. I noticed cutting at an angle, it pushes the wheel a bit at first. Didnt seem to create any issues though. | |
|
  | |
MatthewD
Veteran Member


2015 Build-Off Entrant
2015 Build-Off Entrant
2016 Build-Off Entrant
2016 Build-Off Entrant
Age : 23
Join date : 2014-11-16
Points : 5750
Posts : 1993
Location : Northern Ireland
 | |
  | |
TheBeal
Veteran Member


Age : 30
Join date : 2013-06-06
Points : 5714
Posts : 1402
Location : Central PA
 |  Subject: Re: Some sort of craftsman... and more! Subject: Re: Some sort of craftsman... and more!  September 11th 2016, 9:45 pm September 11th 2016, 9:45 pm | |
| Yeah me too... I mostly welded up the frame rails. Having a hard time putting down a bead and not burning through.Didnt think Id have much trouble but apparently Im wrong. Thats ok, the welds will be getting ground down anyways no one will know.  | |
|
  | |
MatthewD
Veteran Member


2015 Build-Off Entrant
2015 Build-Off Entrant
2016 Build-Off Entrant
2016 Build-Off Entrant
Age : 23
Join date : 2014-11-16
Points : 5750
Posts : 1993
Location : Northern Ireland
 | |
  | |
TheBeal
Veteran Member


Age : 30
Join date : 2013-06-06
Points : 5714
Posts : 1402
Location : Central PA
 |  Subject: Re: Some sort of craftsman... and more! Subject: Re: Some sort of craftsman... and more!  September 12th 2016, 6:31 pm September 12th 2016, 6:31 pm | |
| Tried turning it down, but then is a royal pain to get the arc started.
Im using 7018 rods, they could be old. maybe thats part of the problem I dont know.
Im still figuring out this new welder.
If Id had been smarter, I would have welded half way then stopped. Welded on another part then come back and finish the weld. I could get about 3/4 of the way welded and then you hear it start burning through.
| |
|
  | |
prancstaman
Veteran Member


Join date : 2015-02-02
Points : 5093
Posts : 1412
Location : Cleveland,Ohio
 |  Subject: Re: Some sort of craftsman... and more! Subject: Re: Some sort of craftsman... and more!  September 12th 2016, 8:07 pm September 12th 2016, 8:07 pm | |
| You got the right idea on welding halfway through, but if you're burning through you got too much heat. Should be around 80 to 90 amps for 1/16 inch steel for good welds with ease. Smaller welds would help, 1/8 inch tack welds, one after the other, starting on top of the end of the finished weld, right before the red glow goes away from the weld before, to restart the arc easier. | |
|
  | |
MatthewD
Veteran Member


2015 Build-Off Entrant
2015 Build-Off Entrant
2016 Build-Off Entrant
2016 Build-Off Entrant
Age : 23
Join date : 2014-11-16
Points : 5750
Posts : 1993
Location : Northern Ireland
 |  Subject: Re: Some sort of craftsman... and more! Subject: Re: Some sort of craftsman... and more!  September 13th 2016, 3:16 pm September 13th 2016, 3:16 pm | |
| Yeah prancstaman that's what I do. Makes the weld look a bit rough though, so I usually grind it down and weld onto of it again all the way across. | |
|
  | |
TheBeal
Veteran Member


Age : 30
Join date : 2013-06-06
Points : 5714
Posts : 1402
Location : Central PA
 |  Subject: Re: Some sort of craftsman... and more! Subject: Re: Some sort of craftsman... and more!  September 13th 2016, 7:58 pm September 13th 2016, 7:58 pm | |
| I have it set just below 50. I ground off the offending beggars, and layed down some new welds. Im happier with it anyways... 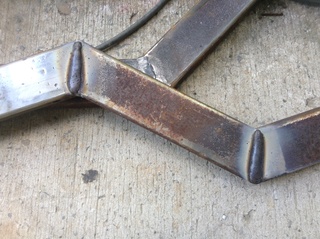 Though I did get this higgledepigglede thing... 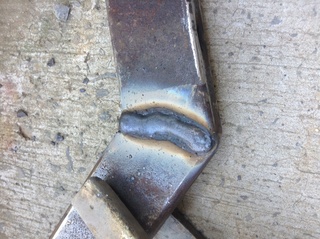 The front end is warped in a bit, but should spring out with the brace up front. 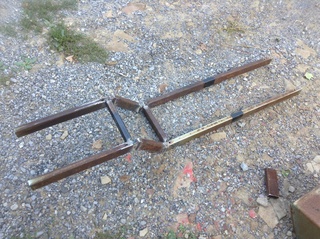  Im quite pleased how it fits... its like it was made for it or something... The back crossmember is tacked in place, it needs tweaked slightly. | |
|
  | |
TheBeal
Veteran Member


Age : 30
Join date : 2013-06-06
Points : 5714
Posts : 1402
Location : Central PA
 |  Subject: Re: Some sort of craftsman... and more! Subject: Re: Some sort of craftsman... and more!  September 13th 2016, 8:18 pm September 13th 2016, 8:18 pm | |
| I have a 14hp, a 16hp(not pictured here) a 16.5hp that *did* run. The one missing parts is a blowed up 20hp, and the other on its side is a 16hp that has a knock. I got them for parts, possibly rebuild the 20 sometime.  ..and Ive hit my first fitment predicament. I would like the have the carb at the back. The exhaust doesnt have to make a U turn to escape this way and the controls would be shorter. However, this way puts the engine too far forward with the gas tank. 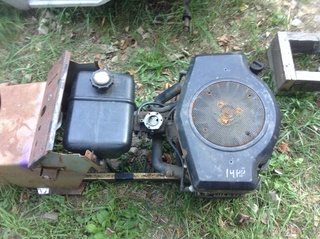 Turned around it sits back a bit further... 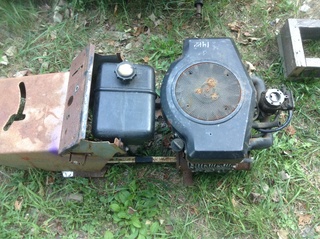 ...but not enough. The hood is sitting about where it would be when its bolted down.  ...and on a more interesting? note... Im thinking a dual carb setup and using some aluminum beer bottles as the air intake. I dont drink beer, but if I did it would be the red one... simply because it is a superior bottle! Its thicker, so I keep looking for one along the road somewhere  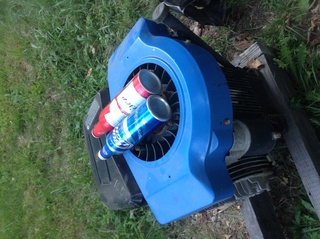 | |
|
  | |
AllisKidD21
Moderator

2020 Build-Off Entrant
2020 Build-Off Entrant
1st Place Build-Off 2019
1st Place Build-Off Winner 2019
Age : 25
Join date : 2016-07-10
Points : 8584
Posts : 5190
Location : Ontario Canada
 |  Subject: Re: Some sort of craftsman... and more! Subject: Re: Some sort of craftsman... and more!  September 13th 2016, 8:52 pm September 13th 2016, 8:52 pm | |
| Yes, dual carburetors!!! I second that idea!! Looks great so far.  "This'll either wake you up or put you to sleep forever!"- Red Green "Whatever you do you should do right, even if it's something wrong." - Hank Hill - MTD Off-Road Build
- Ford LT 110 Off-Road Build
- Craftsman GT 6000 Off-Road Build
- Sears LT11 Rat Rod Build *2019 Build-Off Winner!* Garden Tractor Collection: Allis B-110 x2, 710, 716, & 410 - Wheel Horse 655, 953 & 500 Special - Case 444 - Bolens Versamatic, G10 & 1668 Diesel Swapped - Cub 106, 124 & 1000/149 Frankentractor - Ford 120, LGT 125 & 145 - White 1650 Yard Boss - Moto Mower 710-100 | |
|
  | |
CraftsmanQuad19
Veteran Member


2018 Build-Off Entrant
2018 Build-Off Entrant
2019 Build-Off Finalist
2019 Build-Off Finalist
Age : 24
Join date : 2016-04-12
Points : 5978
Posts : 2645
Location : Indiana
 |  Subject: Re: Some sort of craftsman... and more! Subject: Re: Some sort of craftsman... and more!  September 13th 2016, 9:32 pm September 13th 2016, 9:32 pm | |
| Dang it! TheGreenHornet and I were too late. we were gonna do dual carbs on the oppy going in his dynamark. Eh, we'll let you troubleshoot it first  looks good though!! | |
|
  | |
MatthewD
Veteran Member


2015 Build-Off Entrant
2015 Build-Off Entrant
2016 Build-Off Entrant
2016 Build-Off Entrant
Age : 23
Join date : 2014-11-16
Points : 5750
Posts : 1993
Location : Northern Ireland
 |  Subject: Re: Some sort of craftsman... and more! Subject: Re: Some sort of craftsman... and more!  September 14th 2016, 11:19 am September 14th 2016, 11:19 am | |
| Cool frame man! That gas tank is very wide. I would try and find a similar one but thinner and deeper. There are a versions of that design of tank out there but that aren't as wide and have the same mounting holes. And for the dual carb thing, mr.mod put a set of Tecumseh carbs on his 14hp opposed briggs in his GTR 40 which you could check out. Good luck! | |
|
  | |
TheBeal
Veteran Member


Age : 30
Join date : 2013-06-06
Points : 5714
Posts : 1402
Location : Central PA
 |  Subject: Re: Some sort of craftsman... and more! Subject: Re: Some sort of craftsman... and more!  September 14th 2016, 7:33 pm September 14th 2016, 7:33 pm | |
| So I removed the plastic tank. This lets the engine sit back much further. Saved the footboards off the green craftsman. Might be using them on this thing. 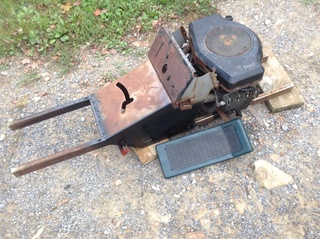 With the engine this far back, Im going to have to come up with some fancy steering linkages... I bent part of the original steering mount to get the engine where it is. The carb is in the way. 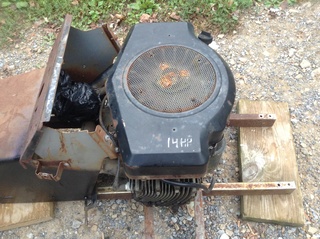 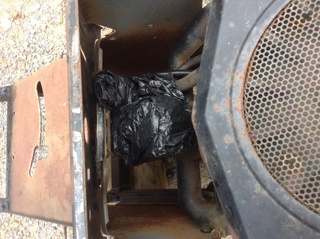 I knew Id have to do some surgery on the hood to fit an oppy like this, but never really sat down to see what needed to be done... Looks like major surgery is needed. Not sure if I wanted to do that much. Was hoping Id just need to cut a little out of the sides. 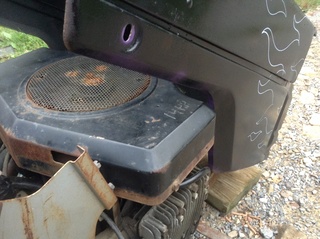 I have the dash from an older lawn chief somewhere maybe I can use it and save the craftsman bits for another build... So maybe I run without a hood? maybe I strap one of these big tanks in front? Seems like a wast of a cool hood though... 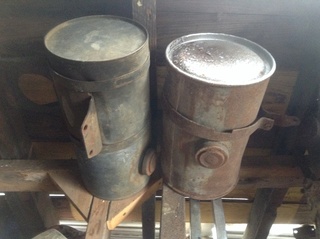 Or maybe use a single cyl? This 14.5 needs some parts for the carb. Started flooding and I robbed the bowl bolt for another engine. 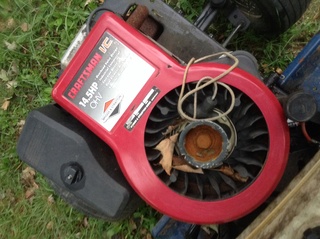 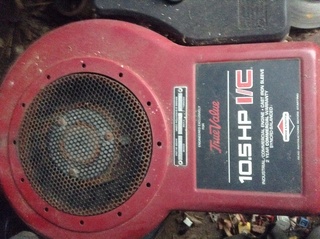 I also have 2 10hp Tec flatheads that had carb troubles.. | |
|
  | |
TheBeal
Veteran Member


Age : 30
Join date : 2013-06-06
Points : 5714
Posts : 1402
Location : Central PA
 |  Subject: Re: Some sort of craftsman... and more! Subject: Re: Some sort of craftsman... and more!  September 15th 2016, 11:46 am September 15th 2016, 11:46 am | |
| Its 13in wide. My frame is 12in. I could make it work. I saved these parts, along with the hood and a few other bits thinking about a racing mower. 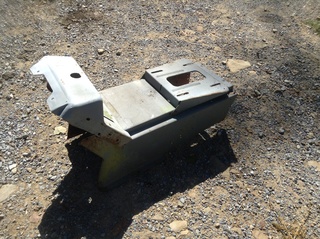 | |
|
  | |
MatthewD
Veteran Member


2015 Build-Off Entrant
2015 Build-Off Entrant
2016 Build-Off Entrant
2016 Build-Off Entrant
Age : 23
Join date : 2014-11-16
Points : 5750
Posts : 1993
Location : Northern Ireland
 |  Subject: Re: Some sort of craftsman... and more! Subject: Re: Some sort of craftsman... and more!  September 17th 2016, 7:03 am September 17th 2016, 7:03 am | |
| I would stay away from trying to fit the dash and other parts onto a narrow frame. I've tried that before and you can run into problems and it doesn't look right. | |
|
  | |
TheBeal
Veteran Member


Age : 30
Join date : 2013-06-06
Points : 5714
Posts : 1402
Location : Central PA
 |  Subject: Re: Some sort of craftsman... and more! Subject: Re: Some sort of craftsman... and more!  September 19th 2016, 5:44 pm September 19th 2016, 5:44 pm | |
| Ehh, I think it could have worked. But anywho. Made some tabs to hold the dash. 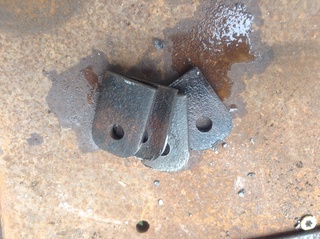 And thinking about suspension... I have some chunks of leaf spring that might work. The one witht eh eys on the ends is too stiff for this. My 200 some odd pound lead butt cant hardly flex it. The other 2 pieces together I think will be pretty good. Maybe it can be seen, but the one piece has some pretty good pitting in it so it might not last too long I dunno... 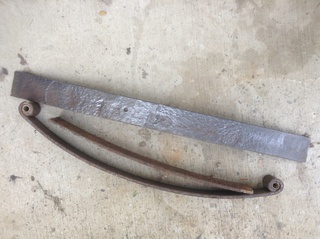 I also have these coil springs. About 1 3/4in or 2in across and 6 or 7in long. My thought for these is to just make a tall spindle bracket and stick em in there with some bushings and whatnot. 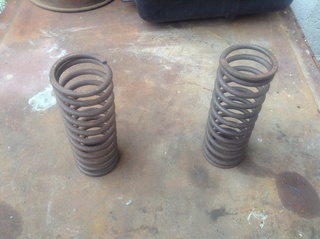 Also saved these table legs thinking they would make for some good exhaust bits. Same diameter as the stock pipe coming out the engine. 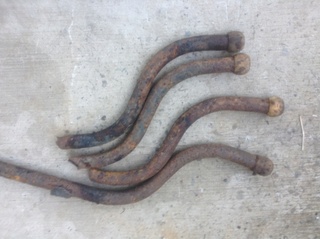 | |
|
  | |
Sponsored content
 | |
  | |
| | Some sort of craftsman... and more! |  |
|


