|
| | Craftsman GT II My first AT Tractor |  |
|
+11crafsmankiller T-Dub13 redlinemotorsportts Creepycrawler Doc Sprocket richie thomas TheRainbowBoxer 1997 Murray Doug Lawren Wimberly Krawler86 15 posters | |
| Author | Message |
|---|
Krawler86
Member


2023 Build-Off Entrant
2023 Build-Off Entrant
Join date : 2014-01-02
Points : 4154
Posts : 152
Location : PNW
 |  Subject: Craftsman GT II My first AT Tractor Subject: Craftsman GT II My first AT Tractor  January 2nd 2014, 7:20 pm January 2nd 2014, 7:20 pm | |
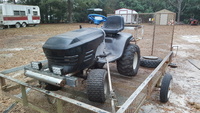
| Now that i know i can host pics here for my first 7 days until i can outside link. Heres what i have goin on. Thanks for the help from people already. Hi, im a newbie here and was completely imspired to build myself something to explore the quad trails instead of being limited to forest roads, gravel roads and 4x4 trails. I never had the money to afford a quad when i was younger but i loved riding them. I also grew up mowing and playing on a Cub Cadet 122. I used to tow my childhood friend around with it on a sled, or an engineless craftsman we had, or whatever we could find to horse around with. It was mainly used to mow the small field we had, so it was nothing special. No hydraulics, creeper gears or ag tires. I thought about restoring that and using it to take into the woods, but other than cosmetics and engine tiredness, its in really good shape. And id hate to beat up the cool old grill and sheet metals. Plus 3spd is not exactly what i wanted. I wanted something strong, i was reading about the peerless stuff, and i thought i wanted and 820 or something like that, im a sucker for drivetrain overkill at all costs. But then i started learning more and more about the differences between riding mowers and garden tractors. I looked on Craigslist and found basically exactly what i wanted ideally,and within my price range that night, called the guy, and brought it home the next afternoon. A unknown year but really good strong running no frills Craftsman II GT. Not this one exactly, i forgot to take a pic before i started, but this is pretty close minus wheels and tires. 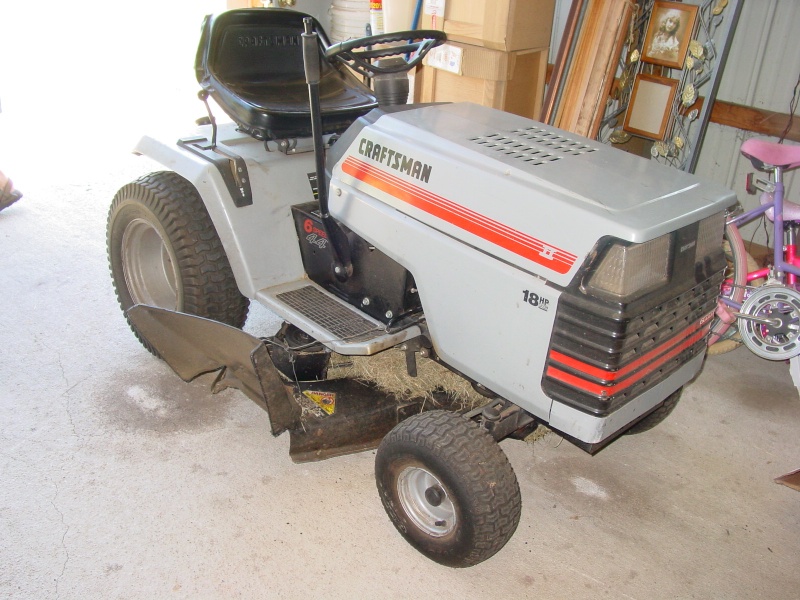 So heres a unique bit about this build. I live alone, on the 2nd floor of an appartment building. I have no garage or shop. I have plenty of tools, as i built most my Toyota, But this is a great place, everyone occasionally makes some noise, noone ever complains, and i use hand tools 99% of the time. Ive been here for 3 years and never got or heard of anyone getting any complaints. So il be building this here, actually about 3 feet to my left as i sit on my livingroom couch. Needless to say i had to take it apart and haul it up the stairs piece by piece from the back of my truck. That went suprisingly easy, except the motor was pretty heavy. Anyways, on to what ive done so far and my plans to come. Heres the hood, all sheetmetal. Im not a fan of plastic. 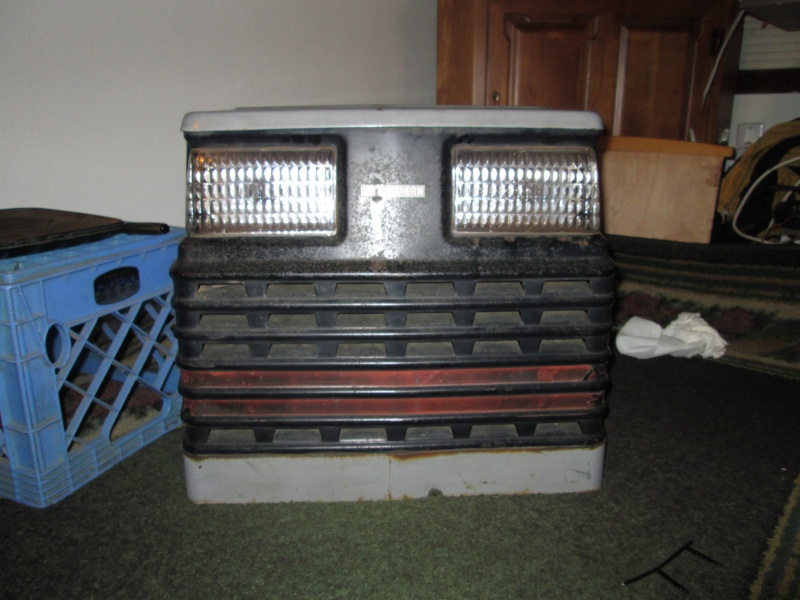 Its got a Craftsman 18hp Horizontal. Runs very well, no smoke, been taken good care of, and starts up like a champ. Id like to maybe fiddle with the idle to get it a little lower, with the pully swap i have in mind it might help that a little. I was in 2 Lo idling up the ramps into my truck and it felt a little fast. Since il be doing some crawling, id like some slowness, and the engine sounded like it could easily lose 2-300 rpm and still be smooth. Not like il be idling it slow or am going for that kind of thing. I just like crawling.  Heres a mockup shot with it stripped down so i could start taking off the useless things and make my changes. Right after i finished bring it all in. 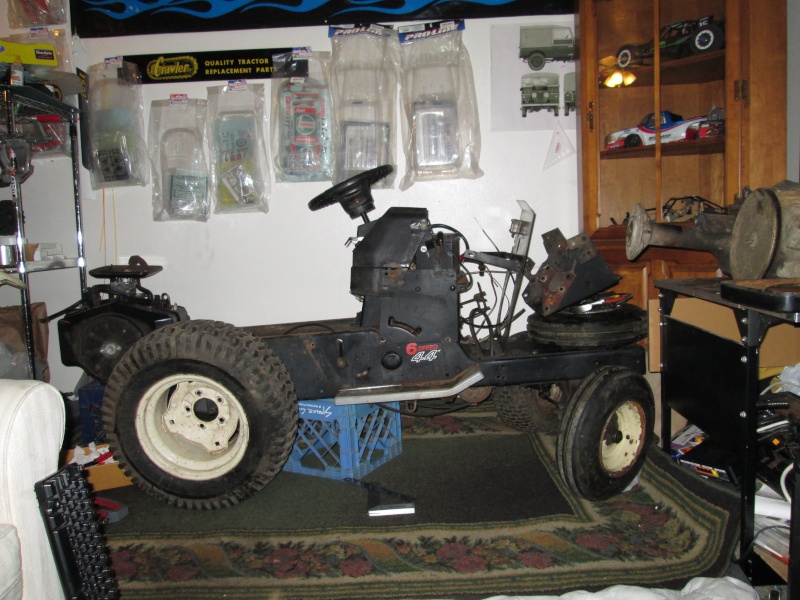 Started on the engine first. Here it is as it came out. Looking at the front electric clutch for the mower deck im assuming. 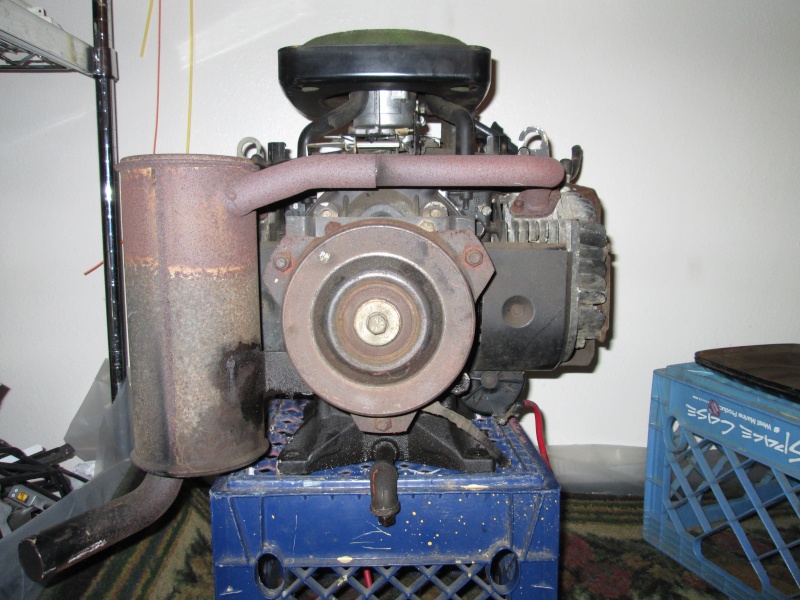 Started taking apart the axle drive side of the engine to see about some speed increases. Dissapointed to find a 4 bolt small pully on a cast aluminum hub, mounted to the fan. Was expecting more beef.  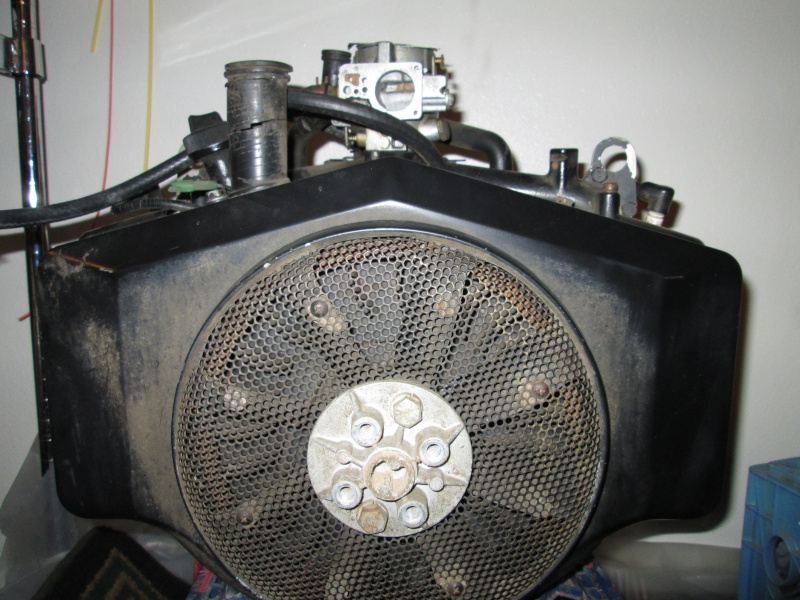 When on the front of the motor for the mower deck, you get this glorious ANSI keyway shaft. 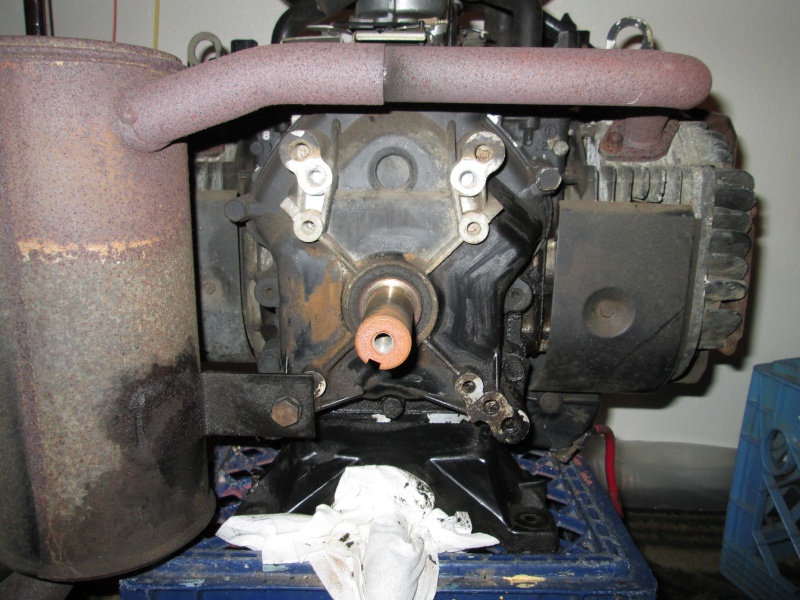 Since this is a horizontal shaft tractor, and transaxle, it does not make alot of sense to me to make the belt do a 90 degree twisty thing off a pulley mounted to the fan, when i could convert it to a proper horizontal shaft, sticking a nice pulley on the keyway shaft and leaving the fan hub available for some larger pulley i can find to put a notch in for emergency pull rope action. Plus the motor is wider than it is long, and has an almost perfectly square mounting pattern. With little mods, i can turn the motor 90 degrees pretty easily. Mounting holes. 2 of them need to be slotted just over 1/16in for the rotation. 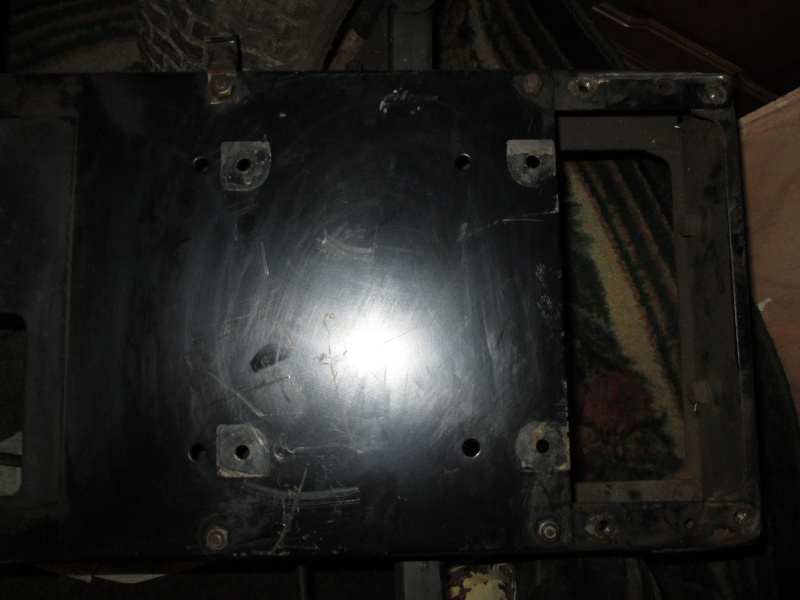 My next idea came when i removed the engine mounting plate. I saw how the front axle was mounted, and with the tired im putting on, and with rock crawling and approach angles in mind, i decided to push the front axle forward. Heres stock. 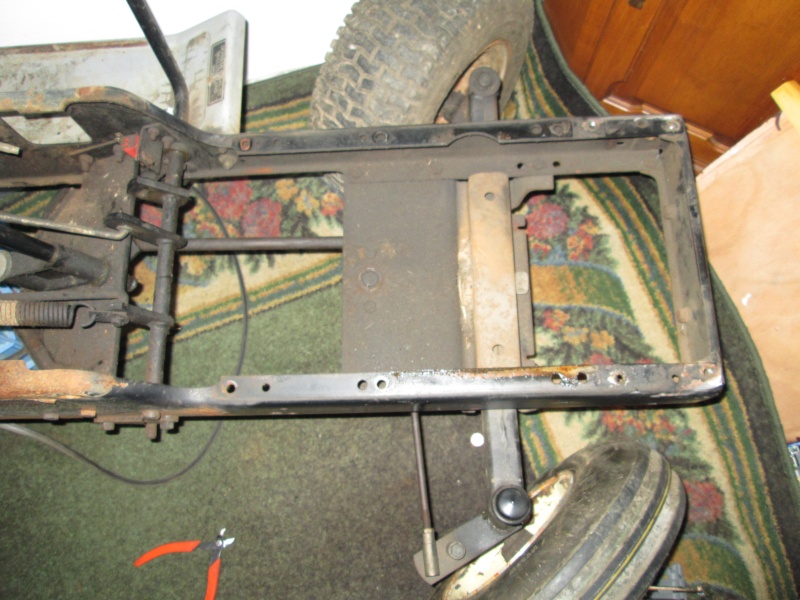 Im changing the steering a bit anyways, so the pushrod doesnt matter. I moved the front mounting holes up to the 2 in the front of the chassis that were there, got it square and drilled the other 4 in the frame and bolted it back on. Looks cool. 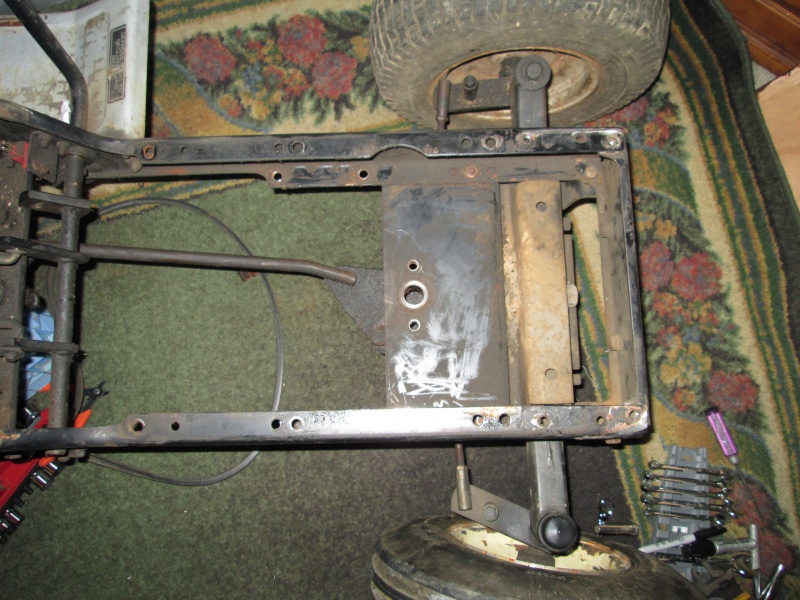 I want a 100% flat belly on this, again for the crawling, i plan on a 1/2in piece of UHMW covering the bottom of the chassis rails front to rear, and a skid for the trans of some kind, im not there yet. So brackets come off.  Even Cats love Tractors! 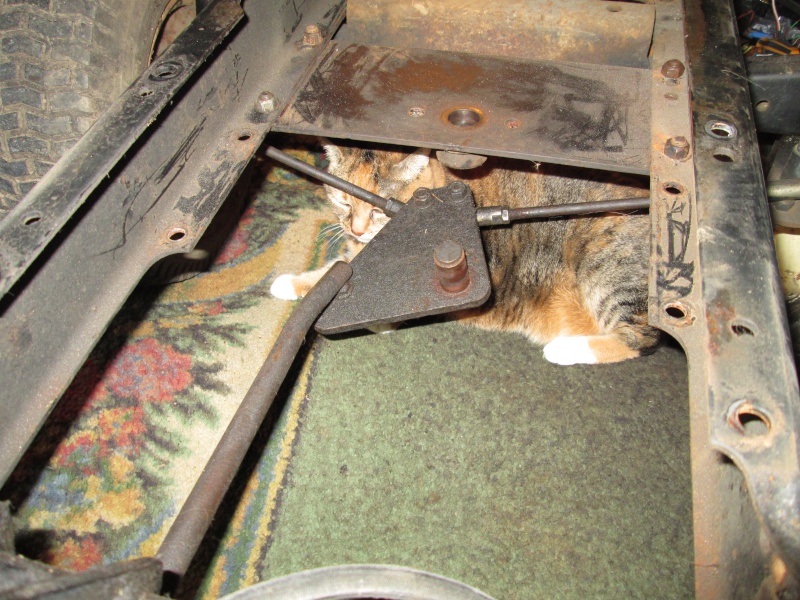 The steering tucks up so nicely in behind the front axle on this thing, its excellent. The linkage is just too low. It and the steering arm driven by the steering gears are the last things hanging below the frame rails. This rod is on the rails, you can see how it contacts the arm. No good. 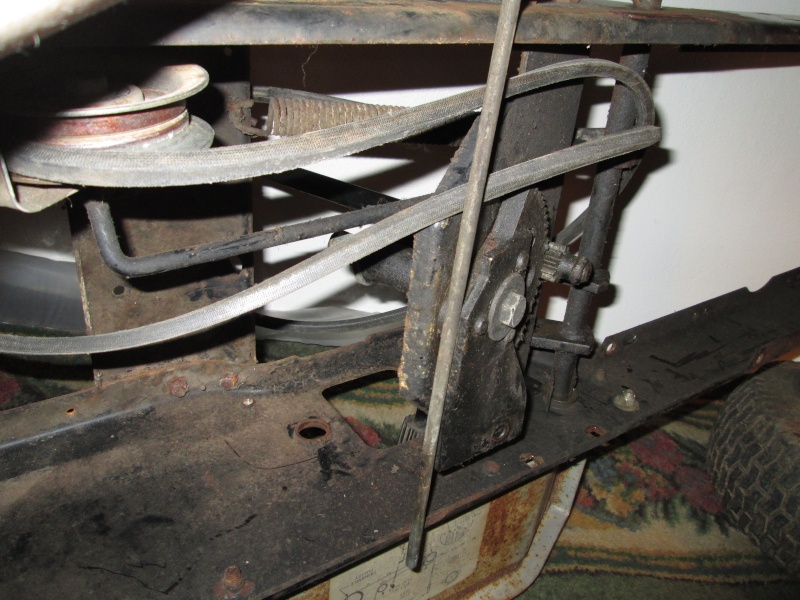 So i saw an easy fix to that. Off comes the bracket, and gets cleaned up a little. 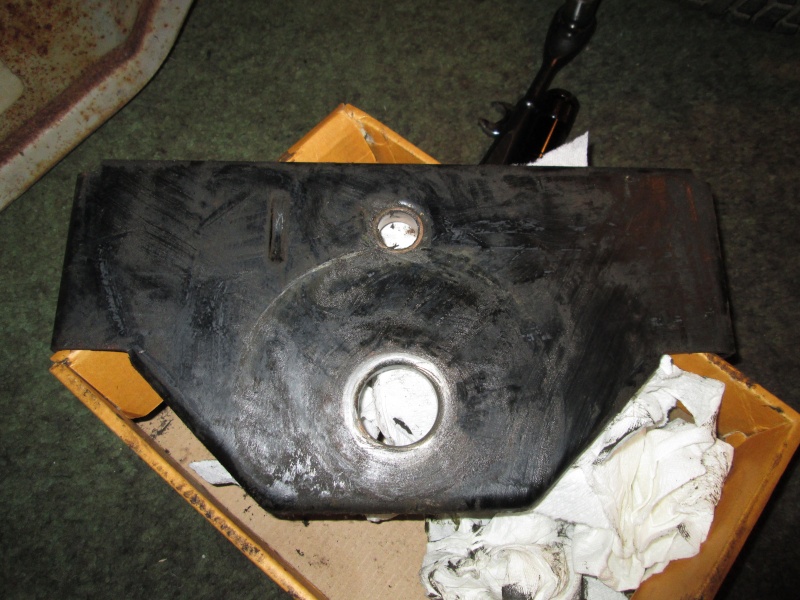 Flip it upside down and reinstall. You can see the rod in the same place, the steering arm was lifted quite a bit and sufficient clearance to mount heim steering joints to the stock steering parts for the stretch all under my flat bellypan. 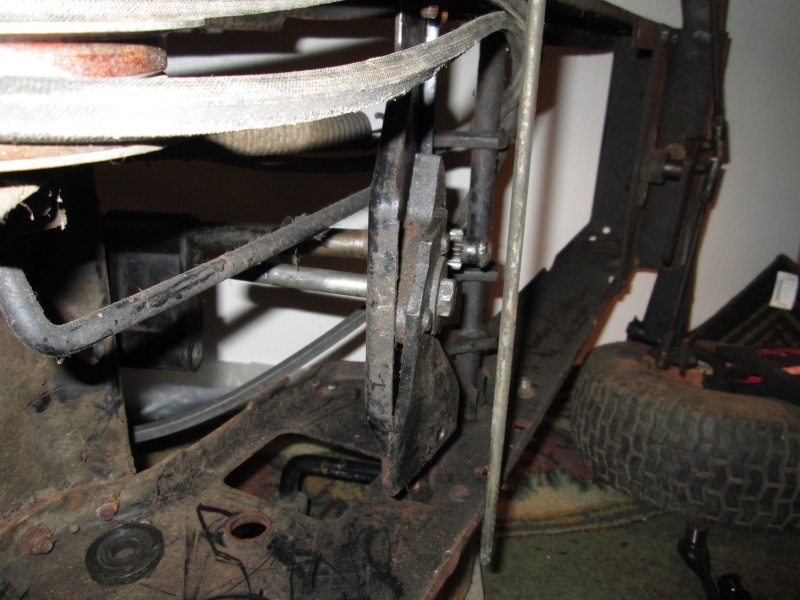 Lots o clearance 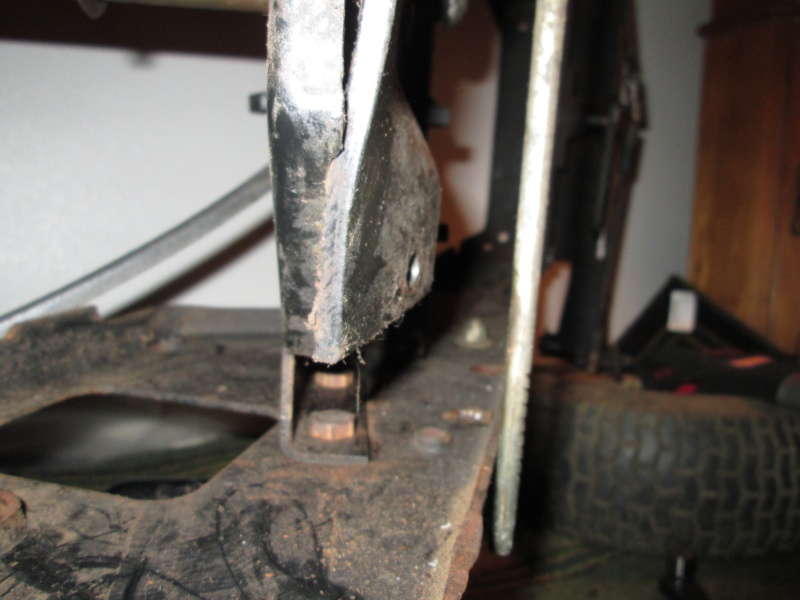 The only mod il have to do is bolt a 1/4in thick thrust/wear plate of probably brass or bronze to give the large gear a smooth surface to ride against since the back stamping doesnt have this. Also il have to remove 1/4in of the brass steering shaft bushing for the pinion gear to sit down and mesh fully with the "rack" gear. Not really sure what to call it. This is the point im at right now, and am thinking of ways to remove that material while still leaving a nice face for the pinion to bear against. Possibly an endmill in my drillpress and go at it lightly by hand and remove it slow. or hacksaw or dremel. Not sure yet. Open to suggestions. 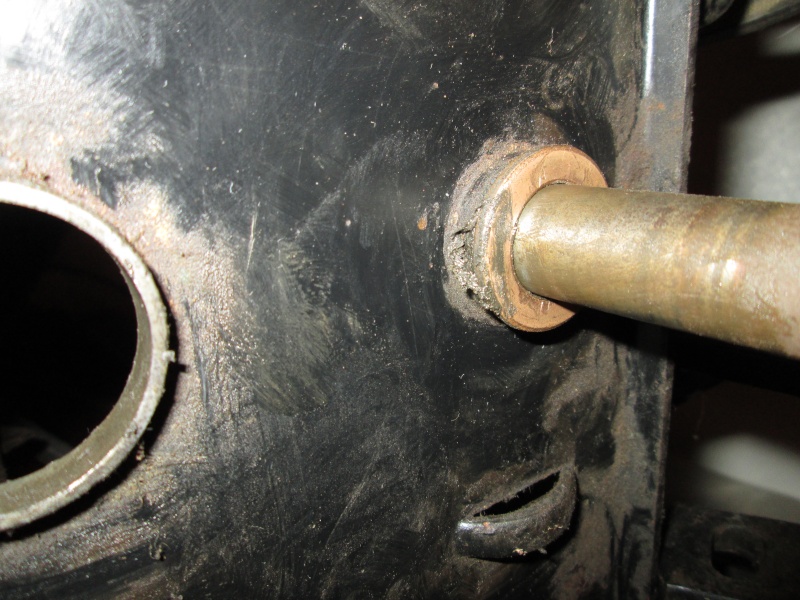 Future plans are a nice exhaust exiting the rear with a top secret muffler, that should sound wicked. Snorkel, seperated case vent lines and delete the air intake from the cooling fan shroud. Might make a small stack for the intake. It gets pretty dusty behind a Fullsize on 40s or a group of bikes or quads. Also Lock the diff, LED headlights, rear lights, OHV permits, and im waiting on a set of tires i ordered. For the front i ordered some DTC if i remember right, 18x9.5x8s, i wanted something with low ground pressure and something that wont fall between the cracks of round rocks and get stuck. For the rear, 27x11x12 Kenda Bearclaws, the biggest size they offered, at least i found. Will trim the fenders to fit when i get the tires in. I might also pinch the front sheetmetal a little if needed for the front tire clearances. But with the axle forward, it shouldnt rub as much. I have 2 questions that i could use some help on. For the pully off the keyway shaft of the engine, im going with a 5.75 to go from a 2.2:1 to a 1.56:1 ratio for some speed. Does a regular cast iron pully do the job or do i need something special for the belt clutches? Also id like to widen the rear a bit for stability by adding 1.5in wheel spacers. Will the 5x4.5 bolt pattern spacers fit the pattern on my hubs? The id and center lip are no big deal, i can have a friend turn the ID if needed, im just wondering on the actual bolt pattern. Thanks, and il post up more when i get there. This stuff is great fun to work on, its like a mini truck or a giant RC, i cant decide which." /> | |
|   | | Lawren Wimberly
Established Member


2014 Build-Off Entrant
2014 Build-Off Entrant
Age : 57
Join date : 2013-12-21
Points : 4805
Posts : 744
Location : Salem Illinois
 |  Subject: Re: Craftsman GT II My first AT Tractor Subject: Re: Craftsman GT II My first AT Tractor  January 2nd 2014, 7:34 pm January 2nd 2014, 7:34 pm | |
| Just keep in mind that the farther out you go, the more bending stress on the axle. I've seen folks widen the axle and add bearings outside the frame (like bearing outriggers lol) for support. As to weather the hubs will match, I'm afraid I'm no help there.
| |
|   | | Krawler86
Member


2023 Build-Off Entrant
2023 Build-Off Entrant
Join date : 2014-01-02
Points : 4154
Posts : 152
Location : PNW
 |  Subject: Re: Craftsman GT II My first AT Tractor Subject: Re: Craftsman GT II My first AT Tractor  January 2nd 2014, 7:36 pm January 2nd 2014, 7:36 pm | |
| While thinking about how to remove that bushing, i decided to try my hand at debeading some tires. Dang these front ribs are stiff and i bent the wheel a little. But a little drift pin action should fix it up. The wheels are chewed up a little anyways, might just try to round out all the wheels best i can. I did get a bead off though! 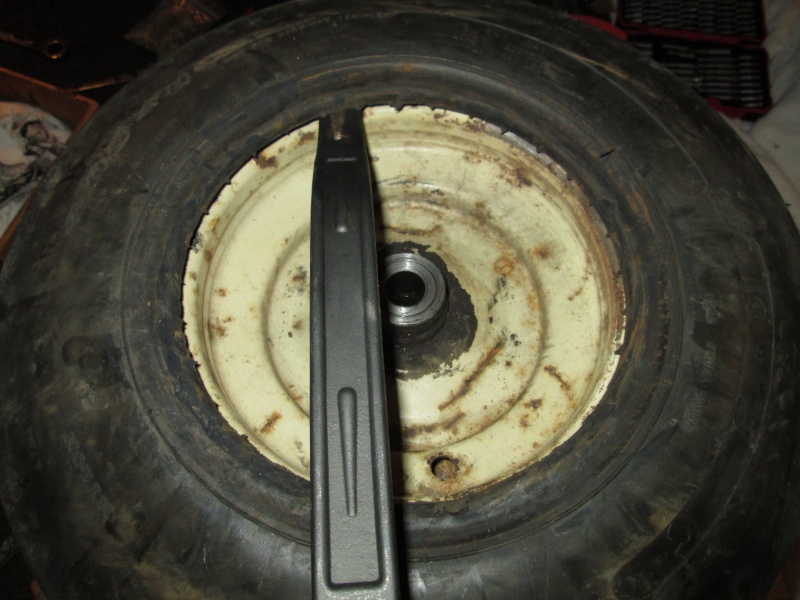 Off to the drillpress with an endmill to remove some brass. I want to bolt the flipped bracket up and get that squared away so i can make the new pushrod. For the width, i know im creating some leverage on the axles. But considering these can carry some pretty decent gear and still handle pulling with weights and wheelstands, big tires and whatnot. If its just me on the tractor, im 145lbs and only 1.5in on either side, doesnt seem too bad. But you never know. | |
|   | | Doug
Site Owner


2014 Build-Off Entrant
2014 Build-Off Entrant
2017 Build-Off Entrant
2017 Build-Off Entrant
Age : 29
Join date : 2012-12-24
Points : 7782
Posts : 3047
Location : Lebanon County, PA
 | |   | | Krawler86
Member


2023 Build-Off Entrant
2023 Build-Off Entrant
Join date : 2014-01-02
Points : 4154
Posts : 152
Location : PNW
 |  Subject: Re: Craftsman GT II My first AT Tractor Subject: Re: Craftsman GT II My first AT Tractor  January 2nd 2014, 8:59 pm January 2nd 2014, 8:59 pm | |
| - Doug Fackler wrote:
- Ive never heard of anyone building a tractor in their apartment before. Neat.
Gotta work with what i got.  So i used an endmill in my drill press set at my desired height. I took all kinds of pics of before during and after without the memory card in my camera... So you get to see how it looks after being vacuumed but not wiped down or sanded to a finished bearing yet. Its all prepped to run normally upside down now though, other than my thrust plate. That shouldnt be too hard, just need to source the material. Probably will have to do 2 layers of 1/8 as 1/4in brass is not the easiest to find where i am. Here it is. Time to break out the little files and the sand paper. 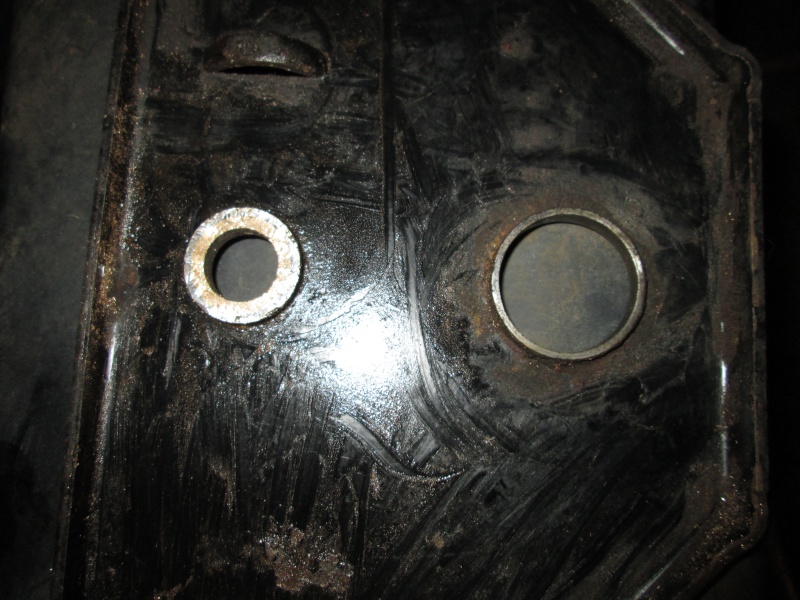 Now everything protrudes 1/4in, with the 1/4in wear plate, it will work just like stock. Only more clearance-ier. 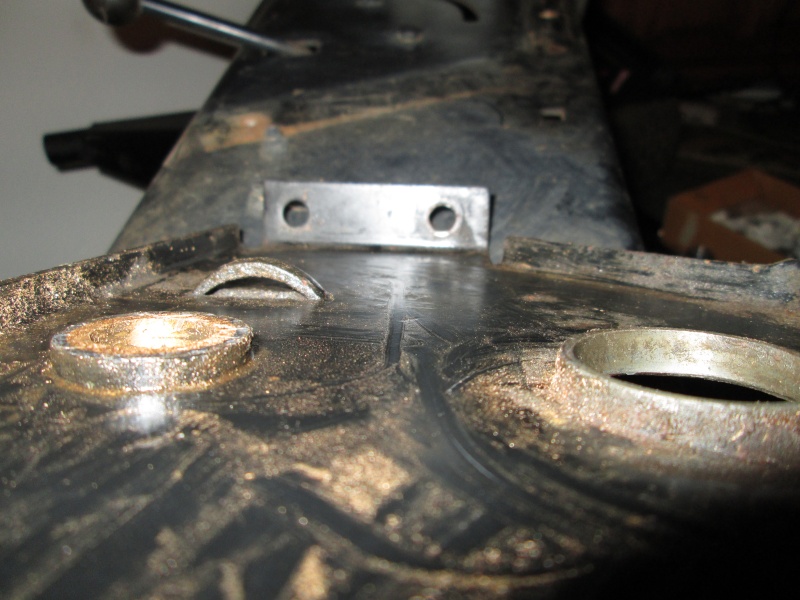 | |
|   | | 1997 Murray
Veteran Member


2014 Build-Off Finalist
2014 Build-Off Finalist
2015 Build-Off Finalist
2015 Build-Off Finalist
2016 Build-Off Entrant
2016 Build-Off Entrant
Age : 26
Join date : 2013-11-13
Points : 5446
Posts : 1311
Location : NW USA
 |  Subject: Craftsman GT II My first AT Tractor Subject: Craftsman GT II My first AT Tractor  January 2nd 2014, 9:03 pm January 2nd 2014, 9:03 pm | |
| looks great! I've been looking for one of those GTs for a time. I to am a fan of sheet metal over plastic. | |
|   | | Krawler86
Member


2023 Build-Off Entrant
2023 Build-Off Entrant
Join date : 2014-01-02
Points : 4154
Posts : 152
Location : PNW
 |  Subject: Re: Craftsman GT II My first AT Tractor Subject: Re: Craftsman GT II My first AT Tractor  January 3rd 2014, 3:05 am January 3rd 2014, 3:05 am | |
| Since my steering is relatively done to a point where the belt and clutch need to take priority and il build everything else around that. I mocked up the motor rotated and i like the looks of it, but it sits a bit far forward. I dont want to bang the head if i crash head on into something. I think im going to flip the plate around and play with a couple different positions. Depending on how i rotate the plate around and which holes i align it with on the frame i can move it rearward a few different intervals between 5 and 11 inches. I think more of a mid engine will give me a good breakover for steep short climbs, but i dont know about stability on the climbs longer than the wheelbase. I guess my pushed forward front end should help with that alot. Here it is sitting with the belt not around any crossmember. It can be removed completely on its own. Id like to keep it that way, and put the motor in a position to let the belt not have to go over the steering shaft support or have the clutch pedal bar have to pass through the center of the belt. Easy changeout is key if and when i break on on the trail. It looks like if i push it back about 8in, trim on some braces and the motor plate a little and maybe put some small roller bearing guides here and there i think il be able to snake it around pretty well. The 5.75in pully i have planned for the engine should help with belt placement as well. Im also pretty happy to see a double pully clutch very similar to the one Fearlessfront made and raves about. Also happy to see it on the correct slack side of the belt. I was planning on making a clutch like he made until i saw this basically had it stock. Man, this GT seems like it was the perfect candidate for an entry level build. Verry happy with my purchase.  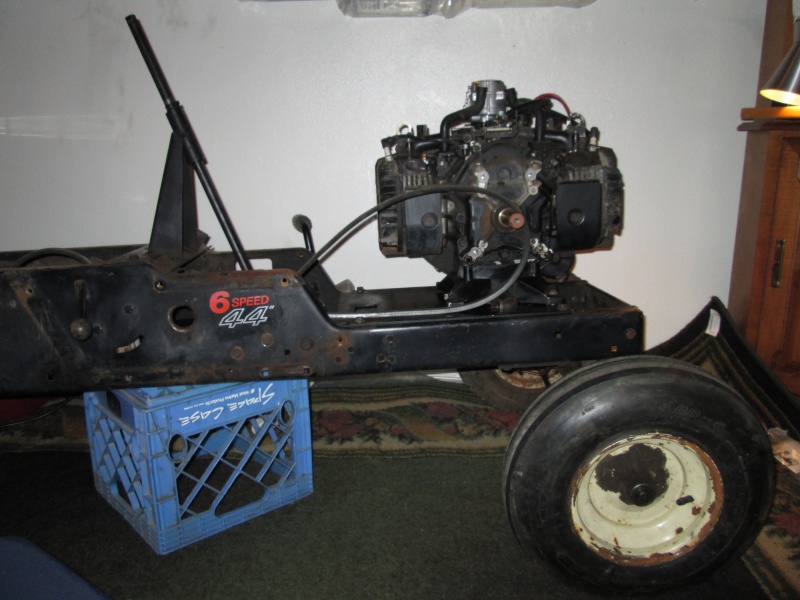 Im looking to order a pully for the keyway shaft. For the kevlar belts or whatever it is the best belts for running off road, do you need any kind of special pully or does it need any surface prep to run with the slack clutch? Im thinking just a regular cast iron pully, but i dont want to buy one that will not perform correctly. | |
|   | | Krawler86
Member


2023 Build-Off Entrant
2023 Build-Off Entrant
Join date : 2014-01-02
Points : 4154
Posts : 152
Location : PNW
 |  Subject: Re: Craftsman GT II My first AT Tractor Subject: Re: Craftsman GT II My first AT Tractor  January 3rd 2014, 3:24 am January 3rd 2014, 3:24 am | |
| Hmmmm. I moved the motor back, mockup, i like where it sits here alot except for the offset weight to the left. I dont want to be off balance. What do you guys think for balance? Looks cool from the side. 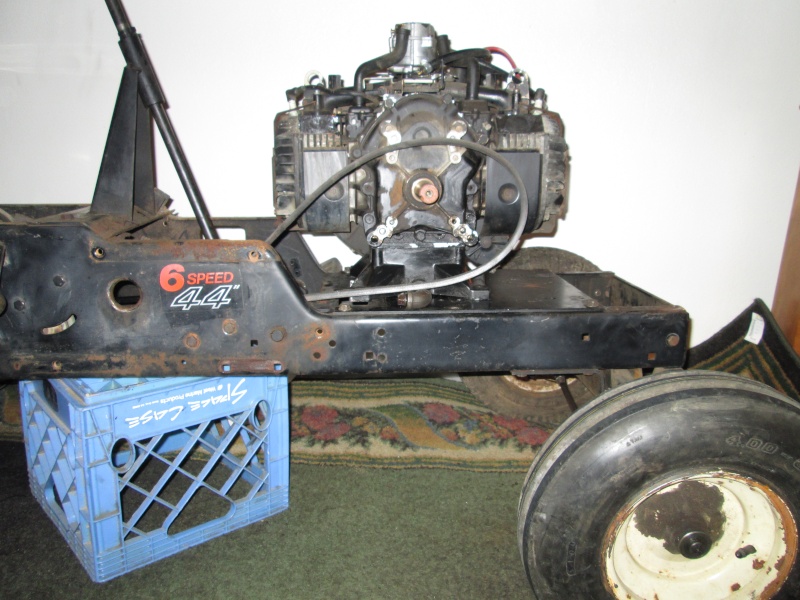 But left side heavy from the top. Note: this is positioned all the way right assuming i had a pully that sat flush to the side of the engine on the keyed shaft side.  So now im considering keeping the motor in the stock location and just making sure the stock belt system is functioning at its best. Input or opinions would be great. | |
|   | | TheRainbowBoxer
Moderator


Age : 49
Join date : 2012-04-23
Points : 5701
Posts : 1091
Location : Galion, OH
 |  Subject: Re: Craftsman GT II My first AT Tractor Subject: Re: Craftsman GT II My first AT Tractor  January 3rd 2014, 8:03 am January 3rd 2014, 8:03 am | |
| As far as potential damage to the head, a good bumper with roll-over bar like what we use on ours should protect it fine. My guess is the balance right to left will make a difference in some situations... it just depends on how hard core you plan to romp it. | |
|   | | richie thomas
Veteran Member

2014 Build-Off Entrant
2014 Build-Off Entrant
Age : 29
Join date : 2011-08-04
Points : 6400
Posts : 1434
Location : east dublin georgia
 |  Subject: Re: Craftsman GT II My first AT Tractor Subject: Re: Craftsman GT II My first AT Tractor  January 3rd 2014, 8:26 am January 3rd 2014, 8:26 am | |
| like trb said, the balance shouldn't be to far off, and a good bumper will protect it from impact
the only way i see the balance screwin with you is iff you jump it, it might lean to the left lol | |
|   | | 1997 Murray
Veteran Member


2014 Build-Off Finalist
2014 Build-Off Finalist
2015 Build-Off Finalist
2015 Build-Off Finalist
2016 Build-Off Entrant
2016 Build-Off Entrant
Age : 26
Join date : 2013-11-13
Points : 5446
Posts : 1311
Location : NW USA
 |  Subject: Craftsman GT II My first AT Tractor Subject: Craftsman GT II My first AT Tractor  January 3rd 2014, 10:55 am January 3rd 2014, 10:55 am | |
| the old sears GTs are set up that way, my buddy from garden tractor pulling has a few, one is pulley swaped and goes about 12 mph. the engines are offset more than what you have by about 1". they seem to handle fine, if your worryed about flipping, just lean to the other side of the tractor. | |
|   | | Lawren Wimberly
Established Member


2014 Build-Off Entrant
2014 Build-Off Entrant
Age : 57
Join date : 2013-12-21
Points : 4805
Posts : 744
Location : Salem Illinois
 |  Subject: Re: Craftsman GT II My first AT Tractor Subject: Re: Craftsman GT II My first AT Tractor  January 3rd 2014, 12:25 pm January 3rd 2014, 12:25 pm | |
| Great progress! Phenomenal write up.... I like how serious you are about the pictures... Other builders could learn a thing or two just from your pictorials  Keep up the good work, I'm waiting to see how ya get it out of your apartment (grin) | |
|   | | Krawler86
Member


2023 Build-Off Entrant
2023 Build-Off Entrant
Join date : 2014-01-02
Points : 4154
Posts : 152
Location : PNW
 |  Subject: Re: Craftsman GT II My first AT Tractor Subject: Re: Craftsman GT II My first AT Tractor  January 4th 2014, 2:53 am January 4th 2014, 2:53 am | |
| - Lawren Wimberly wrote:
- Great progress! Phenomenal write up.... I like how serious you are about the pictures... Other builders could learn a thing or two just from your pictorials
 Keep up the good work, I'm waiting to see how ya get it out of your apartment (grin) Keep up the good work, I'm waiting to see how ya get it out of your apartment (grin) Thanks for the appreciation. I have been doing custom Scale RC model builds for years and am just used to doing detailed pictures / explanations. Working on this feels just like a big RC crawler. As for getting it out, same as how i got it in. Il build it all, with the main components either just sitting, or held on with a few bolts, and il get everything done. I know it runs awesome so i dont need to start it. Then once im happy, il take off the major pieces, it was 8 trips up, so im guessing 7-8 down. Maybe less since i can put the motor on the chassis to go down and save a trip. Then put it together with all the bolts, and cruise it over to its storage shed at my moms house. Luckily i have a place to keep it between romps, just no space there to work. Plus its nice and cozy working on my tractor in comfy clothes sitting on a wool rug. Its pretty awesome. Maiden voyage il be sure to bring tons of junk in case something needs to be adjusted. Im worried about the clutch because ive never set up a belt clutch before. So il get it as good as i can, and be sure i have adjustments either way on the trail if needed. I know for something 2wd to be capable you need little ground pressure in the front and most in the rear, which is why i wanted to move the motor back. I do plan on a nice skid plate to be able to climb rocks that my front tires are not necessarily touching, and a small bumper with a tow point, but i want to keep weight down and aproach angles up. Having a full sheetmetal body as well, i am not concerned with a brush guard. For balance, where i have the motor sitting currently, it puts about 25lbs more on the left. Not too bad, but not good enough for me. Knowing the 4x4 trails ive driven, 33s go many places, but 37s go more. Considering 18x9.5.8s in the front, and way skinnier track width, i dont want to be concerned to favor the right rut because it puts the heavy side on the high side. I dont want it to turn uphill left but not right. I dislike inconsistent handling. So il probably just find a big lump of scrap steel once im done with everything, tap a hole in it and bolt it under the right side of the motor to balance everything out. 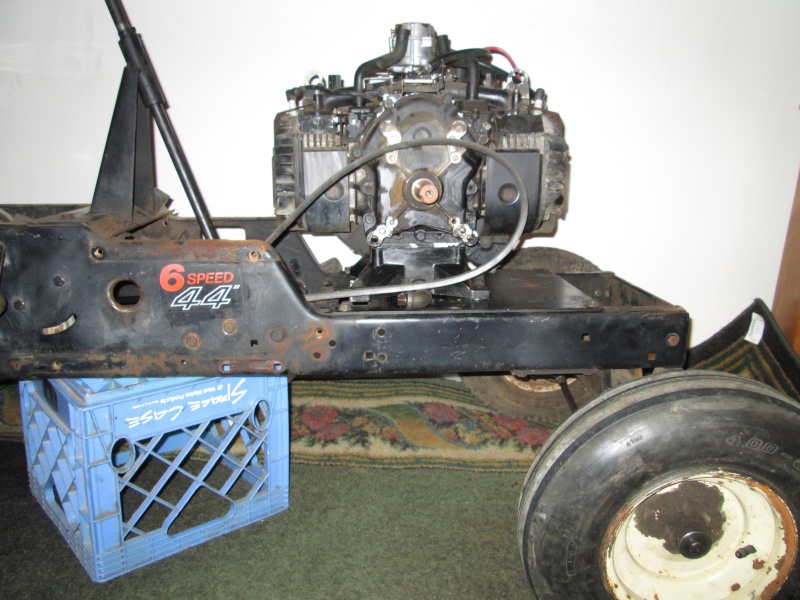 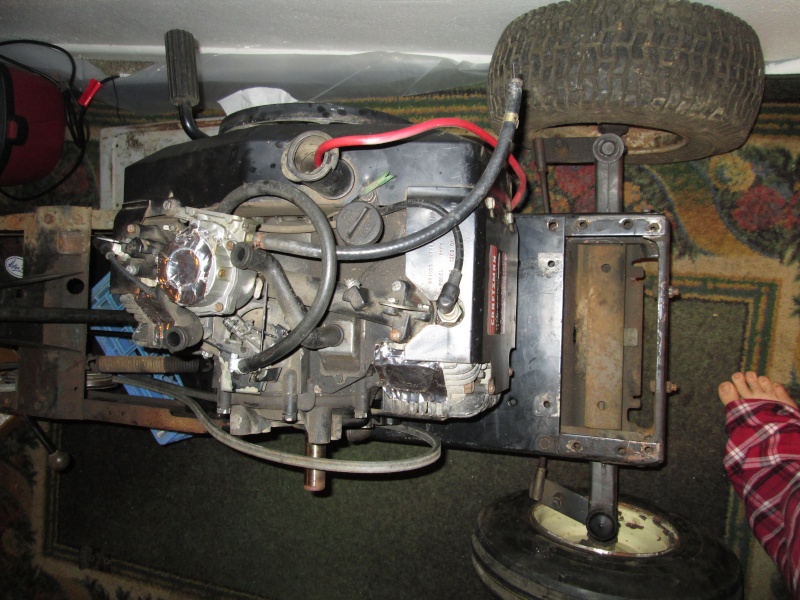 Clutch foot might hit the fan shrouding, its close but i have not sat on it yet. It will all work out, i like the motor where it is not too much to change my mind. 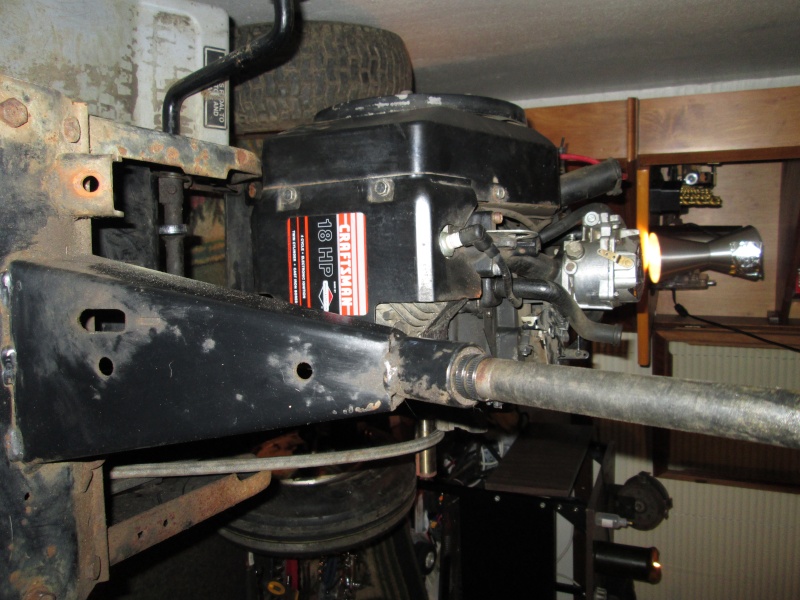 Ruts considered and rock size as well is why i want to do 1.5in wheel spacers in the rear, and im debating widening the front as well, but of i do that, il be lifting it as well with a new front axle i want to build someday. And if the front end ever comes apart, im not going to do anything but a completely new design of axle. For now though, it looks like with the tires im going with, on the skinny ass rims i have, it should clear except for some hard turn on articulation on the front sheet metal. But whats a crawler that doesnt rub the front tires on full compression on at least something. I do plan on limiting the steering a bit too, i dont want it to turn so sharp that i put excessive force on the steering arms to steer if a tire drops in a hole. I dont really need any more than 45 degrees anyways. Im not mowing around trees. Who doesnt like a nice flat tummy.  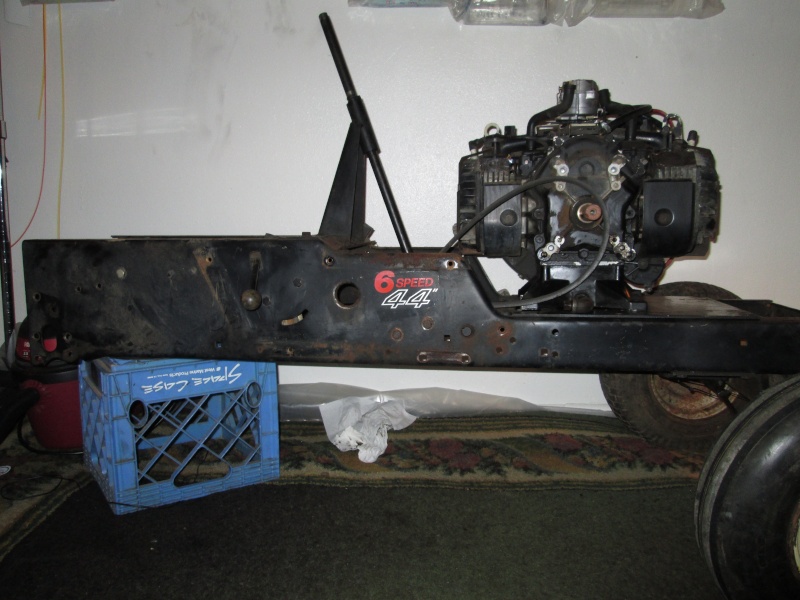 I want to be able to grind some railings with this mamma jamma. On a serious note, i dont plan on jumping. I plan on also running extremely low pressure in the front tires for suspension. Il be running a 18x9.50x8 on a 4in wide wheel. So if i do get the front off the ground, it wont hurt me or the machine as much. Plus cruising on gravel and potholes gets old when you can feel every little bump. Marshmallow tires are where its at. Also thinking about a gas tank for this thing. I want about 4 gallons, and i want to mount it probably mid somewhere, maybe where the stock battery is and move the battery. I want the space under my seat for something else. | |
|   | | Doc Sprocket
Site VIP

2018 Build-Off Entrant
2018 Build-Off Entrant
2021 Winner of Winners
2021 Winner of Winners
1st Place Build-Off 2016
1st Place Build-Off Winner 2016
Age : 51
Join date : 2013-04-21
Points : 7318
Posts : 2914
Location : Ontario Canada
 |  Subject: Re: Craftsman GT II My first AT Tractor Subject: Re: Craftsman GT II My first AT Tractor  January 4th 2014, 9:13 am January 4th 2014, 9:13 am | |
| Man, I gotta give you credit for determination! Faced with your logistics, most folks would throw their hands up in the air and say "I can't do it!". Kudos... I've built and worked on stuff in my living rooms- but NOT in an apartment building!!! (What would management say if they knew you had a tractor up there? LMAO)
You did pick a heck of a good tractor to start with. An excellent engine and gearbox, and a pretty good frame, too. I like what you're doing. | |
|   | | Krawler86
Member


2023 Build-Off Entrant
2023 Build-Off Entrant
Join date : 2014-01-02
Points : 4154
Posts : 152
Location : PNW
 |  Subject: Re: Craftsman GT II My first AT Tractor Subject: Re: Craftsman GT II My first AT Tractor  January 4th 2014, 11:04 pm January 4th 2014, 11:04 pm | |
| - Doc Sprocket wrote:
- (What would management say if they knew you had a tractor up there? LMAO)
She saw me taking it apart in the back of my truck. The wheels and tires were sitting on the ground behind my truck, and the ramps beside. Since i ran out of daylight on the evening i brought it home, got half of it inside, the next day she saw me working on it again and just asked if i was going to have the stuff on the ground cleaned up by tomorrow. I told her for sure, and that was that. Next time she came home, my truck was empty and everything was picked up... I filled her requests.  | |
|   | | Krawler86
Member


2023 Build-Off Entrant
2023 Build-Off Entrant
Join date : 2014-01-02
Points : 4154
Posts : 152
Location : PNW
 |  Subject: Re: Craftsman GT II My first AT Tractor Subject: Re: Craftsman GT II My first AT Tractor  January 5th 2014, 9:52 pm January 5th 2014, 9:52 pm | |
| I didnt really know what i wanted to work on next since im kind of at the point of setting up the belt and clutch. I didnt want to bolt the transaxle in without the diff locked because i didnt want to have to take it out again just to take it apart and weld it, then mock it back up. So im going to order my main pully, and while im waiting, i pulled the hubs off, brakes and input pully and got it ready to split. I didnt know what to expect inside as i couldnt find a manual of my transaxle. I found many similar and of close power and weight ratings and many of them had bolt together planetary diffs. IMO they are easier to lock up than a spider gear diff, especially one thats not held together in its own carrer, like on cars and trucks. I deal with alot of planetary diff locks in RC crawling, especially before it became popular and companies actually made crawlers. Most the old stuff we build RC crawlers with back in 02-03 had ball diffs or planetary diffs. Ive experimented with many ways of locking them, and some are much weaker than others. Im glad it had a beef of a bolt together planetary, as im familiar with how they break under load. But this thing welded up into a blob should be plenty strong. Id like to try and make the bull gear replaceable, but its in such good shape, it will probably be worn out if and when i either blow the trans or break a shaft that id probably want to replace it anyways. First look after the drain and split. Good news and grins from ear to ear from me. Super clean, no marred up anything and needle bearings everywhere. woohoo. 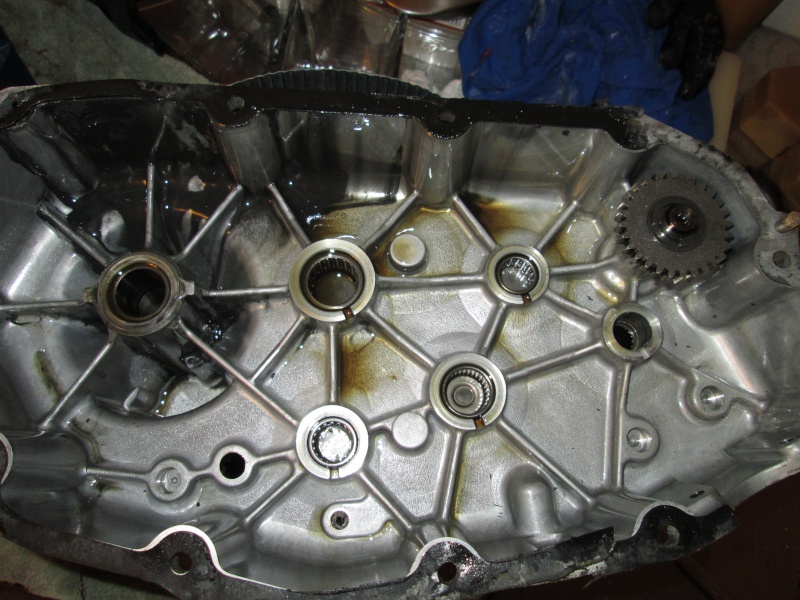 Gears are in fantastic shape. Another find that gives me confidence that this thing was taken good care of. 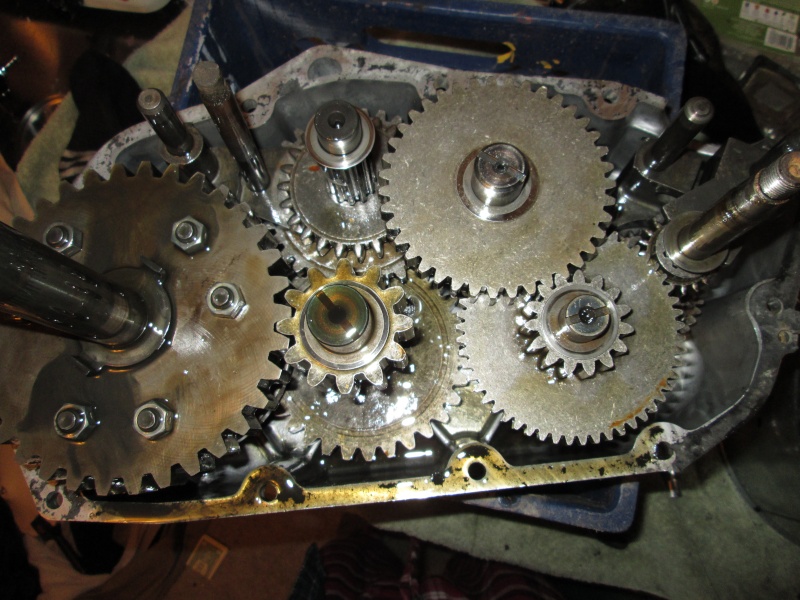 The only issue ive ran into is the diff doesnt want to slide out. One side of the axle shaft assembly, (the bottom side) is really tight in the seal. I think it might be a little rusted or gunky. It doesnt turn smooth like the topside does either. So i think im going to blow all this out with brake clean, flip it over and just whack the shaft a few times and see if it starts moving. It rotates by hand, just real stiff compared to the other side. But the diff is straight beef. Looks alot like the diff out of a Sears Suburban, and i know those are beef. 27x11x12 Kenda Bearclaws will test that theory. Going to take it to a friends soon and weld this sucker up. So stoked to have this part almost done. Its the only fab work i cant do myself. I could if i had a welder, and a place to weld. I used to. But not here, i dont think wirefeeding in my livingroom would be the best idea... Thumb for size referance. Bull gear is 1in thick, planets in the diff are 1.5in wide. Serious beef. I love it.  | |
|   | | Krawler86
Member


2023 Build-Off Entrant
2023 Build-Off Entrant
Join date : 2014-01-02
Points : 4154
Posts : 152
Location : PNW
 |  Subject: Re: Craftsman GT II My first AT Tractor Subject: Re: Craftsman GT II My first AT Tractor  January 5th 2014, 9:57 pm January 5th 2014, 9:57 pm | |
| I forgot to mention, man i wish i had recorded the trans splitting process. You guys would not believe how easily everything came apart. I was scared reading about all the stuck wheels, stuck pullies, lead hammering the case halves apart all that. I was geared up for a fight with chissels, torch, hammer, sockets and the like. I got the clip off the first wheel hub, and the hub slid off into my hand in the gentlest fashion. Literally as if the trans is like OMG thankyou wor working on me, Here have a wheel hub, as it slides gingerly into my hand. The other side went the same way.
Took out all the 1/2in bolts, tapped each dowel pin as i lifted gently, and with a splootttchhhhchkkk the case halves seperated like nothing was holding them together. Yet this thing didnt leak a drop and was perfectly full when i checked before drain.
The traptor gods are smiling on me tonight.
****
Also have to give a huge shout out to RedneckComputerGeek for the tip using paraffin wax as a penetrant lube. I used that tech on the brake drum and input pully on the trans, and mine werent drazy stuck, but they didnt want to come off with just some hits. I heated em up, waxed it, (I make candles too so i have an abundance of many kinds of wax, paraffin being the least desireable so i have tons. I cast a small bar now just for this purpoe and tossed iit in my toolbox. Just a 1x1/2x3in block.
That was just a phenominal help in removing those. It made it so i could do it quietly in the middle of the night with no concerns since it took the lightest taps to get them off.
I had better luck after i refined the process a bit. I heat cycled it twice to try and use the wax in there to break up gunk. I heated it, and got the wax to penetrate, let it cool completely, then heat it back up until you see some wax start to come out, then tap on it, and it seemed to make it come off even easier, if not quite as fast as his wax and beat approach. Anyways, it was a very helpfull tip i plan on keeping in my bag of tricks for future stuck stuff. | |
|   | | Creepycrawler
Established Member

2024 Build-Off Entrant
2024 Build-Off Entrant
Age : 37
Join date : 2013-07-02
Points : 5019
Posts : 731
Location : Logan Ohio
 |  Subject: Re: Craftsman GT II My first AT Tractor Subject: Re: Craftsman GT II My first AT Tractor  January 5th 2014, 11:07 pm January 5th 2014, 11:07 pm | |
| we run alot of those type trannys, well we used to, but this is how we lock all planetary diffs now, with no failures. separate the differential take one planetary gear from each side and flip it. and bam diff locked and its removeable
EDIT
just read farther back to your other updates. here is a option I dont know if you have considered, center the motor on the frame 90 degrees from its factory location. and then use a jackshaft to get the belt in proper position. either way I would definetly vote for pushing the motor as far forwards as you can. unless you weigh 110 pounds your always gonna be rear heavy anyways. Ive been riding for along time, with a big group and we always slide our motors as far forward as possible and still end up adding weight up from to keep the front ends down. extra weight also helps you turn when your locked, which you will run into with those 27s | |
|   | | Krawler86
Member


2023 Build-Off Entrant
2023 Build-Off Entrant
Join date : 2014-01-02
Points : 4154
Posts : 152
Location : PNW
 |  Subject: Re: Craftsman GT II My first AT Tractor Subject: Re: Craftsman GT II My first AT Tractor  January 6th 2014, 1:18 am January 6th 2014, 1:18 am | |
| I weigh 140lbs, and with my 12in wheelbase stretch, and where im going to be wheeling 90% of the time, i have a certain weight bias and balance im going for. Also remember i have 50lbs of sheetmetal, gas tank, headlights and hood to add weight to the front, as well as bigger tires, and a bumper. I am familiar with that locking method of a planetary diff. Im surprised to hear you have no failures. In my experience building RC crawlers, in the early days, we would essentially take a all in one motor/transmission/differential like on the back of any 2wd electric truck, the ones we favored because of availability have a planetary diff very similar to this one. Then used it as the central trans to run the drivelines to solid axles, so the diffs in the center had to be locked. Ive locked many in that way, they were even 6planet units just like this one, and they would always fail by breaking the teeth off the output shaft drive gears. The only way to make them hold up was to fill them with epoxy to make them "welded". This differential also was only recieving 50% of the actual wheel torque because of the 2:1 ratio in the axles. Yet this method still always failed without reenforcement. Id be very interested in seeing a romp of a tractor locked with this method and multiple vouches of it lasting long term before i decide to use it. With all the failures of the small scale versions, i definitely see the same part in this diff as the weak link. The drive gears are definitely not as burly as the planets, and the bull gear is overkill. Those side gears..... i dont know man, im leary. EDIT: So looking more at flipping gears, the side gears are tougher than what i originally glanced and saw. Id be kinda ok with this if it was not for one thing. Forces being out of balance in the diff. Being 3 pairs of 2 planets, you cannot flip all 3 without compromising the strength, therefor you can only bind up 2 of the 3, and you have unbalanced things going on. See my crude paint drawing. 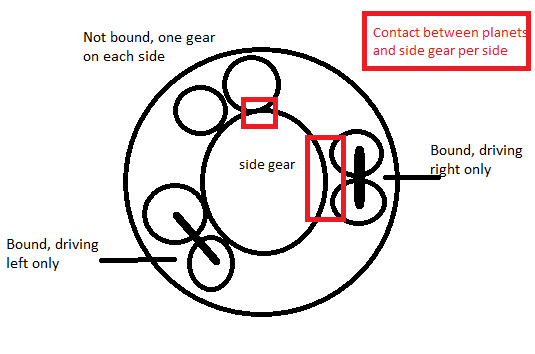 Would you leave the 3rd pair normal, so as to have 1 gear per side to help transfer the torque back to the 2 bound up pairs? Also there would only be gear contact on 0 degrees and 120 degrees on the side gears, With one pair flipped up, and one pair flipped down, relative to each axle shaft, you have 2 gears bound together contacting at zero degrees, and 1 gear free to move except bound to the other pair on the other axle shaft, so you have 3 gears in contact, but in a very uneven arrangement. Same on either side. Im kind of seeing an alternate solution. Tack the 2 planets together where they all sit stock. Remove, weld to hell, and reinstall. Then there is gear contact to bound up gears equally spaced at 0, 120, and 240 degrees. Then to re-open, just order new planets. | |
|   | | Krawler86
Member


2023 Build-Off Entrant
2023 Build-Off Entrant
Join date : 2014-01-02
Points : 4154
Posts : 152
Location : PNW
 |  Subject: Re: Craftsman GT II My first AT Tractor Subject: Re: Craftsman GT II My first AT Tractor  January 7th 2014, 10:41 pm January 7th 2014, 10:41 pm | |
| SO... A decision has been made. Im going to be locking the diff by welding all 3 pairs of planet gears together in pairs. That way each axle side is being driven at stock open diff strength, but locked up, making the side gears in the diff the weak link. I decided id rather break a side gear and be able to limp to camp 1-wheel drive and likely be able to fix it with just a new side gear in the diff, rather than lock the whole thing up completely, and have an axle shaft be the weak link. Now i dont think these shafts well break, but id much rather break an internal that lets me limp home, than break a whole rear wheel and axle off the thing and try to limp 3 wheeled. Also, in anticipation of limping while broken, im installing a fairly large, extremely powerfull Neo magnet inside the case so it could hold multiple gear teeth or even nuts and bolts without them circulating. Nice feature with the Al case. So everything is all clean and ready for welding, i.e. Locker for me tomorrow!     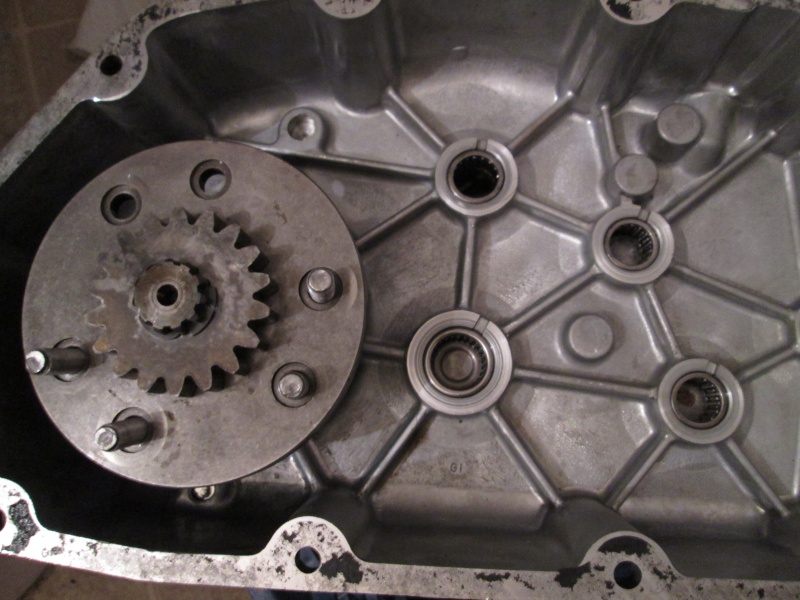 Hardwares: Only 2 bolts come out, you have to turn (hard to do) or pull the diff out further (also hard) to get the rest. They dont need to come all the way out for what im doing. All nice and clean ready for the heat. Im not welding to the bull gear, the shaft or the side gear, but they were in the same place drying after cleaning, so here. 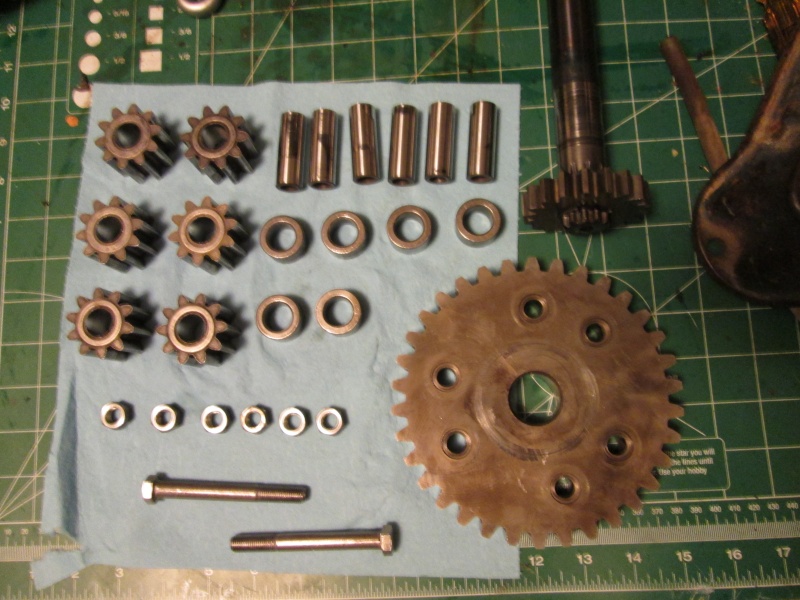 This will mark the main achievement in this things progress. After this, parts start going back on instead of constantly coming off. Its the beginning of the end, and the end marks trial run and wheelin. I freekin cant wait for the end! I hope theres still a crapload of snow up in TSF. If not, sticky mud and rocks make for a fun mix. Totally off topic, and not in the most well read place, because its kind of a shot in the dark. Anyone on here ever built a wheeler or general purpose machine out of a GE Electrac? The place my Cub 122 is, my friend has one that hes had for longer than ive been alive, its got electric hydraulic tilt on the front plow / electric front mow deck. Electric lift on small side expander mow decks, electric lift on the 3 point hitch with electric (plugs) and electrically driven PTO. He usually runs all the mowers and a big GE electric pto (plugs) grass sweeper that puts it in a huge sack dragged behind. Its a super cool setup. For as long as i can remember its looked exactly the same, except it gets tire chains for mud or more traction. He used it to trench for pipe and conduit when he dug out the basement, and we used it to pull out my FJ40 when it sold  . But i just remember it as a super cool GT. Looks really similar to the cub, yellow and i think white, maybe light blue. But pretty much the same wheels and tires. I saw one on a trailer today on my way home from the parts store and it sparked tons of memories. I also remember it was basically limitless in throttle control and power. You could put it in 4th and have the tires turning like you are in crazy low range. The motor or motors or whatever powers those things, was quite impressive. Id love to have all that finesse in a crawler. | |
|   | | 1997 Murray
Veteran Member


2014 Build-Off Finalist
2014 Build-Off Finalist
2015 Build-Off Finalist
2015 Build-Off Finalist
2016 Build-Off Entrant
2016 Build-Off Entrant
Age : 26
Join date : 2013-11-13
Points : 5446
Posts : 1311
Location : NW USA
 |  Subject: Craftsman GT II My first AT Tractor Subject: Craftsman GT II My first AT Tractor  January 8th 2014, 10:27 am January 8th 2014, 10:27 am | |
| quote: Looks alot like the diff out of a Sears Suburban, and i know those are beef.
it is virtuly the same. from 1960 to as late as 2003 i've seen the same axle in sears products. at first they where used in sears own line of tractors and then they used the frame that you have for there craftsman line until the mid 2000's. but they have the same transaxle, other than the shifter is bent differently. | |
|   | | Creepycrawler
Established Member


2024 Build-Off Entrant
2024 Build-Off Entrant
Age : 37
Join date : 2013-07-02
Points : 5019
Posts : 731
Location : Logan Ohio
 |  Subject: Re: Craftsman GT II My first AT Tractor Subject: Re: Craftsman GT II My first AT Tractor  January 8th 2014, 2:18 pm January 8th 2014, 2:18 pm | |
| Your 100% right with your engineering analysis, and your way will be stronger. But we have broken 2 axle shafts outside of the case near the tire with just flipping the gears. Tear the tranny apart and the planetary set looks fine, no stress cracks etc. I can say our group runs harder trails than anybody else, at least that I have met or spoken too. we bounce up over rocks, logs and hills and bury our stuff up to the fenders in mud, with 25 and 26 inch rear tires. and no planetary failures. Just food for though for anyboy considering this for themselves | |
|   | | Krawler86
Member


2023 Build-Off Entrant
2023 Build-Off Entrant
Join date : 2014-01-02
Points : 4154
Posts : 152
Location : PNW
 |  Subject: Re: Craftsman GT II My first AT Tractor Subject: Re: Craftsman GT II My first AT Tractor  January 9th 2014, 5:54 pm January 9th 2014, 5:54 pm | |
| That gives me confidence in that locker method, though after finding what i found, im surprised you broke the axles out by the wheel. To me it looks like the spline roots on the inside are the weak part. I was cleaning my diff after all the planet pairs got welded up and i found this hidden under the left diff carrier, side gear and clip. This is definitely a sheared axle just waiting snap off at the back of the side gear. I mean, with the tires im putting on, id be surprised if this axle lasted the first couple obsticals. 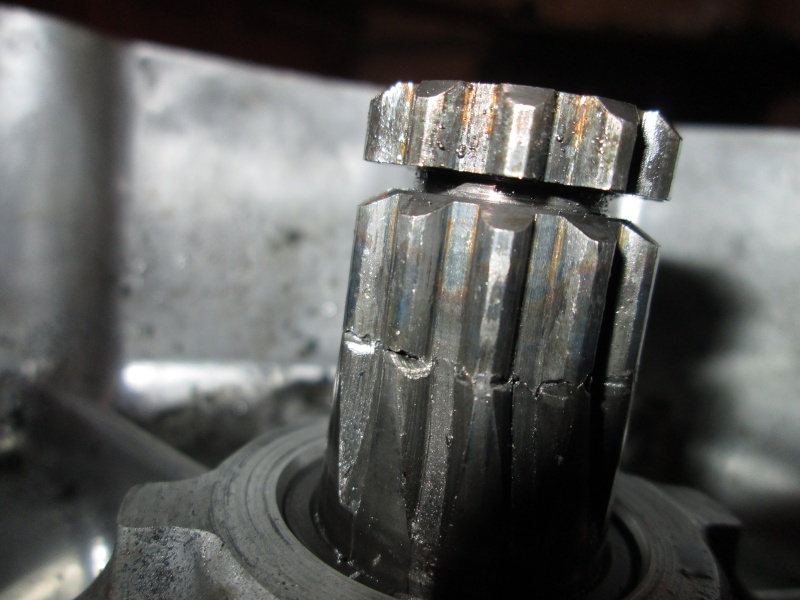 On another progress note, heres all the diff cleaned up with a magnifying glass and small chisel, ready to be ioled up and put back in..... as soon as i get new rear axle shafts.... bummer. 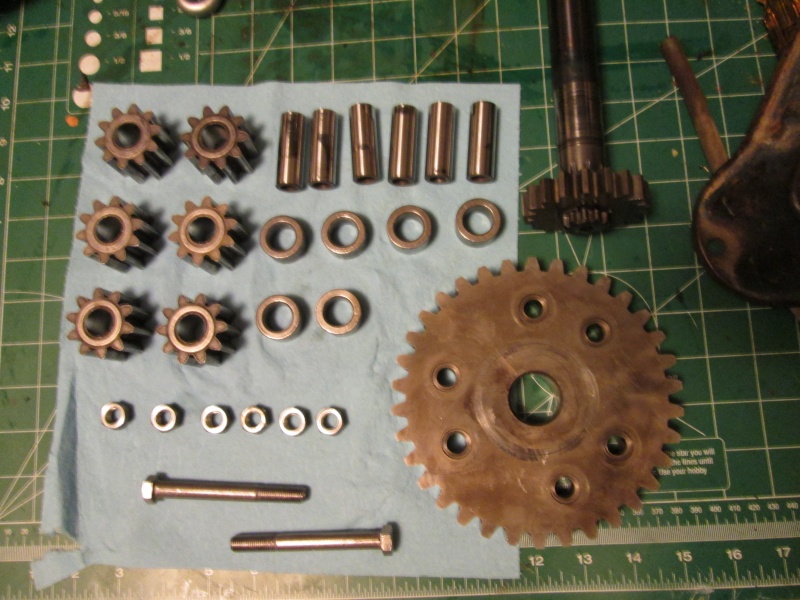 Another progress update. Persistence, and a little seafoam as lubrication and i got a tire off. Woo, first tire ive ever taken off manually. Now that i have it down, im going to try to mount a rear. 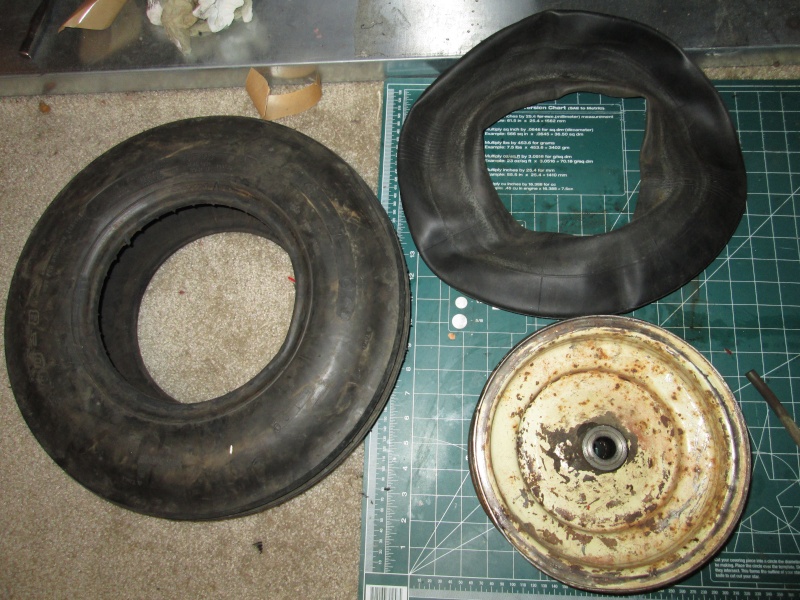 Something evil is lurking behind my turf. 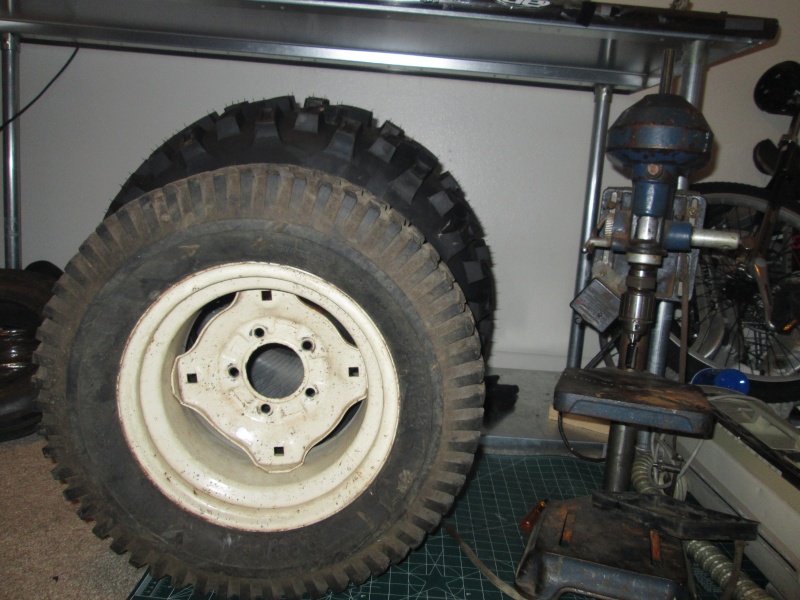  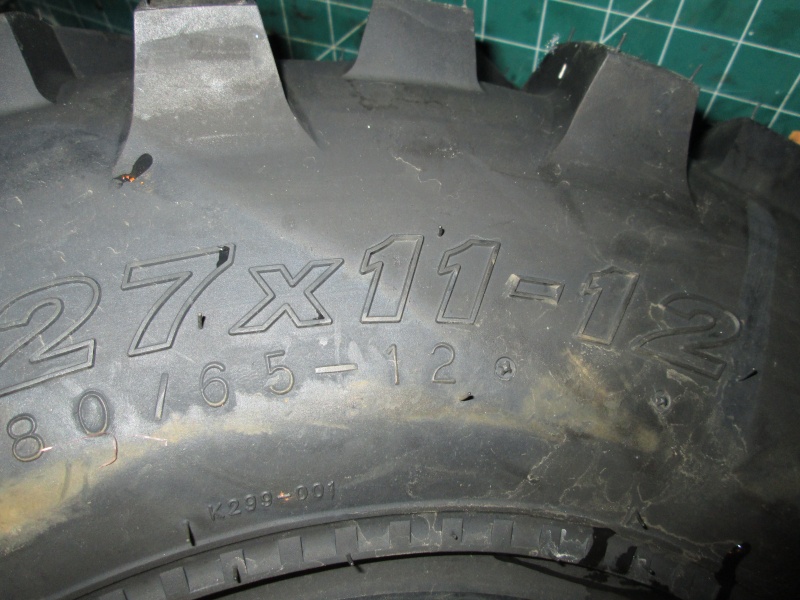 Look at the aggressiveness of these things. This is a 21mm Sparkplug socket. 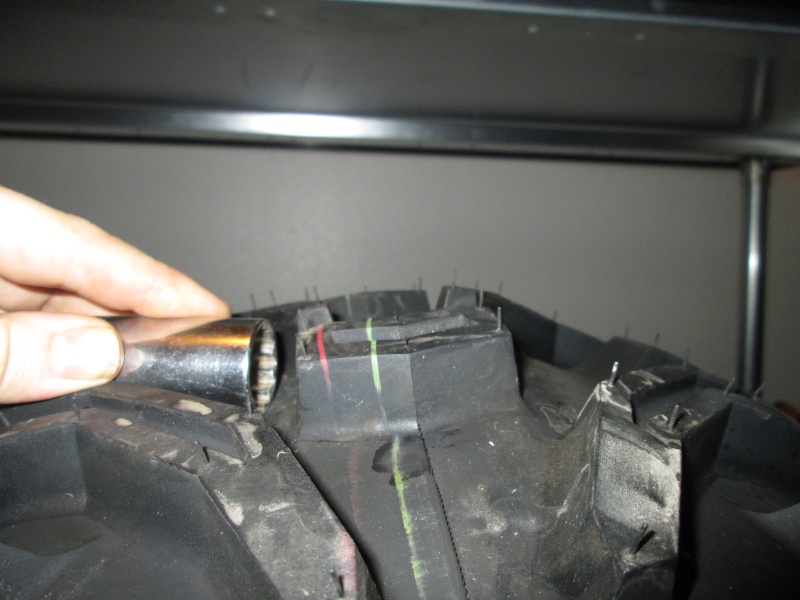 Badass pattern too. 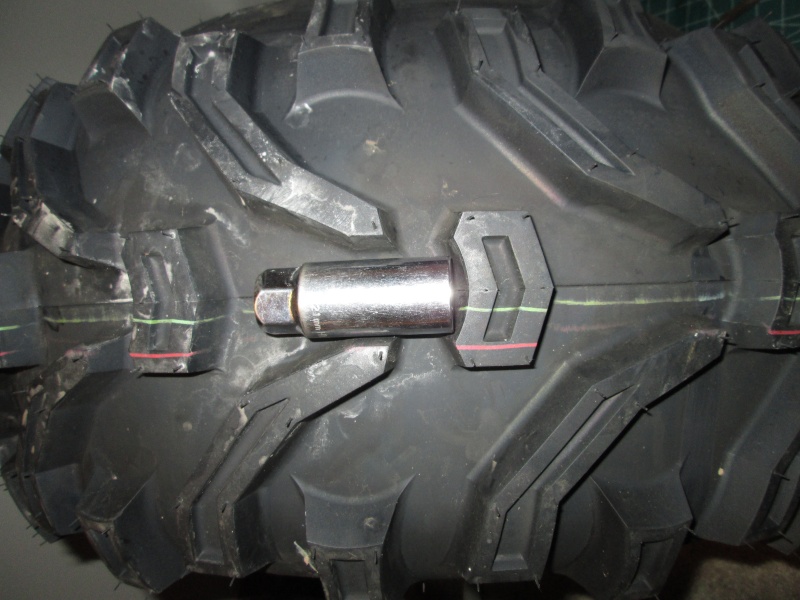 Before any cleaning or slag removal. But oh no, someone glued my planetaries together. Now both tires are going to turn at the same time.... wtf, who wants that? 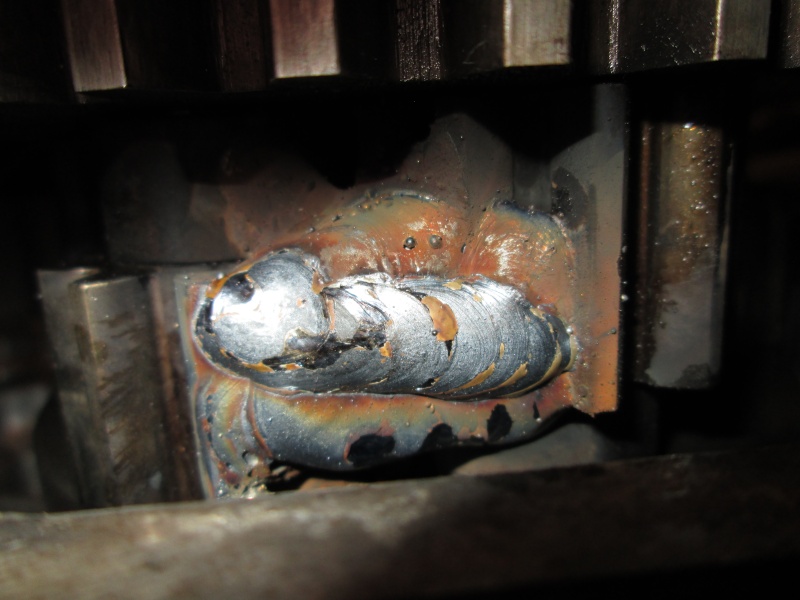 So thats that for now. I can play with tires, fronts are not in yet unfortunately because i decided i wanted larger than 18 and a little narrowed than 10 after borrowing a buddies 20x9. I ordered up some 22x7.5s that i think will work better. Plus i learned the fronts i previously ordered are a rock hard compound, and if im in the snow, i dont want plastic tires. Thats all for now. Going to try and find a manual and part numbers for rear shafts. If anyone has a hookup on a manual for this axle, id be very thankfull. Im having trouble finding anything.
Last edited by Krawler86 on January 10th 2014, 3:12 am; edited 1 time in total | |
|   | | Doc Sprocket
Site VIP


2018 Build-Off Entrant
2018 Build-Off Entrant
2021 Winner of Winners
2021 Winner of Winners
1st Place Build-Off 2016
1st Place Build-Off Winner 2016
Age : 51
Join date : 2013-04-21
Points : 7318
Posts : 2914
Location : Ontario Canada
 |  Subject: Re: Craftsman GT II My first AT Tractor Subject: Re: Craftsman GT II My first AT Tractor  January 9th 2014, 6:10 pm January 9th 2014, 6:10 pm | |
| I'm watching this with great interest. So far, so good! Pity about the broken axle, but it's better to find out now, rather than after it's together and called "done". | |
|   | | Creepycrawler
Established Member


2024 Build-Off Entrant
2024 Build-Off Entrant
Age : 37
Join date : 2013-07-02
Points : 5019
Posts : 731
Location : Logan Ohio
 |  Subject: Re: Craftsman GT II My first AT Tractor Subject: Re: Craftsman GT II My first AT Tractor  January 10th 2014, 4:12 pm January 10th 2014, 4:12 pm | |
| I regret to say I have to retract my previous statement. this happened yesterday to my buddys tractor  breakage seems to have started exactly where you said it would, and then the pieces that broke off got wedged between the case and the bull gear. Now this hasnt happend to any wheel horse trannys, but they have 4 sets of gears instead of three. Sears owners beware, flipping gears for diff lock is bad news. 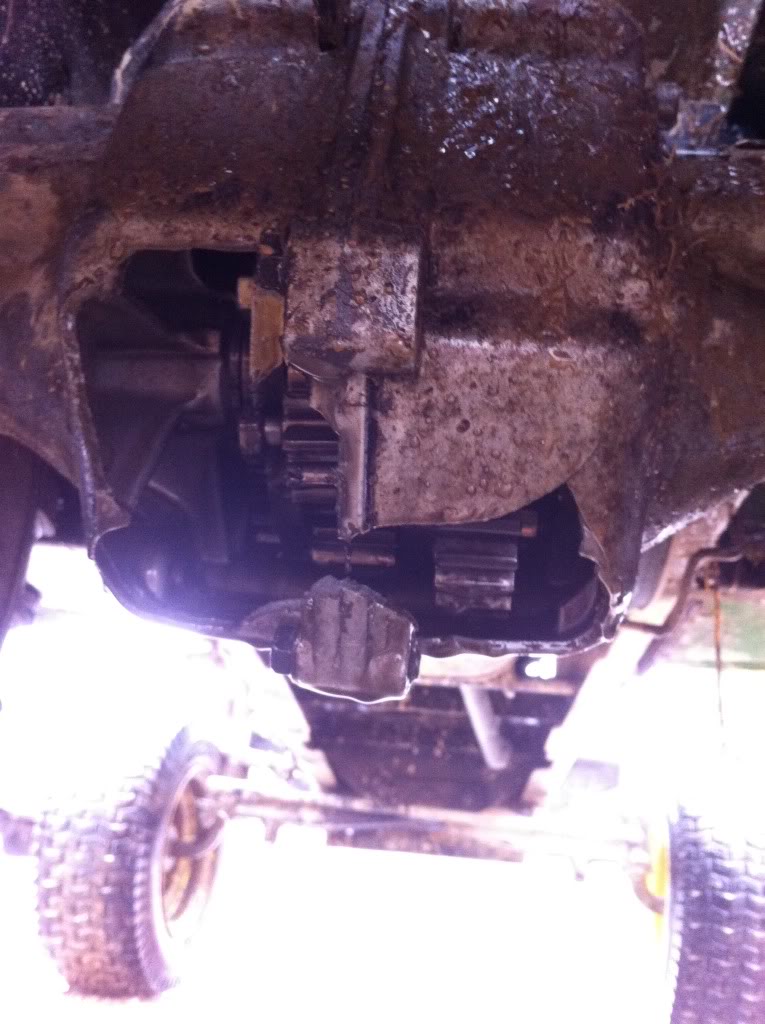 | |
|   | | Sponsored content
 | |   | | | | Craftsman GT II My first AT Tractor |  |
|
Similar topics |  |
|
| | Permissions in this forum: | You cannot reply to topics in this forum
| |
| |
| | Who is online? | In total there are 34 users online :: 0 Registered, 0 Hidden and 34 Guests
None
Most users ever online was 412 on January 7th 2023, 7:59 am
|
|


