| | The Craftsman build |  |
|
+13CraftsmanQuad19 MatthewD Crazy_Carl MightyRaze muddstir Thunderdivine k2500life willis923 Stretch44875 FOSWMT Doc Sprocket redlinemotorsportts richie thomas 17 posters |
|
| Author | Message |
|---|
muddstir
Member

2018 Build-Off Entrant
2018 Build-Off Entrant
Join date : 2012-01-22
Points : 5037
Posts : 318
Location : Western,PA
 |  Subject: The Craftsman build Subject: The Craftsman build  September 26th 2013, 10:13 pm September 26th 2013, 10:13 pm | |
| The Plan -- Build an offroad machine that can play as much as it can work. The List-- Build a new stronger frame Lift 3 to 5in Bigger tires Snowplow and rototiller mounts- front and rear Winches front and rear Find a strong motor Keep the $ on the low side And 100 more little things that I'm not going to type out This is my craftsman tractor that I collected awhile ago - it was free (couldn't pass that deal up). It will be the platform for my build, it has no motor but overall its in very good condition. First step is to tear it down to the frame. Then I can get the measurements to go ahead and build an new frame.  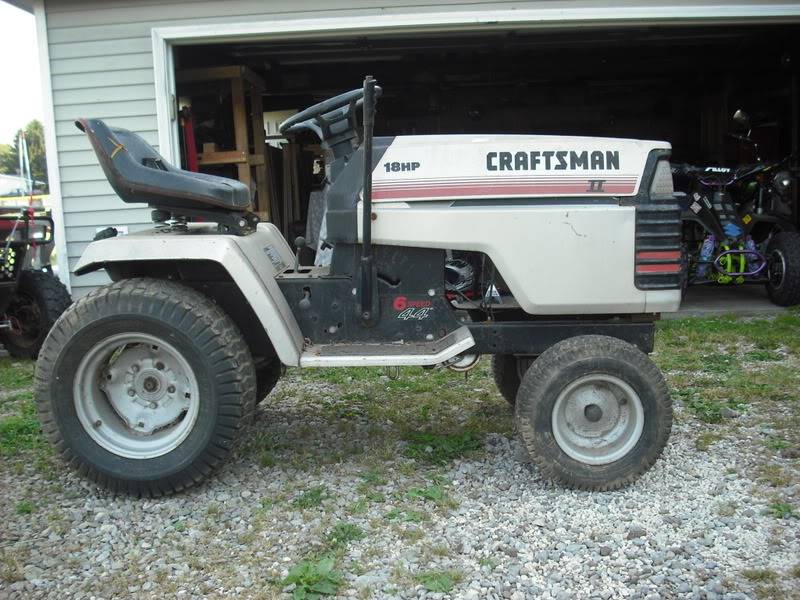 " />   " />  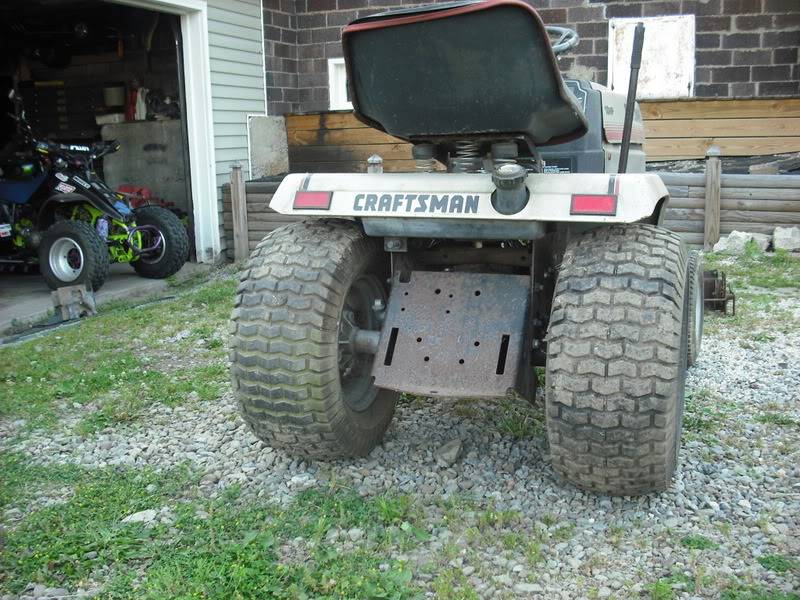 " /> | |
|
  | |
richie thomas
Veteran Member

2014 Build-Off Entrant
2014 Build-Off Entrant
Age : 29
Join date : 2011-08-04
Points : 6400
Posts : 1434
Location : east dublin georgia
 | |
  | |
redlinemotorsportts
Moderator


2014 Build-Off Entrant
2014 Build-Off Entrant
Age : 27
Join date : 2013-03-18
Points : 7483
Posts : 3131
Location : raleigh nc
 |  Subject: Re: The Craftsman build Subject: Re: The Craftsman build  September 26th 2013, 10:28 pm September 26th 2013, 10:28 pm | |
| I x2 richie, and looks like a nice mild build you got going. | |
|
  | |
muddstir
Member


2018 Build-Off Entrant
2018 Build-Off Entrant
Join date : 2012-01-22
Points : 5037
Posts : 318
Location : Western,PA
 |  Subject: Re: The Craftsman build Subject: Re: The Craftsman build  September 26th 2013, 10:48 pm September 26th 2013, 10:48 pm | |
| - richie thomas wrote:
what happened to inbred allis???  The Allis is still sittin where I left it, on the cart in my garage. From spring to now I haven't had time to do much of any thing at home but when winter hits i'll get back on it. This one I'm building at work so I can hopfully have it done by winter to plow that white crap that falls from the sky. And it's noting really detailed just a worker and a romper. | |
|
  | |
muddstir
Member


2018 Build-Off Entrant
2018 Build-Off Entrant
Join date : 2012-01-22
Points : 5037
Posts : 318
Location : Western,PA
 |  Subject: Re: The Craftsman build Subject: Re: The Craftsman build  September 29th 2013, 12:19 am September 29th 2013, 12:19 am | |
| The craftsman is now down to the bare frame rails. I then got all the measurements that I needed to design a new frame for it, but when I went to work to buy the angle iron for the frame they kinda made me change my mind on my frame. What happen was- the 2x2 x 1/4 angle iron was $2.75 a foot. I needed about 40ft to make my frame, that's over $100 for metal. Then they told me if I could use the cutoffs we had laying around, then I could just have them. So to keep cost down I'm going to use the cutoff pcs and there is just enough to build 1/2 the frame that I wanted. Since I'm only able to build 1/2 the frame I am now going to use the stock frame too. The stock frame will sit on top of my built frame and if I do it right I don't think it would look to bad. Now here's something strange I found out when I measured out the tractor's frame. For some reason they made the right (pass) side frame rail 1/4in longer than the other. I did trim the rail down to match the other and cleaned both of them up of any unused junk. Now here are some pics of it down to the bare frame and the little pc I had to cut off. The pics of the wheels are the ones I will be using the silver ones are for the rear, they are 12in and the stock ones off the tractor. The rusty white ones are for the front, they are 10in and they were the stock rear ones off of my Allis Chalmers. The last pic is just something that's stamped on the rear rims- I thought it was fitting.   " />  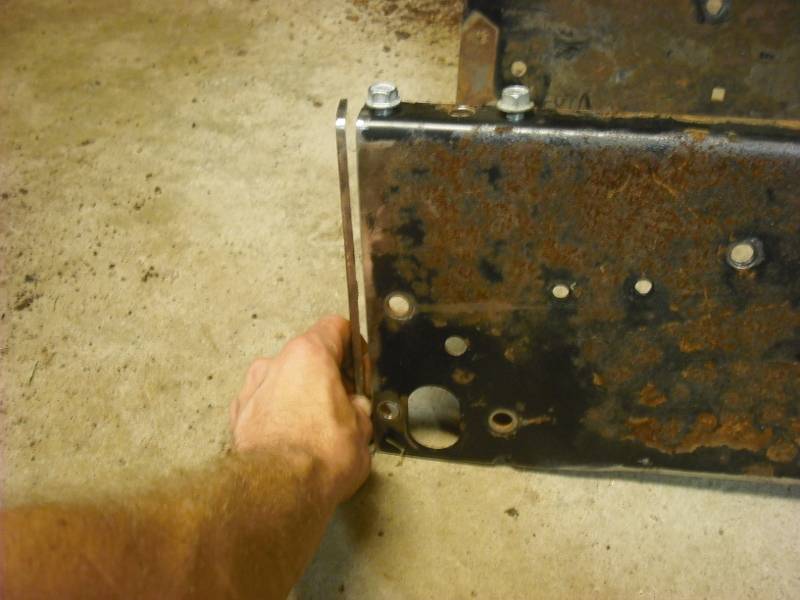 " />   " />   " /> | |
|
  | |
Doc Sprocket
Site VIP

2018 Build-Off Entrant
2018 Build-Off Entrant
2021 Winner of Winners
2021 Winner of Winners
1st Place Build-Off 2016
1st Place Build-Off Winner 2016
Age : 51
Join date : 2013-04-21
Points : 7318
Posts : 2914
Location : Ontario Canada
 |  Subject: Re: The Craftsman build Subject: Re: The Craftsman build  September 29th 2013, 12:46 am September 29th 2013, 12:46 am | |
| Well, it certainly looks like you've got your work cut out for you! With the frame-on-frame design, how much lift do you figure you'll gain over stock?
As your building this for snow removal (amongst other things) what are you doing to improve traction? Locked diff, chains, wheel weights, loaded tires, maybe all of the above? | |
|
  | |
FOSWMT
Member

Join date : 2013-07-28
Points : 4329
Posts : 163
 |  Subject: Re: The Craftsman build Subject: Re: The Craftsman build  September 29th 2013, 5:59 am September 29th 2013, 5:59 am | |
| - Doc Sprocket wrote:
- Well, it certainly looks like you've got your work cut out for you! With the frame-on-frame design, how much lift do you figure you'll gain over stock?
As your building this for snow removal (amongst other things) what are you doing to improve traction? Locked diff, chains, wheel weights, loaded tires, maybe all of the above? Doc I have seen snow plough parts on ebay they are big wallet bucks I have no idea why. I have also seen people make them from boiler parts low cost. You told mudstr you need traction more . Will the standard MTD with V tyres on rear not handle the snow and push a plough through in low gear in low gear ? Is this why peole on utube are using ploughs with a cutting blade and blower? | |
|
  | |
Doc Sprocket
Site VIP


2018 Build-Off Entrant
2018 Build-Off Entrant
2021 Winner of Winners
2021 Winner of Winners
1st Place Build-Off 2016
1st Place Build-Off Winner 2016
Age : 51
Join date : 2013-04-21
Points : 7318
Posts : 2914
Location : Ontario Canada
 |  Subject: Re: The Craftsman build Subject: Re: The Craftsman build  September 29th 2013, 11:15 am September 29th 2013, 11:15 am | |
| Simple physics, really. I don't know if you've done any noteworthy snow removal, but it works like this:
A heavy load of wet snow (especially) pinned to the front of a tractor throws the weight bias way forward and can actually remove weight from the rear tires. Many methods are employed to counter this, most of them coming down to adding weight over the rear, tractive tires. | |
|
  | |
muddstir
Member


2018 Build-Off Entrant
2018 Build-Off Entrant
Join date : 2012-01-22
Points : 5037
Posts : 318
Location : Western,PA
 |  Subject: Re: The Craftsman build Subject: Re: The Craftsman build  September 29th 2013, 3:42 pm September 29th 2013, 3:42 pm | |
| - Doc Sprocket wrote:
- Well, it certainly looks like you've got your work cut out for you! With the frame-on-frame design, how much lift do you figure you'll gain over stock?
As your building this for snow removal (amongst other things) what are you doing to improve traction? Locked diff, chains, wheel weights, loaded tires, maybe all of the above? The lift will be around 4in on the front and 5 1/2 in on the rear. I even it out with different tire sizes. I will be locking the diff, I am also putting some meaty tires on the rear. I want to try to keep it light for summer use but I will be making some weight bars for the rear. I'm not sure how much weight will be needed but I know ill need it. My plow is made from 1/8in stainless steel plate and weighs around 125lbs (yes its overkill for the snow we get around here but it will never rust.) I am also moving the front axle beam ahead 3in, that should help a lot too. | |
|
  | |
muddstir
Member


2018 Build-Off Entrant
2018 Build-Off Entrant
Join date : 2012-01-22
Points : 5037
Posts : 318
Location : Western,PA
 |  Subject: Re: The Craftsman build Subject: Re: The Craftsman build  October 4th 2013, 8:05 pm October 4th 2013, 8:05 pm | |
| Just found out that the rims I was going to use for the front are not going to work (they were the rusty ones anyway).
My tires came in and the front ones will need a 5in wide rim to be mounted on, these rims measured 6 1/2in wide. So I found some new ones on the net for $31.00,their just plain old steel ones.
But now I know what rims ill be using for my trailer build - (after the tractor is finished.) | |
|
  | |
muddstir
Member


2018 Build-Off Entrant
2018 Build-Off Entrant
Join date : 2012-01-22
Points : 5037
Posts : 318
Location : Western,PA
 |  Subject: Re: The Craftsman build Subject: Re: The Craftsman build  October 13th 2013, 1:05 am October 13th 2013, 1:05 am | |
| Small update - I got all the pcs of angle cut, fitted and welded for my frame. Now I got like 2 days of grinding ahead of me, then i'll have to start notching the frame to clear all the brackets and such.
So as soon as I find the battery for the camera I can get some pics put up of it.
Some other stuff I been doing -
Sand blasted the crappy wheels that i'm not using for this build
Brain storming on a front axle beam design
shopping the internet for a motor (any suggestions) | |
|
  | |
richie thomas
Veteran Member


2014 Build-Off Entrant
2014 Build-Off Entrant
Age : 29
Join date : 2011-08-04
Points : 6400
Posts : 1434
Location : east dublin georgia
 |  Subject: Re: The Craftsman build Subject: Re: The Craftsman build  October 13th 2013, 1:23 am October 13th 2013, 1:23 am | |
| i bought one of these tranny's a few days ago,can you get a pic of the H where the shifter comes out for me so i can know how to mark the shift nob, i forgot to look and dont know which is which gear lol, also, the high/lo lever, when it is pushed in on the tranny is it in low or high? because mine doesn't want to work right when it is pushed in | |
|
  | |
muddstir
Member


2018 Build-Off Entrant
2018 Build-Off Entrant
Join date : 2012-01-22
Points : 5037
Posts : 318
Location : Western,PA
 |  Subject: Re: The Craftsman build Subject: Re: The Craftsman build  October 28th 2013, 12:03 am October 28th 2013, 12:03 am | |
| I got most of the new frame done except for the rear winch mount and some crossmembers and odd mounts and stuff. I should have bought complete lengths of angle iron rather than weld all kind of scrap pieces together, would have been done weeks ago then. If my memory is right I have 36 pcs of metal in this frame as it sits now. I sat it on the scale at work and it read 107 lbs, so that frame costed me a $20 dollar bill. There is 2x2 x 1/4in angle, 1/4 in plate steel, 2x4 x 1/8 rec tube, and the old hitch plate off of the tractor welded in to make this frame. Where there is any hook up spot on this frame I ended up doubling it so the mount is now 1/2in thick. Here is the pics The first one is of the rear hitch area I made two different spots to hook up to, then the 1in diameter holes on the side is for the rototiller hook up. The second one is of the front where the snowplow will hook up, and where the winch will bolt to. The third is a side shot to get the overall look of the frame The fourth is another side shot The fifth is to show some of the angle iron   " />   " />   " />   " />   " /> | |
|
  | |
Stretch44875
Administrator

Age : 49
Join date : 2012-04-05
Points : 5701
Posts : 959
Location : Mansfield, Ohio
 | |
  | |
Doc Sprocket
Site VIP


2018 Build-Off Entrant
2018 Build-Off Entrant
2021 Winner of Winners
2021 Winner of Winners
1st Place Build-Off 2016
1st Place Build-Off Winner 2016
Age : 51
Join date : 2013-04-21
Points : 7318
Posts : 2914
Location : Ontario Canada
 |  Subject: Re: The Craftsman build Subject: Re: The Craftsman build  October 28th 2013, 6:03 pm October 28th 2013, 6:03 pm | |
| Boy- when you build a frame, you don't fool around, do you? Nicely done! | |
|
  | |
willis923
Veteran Member


Age : 28
Join date : 2013-04-10
Points : 5761
Posts : 1408
Location : Galway NY
 |  Subject: Re: The Craftsman build Subject: Re: The Craftsman build  October 28th 2013, 6:32 pm October 28th 2013, 6:32 pm | |
| one word- tank.. for an engine, id go with an opposed or a 20+ v-twin.. i believe the engine that came on that tractor was an 18 oppy. my dads gf has a newer version, same tranny, with a 22 horse kohler pro. | |
|
  | |
muddstir
Member


2018 Build-Off Entrant
2018 Build-Off Entrant
Join date : 2012-01-22
Points : 5037
Posts : 318
Location : Western,PA
 |  Subject: Re: The Craftsman build Subject: Re: The Craftsman build  October 31st 2013, 6:19 pm October 31st 2013, 6:19 pm | |
| Stretch44875
Mon Oct 28, 2013 8:01 am
--------------------------------------------------------------------------------
Looking pretty. That's a lot of welding.
Thanks, It was but I bet the grinding was twice as long
Doc Sprocket
Mon Oct 28, 2013 6:03 pm
--------------------------------------------------------------------------------
Boy- when you build a frame, you don't fool around, do you? Nicely done!
Thanks, I want to build it once and make it last my life time, and I been known to over due it.
willis923
Mon Oct 28, 2013 6:32 pm
--------------------------------------------------------------------------------
one word- tank.. for an engine, id go with an opposed or a 20+ v-twin.. i believe the engine that came on that tractor was an 18 oppy. my dads gf has a newer version, same tranny, with a 22 horse kohler pro.
Yep they had 18's on them but this one didn't come with a motor. I been looking at a 23hp Honda v-twin but the price is stopping me right now. | |
|
  | |
muddstir
Member


2018 Build-Off Entrant
2018 Build-Off Entrant
Join date : 2012-01-22
Points : 5037
Posts : 318
Location : Western,PA
 |  Subject: Re: The Craftsman build Subject: Re: The Craftsman build  November 10th 2013, 11:13 pm November 10th 2013, 11:13 pm | |
| This is what it looks like with both frames together. Still need front rims to come in so I can see the stance before I connect the steering up. will do body positioning after that, then stuff a motor in it.   " /> | |
|
  | |
richie thomas
Veteran Member


2014 Build-Off Entrant
2014 Build-Off Entrant
Age : 29
Join date : 2011-08-04
Points : 6400
Posts : 1434
Location : east dublin georgia
 |  Subject: Re: The Craftsman build Subject: Re: The Craftsman build  November 10th 2013, 11:32 pm November 10th 2013, 11:32 pm | |
| just hazarding a guess, fro what i can se it has around 8 inches of liift? that what it looks like in that pic lol, anyway, it looks damn good | |
|
  | |
muddstir
Member


2018 Build-Off Entrant
2018 Build-Off Entrant
Join date : 2012-01-22
Points : 5037
Posts : 318
Location : Western,PA
 |  Subject: Re: The Craftsman build Subject: Re: The Craftsman build  November 10th 2013, 11:45 pm November 10th 2013, 11:45 pm | |
| Thanks Richie, the pic does make it look taller than it is. The front end is to chunks of 2in wide angle iron welded together so its got 4in of lift, and the rear is three chunks of 2in wide angle iron welded together so there is six but I drilled half way up the last pc of angle for transaxle mounts so I lost an inch there and I cut the old trans mounts off of the org. frame so I lost another 1/2in there so that puts me down the 4 1/2 in the rear. | |
|
  | |
k2500life
Veteran Member


Age : 27
Join date : 2013-06-19
Points : 5371
Posts : 1135
Location : Southern Florida
 | |
  | |
muddstir
Member


2018 Build-Off Entrant
2018 Build-Off Entrant
Join date : 2012-01-22
Points : 5037
Posts : 318
Location : Western,PA
 |  Subject: Re: The Craftsman build Subject: Re: The Craftsman build  November 14th 2013, 10:33 pm November 14th 2013, 10:33 pm | |
| The big brown truck made a stop at my place today.  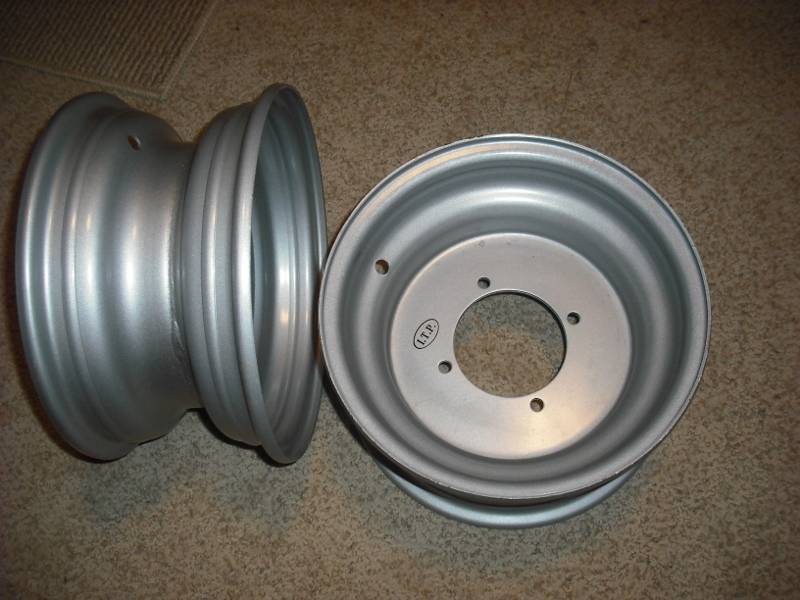 " /> Those are my new front rims, 10in x 5in with 4 on 110mm bolt pattern. Now that there here I'll be able to get them blasted, then its on to some hub fabb'in. | |
|
  | |
muddstir
Member


2018 Build-Off Entrant
2018 Build-Off Entrant
Join date : 2012-01-22
Points : 5037
Posts : 318
Location : Western,PA
 |  Subject: Re: The Craftsman build Subject: Re: The Craftsman build  November 27th 2013, 11:24 pm November 27th 2013, 11:24 pm | |
| Got a few more things ordered today but it will probably take longer to get because of the holiday.
I got some 7/16 rod ends for the tie rods and new bronze bushings for the front axle beam. When the bushings come in I'll post my pics of the front end rebuild. | |
|
  | |
Thunderdivine
Veteran Member


Join date : 2012-12-21
Points : 6543
Posts : 2101
Location : Norway, Europe
 | |
  | |
muddstir
Member


2018 Build-Off Entrant
2018 Build-Off Entrant
Join date : 2012-01-22
Points : 5037
Posts : 318
Location : Western,PA
 |  Subject: Re: The Craftsman build Subject: Re: The Craftsman build  December 9th 2014, 9:17 am December 9th 2014, 9:17 am | |
| Time is freeing up for me now so its time to get back at this.
Nothing has been touched on this since my last post (over a year ago), so i need to pickup where i left off.
#1: I need to dig it out of the corner of the garage and blow the dust off.
#2: Got some work to do to the rims then sand blast them.
#3: Need to make some front hubs for the 110mm bolt pattern.
#4: Reinforce front axle beam then rebuild it.
#5: Sand blast the front axle beam and mount.
#6: Assemble front with tires on to see if tires clear all objects at full turns.
#7: Make rear wheel spacers to equal up footprint with front.
#8: Finish up front winch mount.
#9: Make rear winch mount.
#10: Get a motor for it.
This list is just a start there is more to do after all this gets done. | |
|
  | |
Sponsored content
 | |
  | |
| | The Craftsman build |  |
|


