|
| | Briggs 5hp Flat head build |  |
|
+5RichieRichOverdrive TheBeal Lawren Wimberly prancstaman mr.modified 9 posters | |
| Author | Message |
|---|
mr.modified
Veteran Member

2015 Build-Off Top 3 Winner
2015 Build-Off Top 3 Winner
2016 Build-Off Top 3 Winner
2016 Build-Off Top 3 Winner
2018 Build-Off Finalist
2018 Build-Off Finalist
2022 Build-Off Entrant
2022 Build-Off Entrant
1st Place Build-Off 2014
1st Place Build-Off Winner 2014
2023 Build-Off Entrant
2023 Build-Off Entrant
Join date : 2013-11-02
Posts : 2910
 |  Subject: Re: Briggs 5hp Flat head build Subject: Re: Briggs 5hp Flat head build  September 11th 2017, 9:57 pm September 11th 2017, 9:57 pm | |
| Thanks. I just thought about the pistons today and the engine I want to build first is an aluminum bore. I think the raptor pistons are only for cast iron sleeve bores as they don't have a chrome finish as far as I know. So for this engine I should probably use the stock piston. The current engine sat outside at doug facklers for who knows how long and had water in it. Aluminum bore and when I took it apart, the dipper had broken off from someone running it at high rpm I would assume. I'm planning on lightening the valves, Lightened cam with the holes but stock lobes, stock piston that came from this engine, raptor 3 rod (which is pretty much a stock rod with a cast in dipper) milled head and a billet intake. The idea is to just use it to test out the handling of the bike and get the exhaust and everything working. I ordered a cheap centrifugal clutch. When that comes in and the engine is put together, I can line up the chain and drill mounting holes in the mini bike frame. Practice Tecumseh head, took off maybe an 1/8" and turned out nice and smooth. The swirl marks are deceiving but it's flat 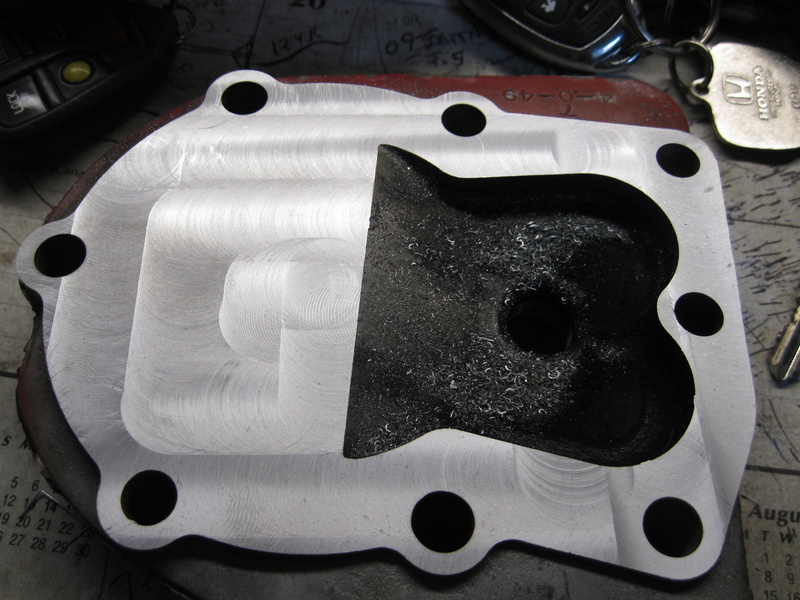 I used a mill vice for the tecumseh head, but the 5hp briggs is too big and won't fit. So I have to clamp it to the table instead. I never did any of this kind of thing before so I'm just figuring things out as I go. So far I didn't break anything.  Head clamped to the table. I'll have to be more careful this time to not hit the clamps, with the tecumseh head they weren't in the way since I used the vice. Eventually I'll get a video of the operation. 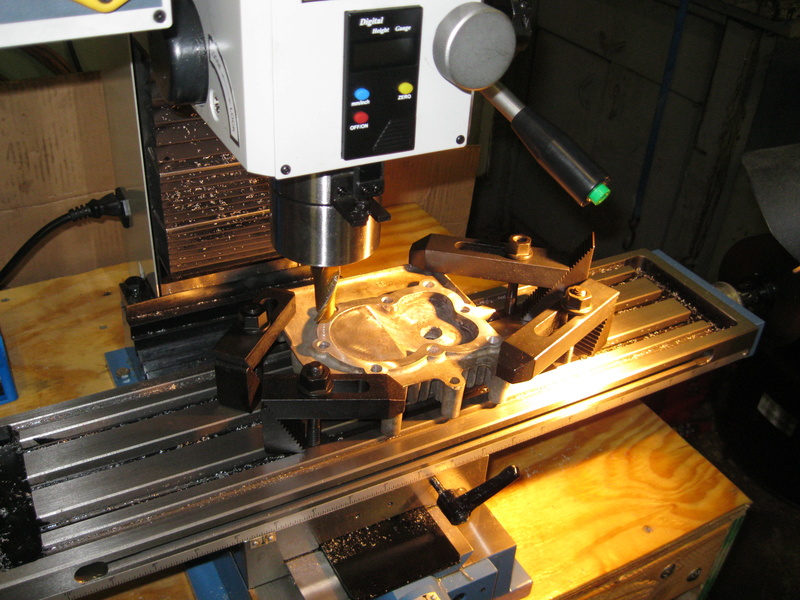 The bit I am using now is the biggest one I have at the moment. Most people just use a fly cutter and make one pass across the whole head. This works good enough to use it, just takes a bit longer. 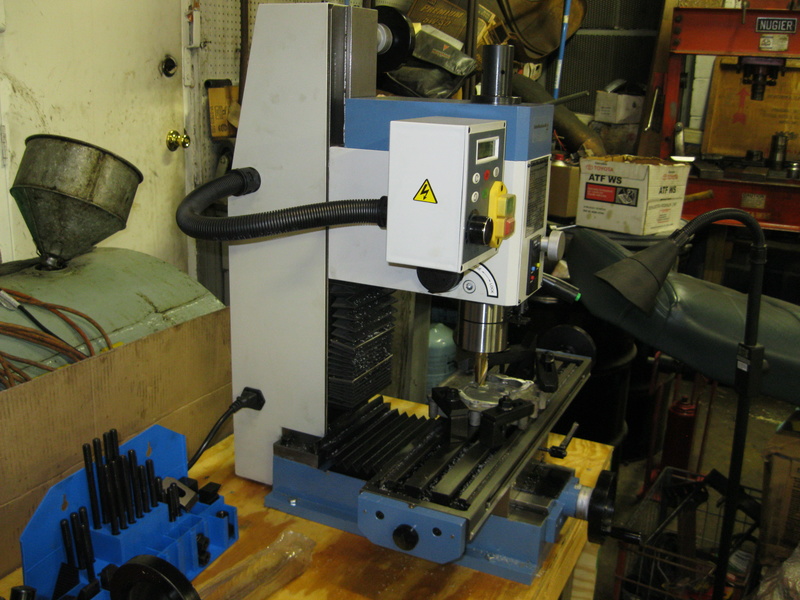 | |
|   | | mr.modified
Veteran Member


2015 Build-Off Top 3 Winner
2015 Build-Off Top 3 Winner
2016 Build-Off Top 3 Winner
2016 Build-Off Top 3 Winner
2018 Build-Off Finalist
2018 Build-Off Finalist
2022 Build-Off Entrant
2022 Build-Off Entrant
1st Place Build-Off 2014
1st Place Build-Off Winner 2014
2023 Build-Off Entrant
2023 Build-Off Entrant
Age : 34
Join date : 2013-11-02
Points : 7171
Posts : 2910
Location : New Jersey USA
 |  Subject: Re: Briggs 5hp Flat head build Subject: Re: Briggs 5hp Flat head build  September 13th 2017, 9:45 pm September 13th 2017, 9:45 pm | |
| Decided to mill reliefs for the valves first before I mill the head down. 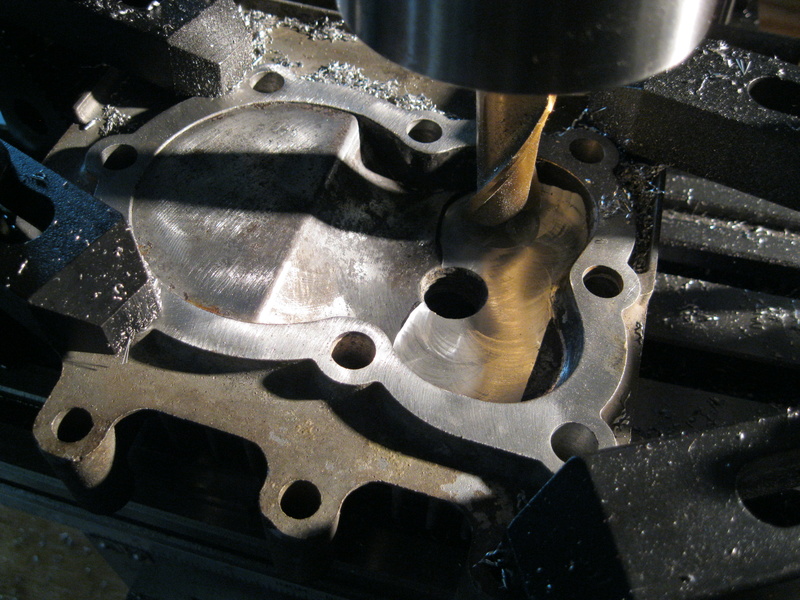 The valves are on a slight angle so I blocked the head at the same angle to cut the space for the valves. Trying to keep everything as tight as I can to keep the compression up.  I could probably get closer around the valves but I'll try it this way first. I have other heads I can use if I need to.  I think I will go a little deeper than this, then I will blend the corners and edges back in by hand with a grinder. I have a low profile spark plug to use also.  | |
|   | | MightyRaze
Administrator


2017 Build-Off Finalist
2017 Build-Off Finalist
2018 Build-Off Top 3 Winner
2018 Build-Off Top 3 Winner
2019 Build-Off Top 3 Winner
2019 Build-Off Top 3 Winner
2021 Winner of Winners
2021 Winner of Winners
1st Place Build-Off 2022
1st Place Build-Off Winner 2022
10,000 POSTS!
10,000 POSTS!
2024 Build-Off Entrant
2024 Build-Off Entrant
Age : 49
Join date : 2016-09-06
Points : 15678
Posts : 10988
Location : Oklahoma
 |  Subject: Re: Briggs 5hp Flat head build Subject: Re: Briggs 5hp Flat head build  September 13th 2017, 9:57 pm September 13th 2017, 9:57 pm | |
| Man that looks nice. I bet it is nice to have tools like that you can use. I would love to have had machine shop when I was younger and know how to use that stuff. | |
|   | | Dave.MTD
Member


Age : 24
Join date : 2017-01-11
Points : 2912
Posts : 37
Location : Hamilton, Ontario
 |  Subject: Re: Briggs 5hp Flat head build Subject: Re: Briggs 5hp Flat head build  September 13th 2017, 10:51 pm September 13th 2017, 10:51 pm | |
| Looks like a lot of fun! Great looking work too!
Now if only I had that in my garage... | |
|   | | TheBeal
Veteran Member


Age : 30
Join date : 2013-06-06
Points : 5719
Posts : 1402
Location : Central PA
 | |   | | mr.modified
Veteran Member


2015 Build-Off Top 3 Winner
2015 Build-Off Top 3 Winner
2016 Build-Off Top 3 Winner
2016 Build-Off Top 3 Winner
2018 Build-Off Finalist
2018 Build-Off Finalist
2022 Build-Off Entrant
2022 Build-Off Entrant
1st Place Build-Off 2014
1st Place Build-Off Winner 2014
2023 Build-Off Entrant
2023 Build-Off Entrant
Age : 34
Join date : 2013-11-02
Points : 7171
Posts : 2910
Location : New Jersey USA
 |  Subject: Re: Briggs 5hp Flat head build Subject: Re: Briggs 5hp Flat head build  September 15th 2017, 8:29 pm September 15th 2017, 8:29 pm | |
| Thanks, I just got it with one of those mini lathes. Been wanting one for awhile to experiment with stuff. So far I didn't break anything or cut off any fingers so it's going good. This pic shows how much of the head is being removed. It's about .1" If there's any better way to say .1" I don't know, but anyway, you can see it's a decent amount. I roughly measured how much I removed from the valves and I took slightly less off the gasket surface. So once the engine is assembled with the cam I can do more checking. It may be that there is actually clearance enough to remove even more from the head. Or...If I messed up my measuring, the valves will hit and I will have to carefully remove more above the valves. It's getting thin in that area though, so hopefully not.  Stock head and modified head side by side. 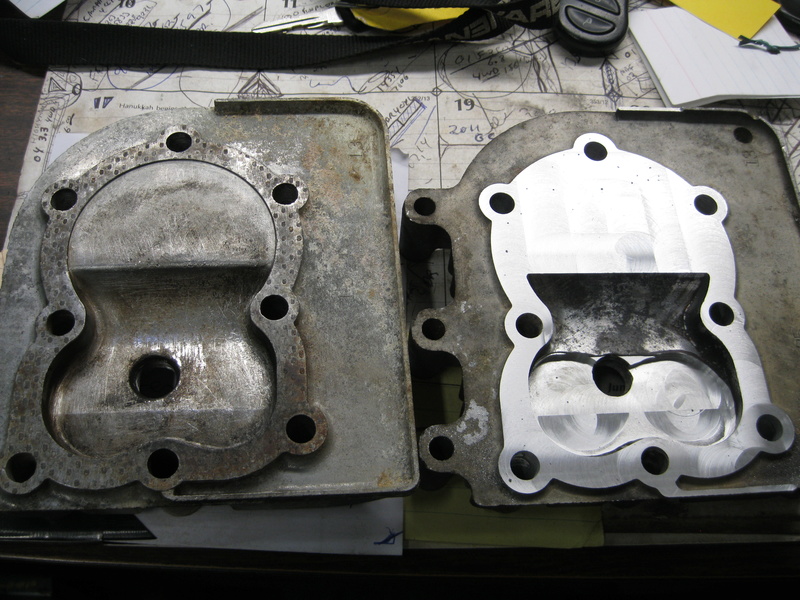 I still need to smooth out the sharp edges and especially blend the area I cut out for the valves into the rest of the combustion chamber. There's a serious "step" that I will round off. But for the most part it should be good to try out. 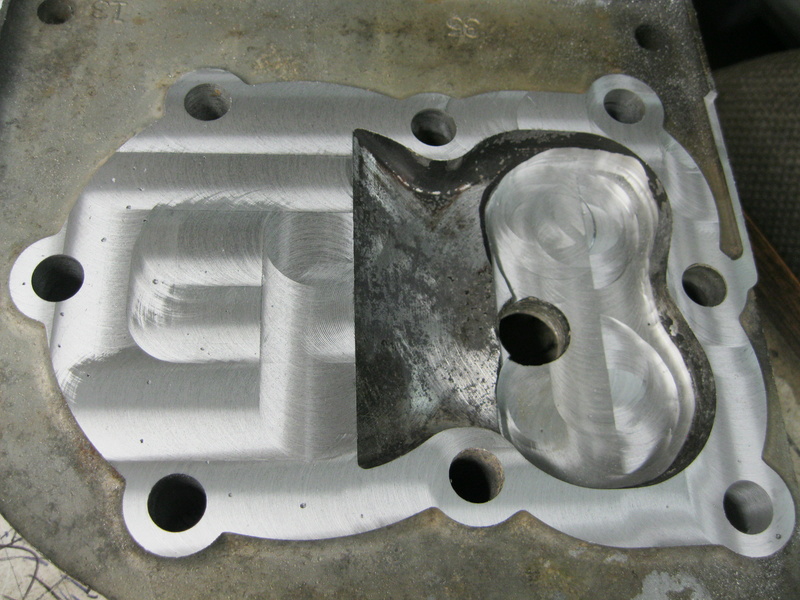 | |
|   | | AllisKidD21
Moderator


2020 Build-Off Entrant
2020 Build-Off Entrant
1st Place Build-Off 2019
1st Place Build-Off Winner 2019
Age : 25
Join date : 2016-07-10
Points : 8589
Posts : 5190
Location : Ontario Canada
 |  Subject: Re: Briggs 5hp Flat head build Subject: Re: Briggs 5hp Flat head build  September 15th 2017, 8:38 pm September 15th 2017, 8:38 pm | |
| Nice work mr.mod! She'll probably be quite a pull with that kinda compression! Hahaha.  "This'll either wake you up or put you to sleep forever!"- Red Green "Whatever you do you should do right, even if it's something wrong." - Hank Hill - MTD Off-Road Build
- Ford LT 110 Off-Road Build
- Craftsman GT 6000 Off-Road Build
- Sears LT11 Rat Rod Build *2019 Build-Off Winner!* Garden Tractor Collection: Allis B-110 x2, 710, 716, & 410 - Wheel Horse 655, 953 & 500 Special - Case 444 - Bolens Versamatic, G10 & 1668 Diesel Swapped - Cub 106, 124 & 1000/149 Frankentractor - Ford 120, LGT 125 & 145 - White 1650 Yard Boss - Moto Mower 710-100 | |
|   | | RichieRichOverdrive
Moderator


2018 Build-Off Entrant
2018 Build-Off Entrant
2024 Build-Off Entrant
2024 Build-Off Entrant
Age : 22
Join date : 2016-10-29
Points : 7224
Posts : 4021
Location : Lewisburg, KY
 |  Subject: Re: Briggs 5hp Flat head build Subject: Re: Briggs 5hp Flat head build  September 15th 2017, 8:41 pm September 15th 2017, 8:41 pm | |
| I bet she's gonna have a lot of compression! Also .1" would be .100"(100 thou) in machinist terms. Everything stays in thou. | |
|   | | MightyRaze
Administrator


2017 Build-Off Finalist
2017 Build-Off Finalist
2018 Build-Off Top 3 Winner
2018 Build-Off Top 3 Winner
2019 Build-Off Top 3 Winner
2019 Build-Off Top 3 Winner
2021 Winner of Winners
2021 Winner of Winners
1st Place Build-Off 2022
1st Place Build-Off Winner 2022
10,000 POSTS!
10,000 POSTS!
2024 Build-Off Entrant
2024 Build-Off Entrant
Age : 49
Join date : 2016-09-06
Points : 15678
Posts : 10988
Location : Oklahoma
 |  Subject: Re: Briggs 5hp Flat head build Subject: Re: Briggs 5hp Flat head build  September 15th 2017, 10:53 pm September 15th 2017, 10:53 pm | |
| I know you said you need to smooth it out, but did you get a nic near that top center screw in the picture? If so, may need to be careful in that area. Looks good. | |
|   | | mr.modified
Veteran Member


2015 Build-Off Top 3 Winner
2015 Build-Off Top 3 Winner
2016 Build-Off Top 3 Winner
2016 Build-Off Top 3 Winner
2018 Build-Off Finalist
2018 Build-Off Finalist
2022 Build-Off Entrant
2022 Build-Off Entrant
1st Place Build-Off 2014
1st Place Build-Off Winner 2014
2023 Build-Off Entrant
2023 Build-Off Entrant
Age : 34
Join date : 2013-11-02
Points : 7171
Posts : 2910
Location : New Jersey USA
 |  Subject: Re: Briggs 5hp Flat head build Subject: Re: Briggs 5hp Flat head build  September 16th 2017, 11:20 am September 16th 2017, 11:20 am | |
| Thanks, and that's what i thought .100"
As for the nick, I don't think there is any serious gouges or anything no, but the milling machine does leave some swirl patterns which show up weird in different lights and on camera. I did run into a decent amount of air holes in the casting as you can see in the pic, but it shouldn't be an issue. | |
|   | | TheBeal
Veteran Member


Age : 30
Join date : 2013-06-06
Points : 5719
Posts : 1402
Location : Central PA
 |  Subject: Re: Briggs 5hp Flat head build Subject: Re: Briggs 5hp Flat head build  September 17th 2017, 11:29 am September 17th 2017, 11:29 am | |
| A piece of glass and lapping compound will take care of the surface finish left my the mill!
I mean, that is if you have several hours to spare... lol
{EDIT} Atleast, it would be neat to see how level your milling is.
Did you check to see how square the table is with the spindle? | |
|   | | prancstaman
Veteran Member


Join date : 2015-02-02
Points : 5098
Posts : 1412
Location : Cleveland,Ohio
 |  Subject: Re: Briggs 5hp Flat head build Subject: Re: Briggs 5hp Flat head build  September 17th 2017, 9:46 pm September 17th 2017, 9:46 pm | |
| I play with milling machines at work, manual lathe, bridgeport mills, CNC's. Monsters compared to that table top mill. Anywho, That finish is pretty typical with the swirl marks and your pattern of swirl marks. There is no concern with how it came out, should seal up real nice. Those pits you uncovered are pretty typical too of cast parts being milled. Only way to not get the pits is by a good piece of billet aluminum, that is even hard to come by these days too.
I can give you some pointers on deck milling.
First, to check your work, just slide a clean fine tooth file across the surface once or twice, this will show the high and low spots of the surface to read it. It will stick out like a sore thumb, if you got an issue with the mill or you just have an end mill cutter with a ruff edge.
Second, it would come out looking better if you use a cutter bigger then the work area being decked, but that can get expensive, so the biggest cutter you got should be used with as little passes as possible being done. (this is just for looks). It will still come out flat no matter what you use.
Third, this will make your end mill cutter last and stay sharp. Ideally, you want a cutter that is twice as big as the widest area you are cutting. Like I mentioned before, this can get expensive real fast, so an alternative done by the pro's would be the biggest cutter you got with multiple passes can be used. For example, if your surface area being milled is 2 inches wide at the most, and you have a 1 inch end mill, a total of 4 passes should be made. You want to cut into the surface a 1/2 inch at a time with each pass and cutting into the part only(this matters). Yes, you are using only half of the end mill to cut. This saves the tool for a couple of reasons. By cutting with half of the tool, you are only cutting into the part and using the other half of the tool to carry out the metal away from the bit to keep the chips from getting cut a second time. With manual mills, you only want to cut going into the part. Cutting going into the part and away from the part is real ruff on the cutter because of the speed. CNC's are the exception, because they can spin really fast and with a lube for cooling the cutter and carry the cut metal away.
Next is the pattern of the cutting using your cyl. head for an example. using multiple passes going in straight lines swiping the total part in 1/2 inch cuts using a 1 inch end mill would make it look good and keep the end mill sharp. Keep in mind, you want to completely swipe the part, even across the open area for the chamber to get the other side cut not deviating from pattern. Plus, cutting, then stopping, then cutting, you can see when you stop and start. A nice even movement would make it look nice too.
Sure, some areas you just can't help but hog out the part, like the valve area. Where you have to come down into the part and just start cutting. these are the times where you see the limits of the machine, finding the slop in the table when it shifts on its own by cutting. Plan for this because this is when you chip or break the cutter. To combat this is simple. Start in the center and work your way out. The idea is to move the table in a way that the slop is always in front of your cutting. This can get tricky by moving around but this is where experience and planning of movements come in handy, because going straight ahead then cutting to the left is different then cutting to the right. Cutting to the left from a straight cut keeps the slop in front of you to where cutting to the right from a straight cut puts the slop behind you and will shift the table. I know, in the pic it looks like a pretty new machine, but trust me, even a 1/4 million dollar CNC has a little bit of slop in the table, even if it's .002", that's alot and should be planed for.
Hope it helps on your next venture. | |
|   | | mr.modified
Veteran Member


2015 Build-Off Top 3 Winner
2015 Build-Off Top 3 Winner
2016 Build-Off Top 3 Winner
2016 Build-Off Top 3 Winner
2018 Build-Off Finalist
2018 Build-Off Finalist
2022 Build-Off Entrant
2022 Build-Off Entrant
1st Place Build-Off 2014
1st Place Build-Off Winner 2014
2023 Build-Off Entrant
2023 Build-Off Entrant
Age : 34
Join date : 2013-11-02
Points : 7171
Posts : 2910
Location : New Jersey USA
 |  Subject: Re: Briggs 5hp Flat head build Subject: Re: Briggs 5hp Flat head build  September 18th 2017, 8:47 pm September 18th 2017, 8:47 pm | |
| Thanks people. No I didn't do much checking to see if the table was square to the spindle. But I don't know that there would be much way to correct it anyway if it was off. Not that I know of anyway.
And thanks for the info Prancstaman, I did watch a few youtube videos talking about climb milling vs conventional milling and what you said about the slop in the table. I'm trying to go slow with things and be careful so I don't bust things up too bad until I get used to doing it.
What I am curious about is what kind of tool would I need to cut a small size hole of an exact diameter. For example, I want to make connecting rods and pistons. I need to cut out the big end of the rod and also the wrist pin holes. There must be some kind of tool for that. I have seen a boring tool for 2" holes, but obviously I am looking to do really small holes for things like wrist pins. What do I need for something like that? | |
|   | | prancstaman
Veteran Member


Join date : 2015-02-02
Points : 5098
Posts : 1412
Location : Cleveland,Ohio
 |  Subject: Re: Briggs 5hp Flat head build Subject: Re: Briggs 5hp Flat head build  September 19th 2017, 1:01 am September 19th 2017, 1:01 am | |
| Yah, no problemo. A connecting rod. I was thinking about that the other day. We got scrap aluminum blocks just laying around the shop, billet blocks at that but I need someone to program the CNC to make it and that guy usually doesn't come to the shop unless he has to, LOL.
OK, Depends how you are making the connecting rod. I'll use an aluminum rod like the stock rod without bearing inserts. You want to have the end cap bolted onto the blank, deck both sides so the bolts center the cap with the rest of the rod by the bolts at the right thickness. Mark your centers, ofcourse the center on the big end will be in the center line of the bolted cap and the rod blank, then the pin end. A center punch would do. To make a precise hole, You need a drill bit that is around 3 to 4 thousandths smaller then the size you need. Drill bits are only good for removing metal, not for a precise hole. You need a cylinder hone for the final hole. It's not like scraping the cylinder with stones to get a cross hatch in the wall. It looks almost like a drill bit or end mill but with a round tip and straight flutes, and the edges of the flutes are your cutters of the final size of the hole. You will only be cutting off the 3 to 4 thousandths with the cylinder hone. Cutting any more and it will clog the flutes and ruin the hole or break inside the hole and ruin it. I'll try to get a pic of the one at work we use to use to hone the bores for our waterpump bearings. It leaves a smooth bore too. Some of the bigger ones are adjustable by around .010" with a bolt in the center to spread out the flutes some for fine tuning. A drill bit might work, if you can get one the exact size you need or a thoundth or 2 smaller and hone it out with sandpaper by hand, but cutting a drill bit to a certain size or even an end mill a certain size is real expensive.
Go to your local machine shop supplier for these tools. He will have everything in stock or can have it custom made for a price. I think to have a drill bit cut to a certain size is around $50 here plus the price of the drill bit. Wouldn't try to use an end mill though, it would walk around starting the hole.
Best bet if using a drill bit would be to get it 1 to 2 thousandths smaller then the hole needed and then get some thousand grit sand paper with oil on it and hone it to the size needed, will even polish the hole too doing it. It will just take a long while to do but can be done.
I'll try to get a pic of the hone tomorrow for you, so you know what to look for. | |
|   | | mr.modified
Veteran Member


2015 Build-Off Top 3 Winner
2015 Build-Off Top 3 Winner
2016 Build-Off Top 3 Winner
2016 Build-Off Top 3 Winner
2018 Build-Off Finalist
2018 Build-Off Finalist
2022 Build-Off Entrant
2022 Build-Off Entrant
1st Place Build-Off 2014
1st Place Build-Off Winner 2014
2023 Build-Off Entrant
2023 Build-Off Entrant
Age : 34
Join date : 2013-11-02
Points : 7171
Posts : 2910
Location : New Jersey USA
 | |   | | prancstaman
Veteran Member


Join date : 2015-02-02
Points : 5098
Posts : 1412
Location : Cleveland,Ohio
 | |   | | prancstaman
Veteran Member


Join date : 2015-02-02
Points : 5098
Posts : 1412
Location : Cleveland,Ohio
 |  Subject: Tooling for precise holes Subject: Tooling for precise holes  September 20th 2017, 8:39 pm September 20th 2017, 8:39 pm | |
| OK Mr.modified, Here are the tooling for what you are asking. How to make a precise hole. Sounds so simple  So these tools are used for production parts, pretty sure they was used on CNC's but can be used for manual mills with the right collets to mount them in the spindle, these tools anyways. When you go buy them, you tell the guy what tool, size hole you need, and shank size for mounting into collet for the spindle holder. That's if you are buying new from a supplier. This bad boy is called a "Reamer" for final honing of a bearing bore of 1.498" for a waterpump bearing of a diameter of 1.5" big. This tool did hundreds of pumps for production and is able to be adjusted, I think around .010" + or - ,maybe more. The thing attached to it is a tool holder for a CNC spindle. The shank is a standard size for the collet being used. Something like this needs coolant for the tool to carry the shavings away, to help cut easier, and to keep the tool sharp. The coolant is water based, around 10% I think that is coolant/90% water. Note the flutes are straight and there is a cut on every other one for the adjuster bolt that is in the center on the tip. To use this tool, the casting had a casting hole that was cut out by a cutter, not a drill bit. The reason for the hole is because a cutter doesn't cut the center of what it is cutting. The cutter would cut the hole to 1.490", the the Reamer would finish the hole to 1.498". The outcome was a smooth dull finish on the bore. I would have taken a pic of that but we don't make pumps anymore (outsourced now). This pic doesn't show how big it is but is huge at over a foot long, weighs about 15 lbs.  Here is the tip of the Reamer with the adjuster screw. There is no lock for the screw, it spins really slow when cutting and goes into the part really slow. The bore it was cutting was about 4 inches long and took around a minute or two to ream out, to give an idea on the speed and feed it cut at. Screw in the bolt to make the bore bigger, screw it out to make smaller.  Here is a smaller Reamer, nonadjustable. Same thing here and basically for all Reamers is that the hole is either cut out or drilled out first to a size that is .010 to .015 smaller then the Reamer's diameter. Then the Reamer is used to finish off the hole. The Reamer is spun slow and the feed rate is slow also. Some kind of coolant should be used also.   OK, after using these Reamers, nothing else needs to be done, part is ready to go. These tools are for precise work which means there is a limit to how many parts they can do. They can be sent out to be resharpened but unless they are adjustable the size of the bore is smaller. Attempting to sharpen them yourself is just wasting time and still will have a smaller diameter bore. The big boy was sharpened twice that I know of and readjusted, and the small one if it dulls then it just gets thrown in the steel scrap bin. I mentioned using a cutter, got a pic of a cutter. These cutters have multiple uses because they have 2 cutting sides. The tip or the bottom, and the side. They have "inserts" on them that do the cutting, and a body with a shank. The inserts are replaceable, so when they dull or chip, you unbolt them and put a new one on. The body, depending how big, can hold as little as one to many inserts and can come in many shapes too. The shank is for mounting into collet for spindle. This one can be used for cutting an existing hole but the cutter can't cut in the center of it because there are no cutters there, reason for saying existing hole that is a certain size too for it to cut a hole. These are also perfect for decking a surface, leaves a nice shiny finish, way better then an end mill. Also can be used for side cutting since the inserts go up the sides of the body. Bad thing about this tool is that it can't be reliable on repeating a bore size because of the inserts. Every time you change an insert, it is in a different spot, plus the inserts might shift while cutting but is rare. They are not the same as a Reamer but are precise in a scents of making one cut. Not good for production on precise work, but on a CNC the tool can be zero'ed out so it can get it's accuracy back. You can do it on a manual mill too but this is where experience comes in. 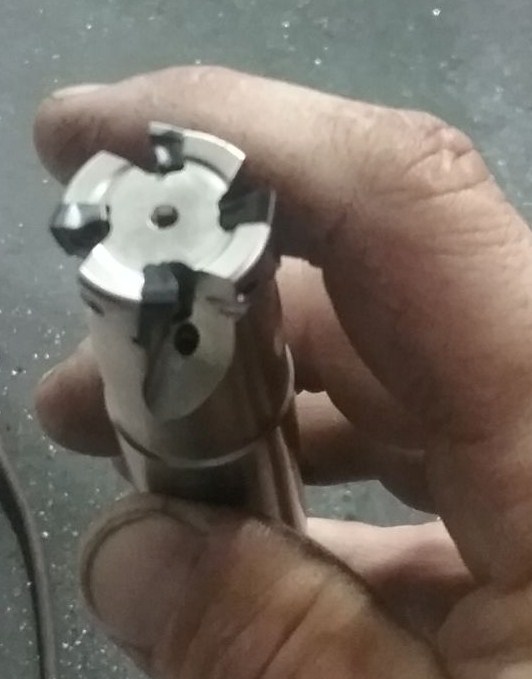 A close up of the inserts. The brass looking pieces with a small torque bolt holding them in place. This is why they are not accurate, because of the tiny torque bolt holding the insert in. The insert just sits on a flat spot and can shift while cutting if you cut too hard loosing your accuracy in the middle of a cut. They are pretty dependable if used right. The end result of a cut is not looking smooth, the machine cut look if you know what that is. Surface will be smooth or rough depending how fast you move. And can be shiny or dull which depends how sharp the inserts are.  OK. That's it. Hope it helps you out. | |
|   | | mr.modified
Veteran Member


2015 Build-Off Top 3 Winner
2015 Build-Off Top 3 Winner
2016 Build-Off Top 3 Winner
2016 Build-Off Top 3 Winner
2018 Build-Off Finalist
2018 Build-Off Finalist
2022 Build-Off Entrant
2022 Build-Off Entrant
1st Place Build-Off 2014
1st Place Build-Off Winner 2014
2023 Build-Off Entrant
2023 Build-Off Entrant
Age : 34
Join date : 2013-11-02
Points : 7171
Posts : 2910
Location : New Jersey USA
 |  Subject: Re: Briggs 5hp Flat head build Subject: Re: Briggs 5hp Flat head build  September 20th 2017, 9:08 pm September 20th 2017, 9:08 pm | |
| Thanks a lot! I'm going to need a really accurate measurement of the holes in a stock rod I guess and go from there. Mostly I want to work on briggs model 5s stuff as far as making pistons and rods. The sizes are definitely much smaller than the tools you have pictured. At least I know what to look for now. I do know of one place not far from where I work that might have this sort of stuff. I have to go that way tomorrow so I'll ask them about it. | |
|   | | prancstaman
Veteran Member


Join date : 2015-02-02
Points : 5098
Posts : 1412
Location : Cleveland,Ohio
 |  Subject: Re: Briggs 5hp Flat head build Subject: Re: Briggs 5hp Flat head build  September 20th 2017, 9:08 pm September 20th 2017, 9:08 pm | |
| Oh, forgot.
If you plan on using a reamer on your manual mill. The steps would be and have to be exact for a good outcome.
1 center punch where the hole will be.
2 spot drill the center punch and lock the table. You can not move the table from this time till you are completely done. You can only lower the spindle and raise the spindle. Otherwise you will loose your center of the hole.
3 drill out hole to specified size for a cutter if used, or for reamer which would be about .010 to .015 smaller then the reamer diameter. If using cutter to enlarge the hole then do it next.
4 ream out the hole. Going slow into the part and adding some kind of coolant.
Yah, if you move the table any after step 2, the table would not be in the same spot, even if you use the gauges on the handles that move the table. The bore would not be straight but would be slanted slightly if the table is moved and then moved back. Raising and lowering the table is OK too, if that is how your Z axes works. Z axes is up and down movement. | |
|   | | prancstaman
Veteran Member


Join date : 2015-02-02
Points : 5098
Posts : 1412
Location : Cleveland,Ohio
 |  Subject: Re: Briggs 5hp Flat head build Subject: Re: Briggs 5hp Flat head build  September 20th 2017, 9:18 pm September 20th 2017, 9:18 pm | |
| - mr.modified wrote:
- Thanks a lot! I'm going to need a really accurate measurement of the holes in a stock rod I guess and go from there. Mostly I want to work on briggs model 5s stuff as far as making pistons and rods. The sizes are definitely much smaller than the tools you have pictured. At least I know what to look for now. I do know of one place not far from where I work that might have this sort of stuff. I have to go that way tomorrow so I'll ask them about it.
Cool. Yah, the place you are looking for is a machine shop supplier. The guy at the counter would know. It's not like walking into a Home Depot or Auto Zone. The sales guy will have machine shop training and probably been doing that job all his life. Bring a piston and a piston rod with you so he can measure it for you. And maybe a crank and piston pin too, LOL. Definitely bring a shop towel too, to wipe the drool off you mouth. LOL. | |
|   | | mr.modified
Veteran Member


2015 Build-Off Top 3 Winner
2015 Build-Off Top 3 Winner
2016 Build-Off Top 3 Winner
2016 Build-Off Top 3 Winner
2018 Build-Off Finalist
2018 Build-Off Finalist
2022 Build-Off Entrant
2022 Build-Off Entrant
1st Place Build-Off 2014
1st Place Build-Off Winner 2014
2023 Build-Off Entrant
2023 Build-Off Entrant
Age : 34
Join date : 2013-11-02
Points : 7171
Posts : 2910
Location : New Jersey USA
 |  Subject: Re: Briggs 5hp Flat head build Subject: Re: Briggs 5hp Flat head build  September 20th 2017, 9:47 pm September 20th 2017, 9:47 pm | |
| These guys have a lot of different stuff. Not sure if they carry actual tooling for mills, lathes ect. or not. The place is called Hunterdon mill and machine supply and they have steel, welding stuff, a lot of other stuff most places don't carry. I'll have to find out I guess, otherwise I'll find someplace online. I had trouble even finding a machine shop to make me a connecting rod before. It's almost like with this stuff, you have to already know someone involved with it. I guess these days most parts and things are replaced not fixed. Machine shops while still needed, maybe aren't needed as much as they used to be. | |
|   | | prancstaman
Veteran Member


Join date : 2015-02-02
Points : 5098
Posts : 1412
Location : Cleveland,Ohio
 |  Subject: Re: Briggs 5hp Flat head build Subject: Re: Briggs 5hp Flat head build  September 20th 2017, 11:35 pm September 20th 2017, 11:35 pm | |
| If that place don't have what you need, call a tool and die shop up and ask where they get there tooling from. They have to have a place near by because there will be tooling they need custom made and you can't do that through mail order or online. Most likely will be a shop without a sign on it. The one we use has just a 2 foot sign in the parking lot. I never new it was there till my boss told me to go there and pick up an order. There around, just have to know who to talk to. Yah, I guess you are right about knowing someone, LOL. | |
|   | | TheBeal
Veteran Member


Age : 30
Join date : 2013-06-06
Points : 5719
Posts : 1402
Location : Central PA
 |  Subject: Re: Briggs 5hp Flat head build Subject: Re: Briggs 5hp Flat head build  September 21st 2017, 12:51 pm September 21st 2017, 12:51 pm | |
| - mr.modified wrote:
- I had trouble even finding a machine shop to make me a connecting rod before.
Alot of it has to do with $$$. Think about the time involved with making a connecting rod from scratch when you can go buy a new one for under $40. No one want to pay hundreds of $$$ for a custom rod. Might have better luck if you needed a pile of them. Ought to be a good project at any rate | |
|   | | Sponsored content
 | |   | | | | Briggs 5hp Flat head build |  |
|
Similar topics |  |
|
| | Permissions in this forum: | You cannot reply to topics in this forum
| |
| |
| | Who is online? | In total there are 15 users online :: 0 Registered, 0 Hidden and 15 Guests
None
Most users ever online was 412 on January 7th 2023, 7:59 am
|
|


