| | BAJA SEARS BUILD |  |
|
+41upnorthkid TheBeal MatthewD the old guy Doug Carshowkid Deluxe66 jonjunk jeremynitro ThatOneTeen Mitch'sgarage dwcopple kawasaki220 CornShuck4CE Angchor rarbaugh07 craftsmancole richie thomas willis923 goesman Stretch44875 Bigal bry_93 TheRainbowBoxer Lawren Wimberly the54 Moose Creepycrawler Craftsman1998 Thunderdivine MowBandit jsisti845 mrkadage T-Dub13 WellThatsSurprising LAWN MOWER MUDDER TroyBilt Pony camomanusa 1997 Murray redlinemotorsportts mr.modified 45 posters |
|
| Author | Message |
|---|
mr.modified
Veteran Member


2015 Build-Off Top 3 Winner
2015 Build-Off Top 3 Winner
2016 Build-Off Top 3 Winner
2016 Build-Off Top 3 Winner
2018 Build-Off Finalist
2018 Build-Off Finalist
2022 Build-Off Entrant
2022 Build-Off Entrant
1st Place Build-Off 2014
1st Place Build-Off Winner 2014
2023 Build-Off Entrant
2023 Build-Off Entrant
Age : 34
Join date : 2013-11-02
Points : 7169
Posts : 2910
Location : New Jersey USA
 |  Subject: BAJA SEARS BUILD Subject: BAJA SEARS BUILD  January 1st 2014, 6:51 pm January 1st 2014, 6:51 pm | |
| 1970's Sears suburban. Going for something that still resembles a tractor at the end, but with a baja 1000 buggy theme. Things to be built and added... -Bumpers and nerf bars/rub rails -Hydraulic brakes, brake pedal -Lock transaxle -Beef up steering -Skid plates for transaxle, steering rods, front end -Headlights and tail lights -ATV tires in rear, 8'' trailer tires in front -Exhaust system -Throttle pedal, bypass/remove governor -Clutch to work with the new engine which is 3-4" rear of the original location -Paint -Horn -Using 11hp Briggs flathead -Gas tank -Battery bracket -Wiring Already previously done... -Shocks added to the front axle to keep things more stable and to look cool -Seat mounted with a spring -Engine mounts welded on, new holes drilled Now I have to put all this junk back... 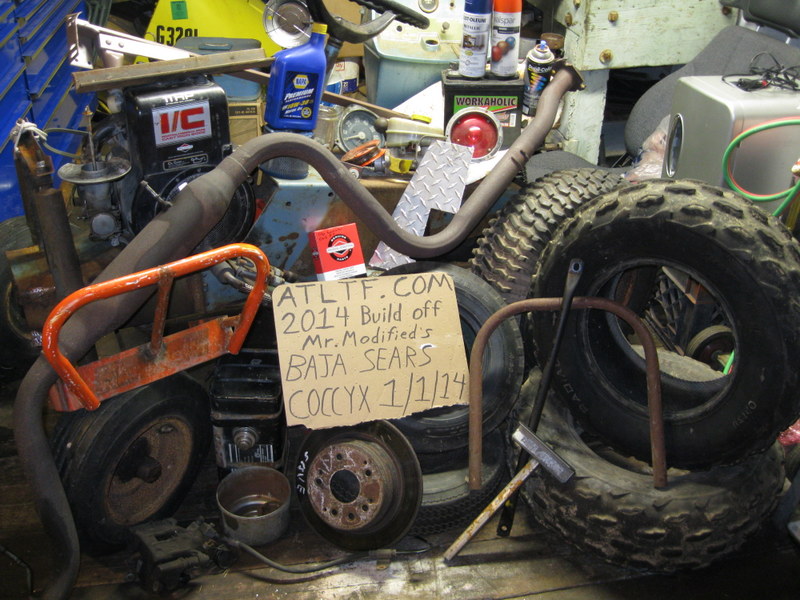 Should be able to build something with all those parts.
Last edited by mr.modified on January 1st 2014, 6:52 pm; edited 1 time in total (Reason for editing : I forgot a couple things...) | |
|
  | |
redlinemotorsportts
Moderator


2014 Build-Off Entrant
2014 Build-Off Entrant
Age : 27
Join date : 2013-03-18
Points : 7483
Posts : 3131
Location : raleigh nc
 |  Subject: Re: BAJA SEARS BUILD Subject: Re: BAJA SEARS BUILD  January 1st 2014, 7:04 pm January 1st 2014, 7:04 pm | |
| Same thing i said. My garage was a mess because all my stuff was stashed away lol. I really like this build! | |
|
  | |
1997 Murray
Veteran Member


2014 Build-Off Finalist
2014 Build-Off Finalist
2015 Build-Off Finalist
2015 Build-Off Finalist
2016 Build-Off Entrant
2016 Build-Off Entrant
Age : 26
Join date : 2013-11-13
Points : 5446
Posts : 1311
Location : NW USA
 |  Subject: BAJA SEARS BUILD Subject: BAJA SEARS BUILD  January 1st 2014, 8:11 pm January 1st 2014, 8:11 pm | |
| haha, I wish I had all the parts that you have! oh, well, good luck. | |
|
  | |
mr.modified
Veteran Member


2015 Build-Off Top 3 Winner
2015 Build-Off Top 3 Winner
2016 Build-Off Top 3 Winner
2016 Build-Off Top 3 Winner
2018 Build-Off Finalist
2018 Build-Off Finalist
2022 Build-Off Entrant
2022 Build-Off Entrant
1st Place Build-Off 2014
1st Place Build-Off Winner 2014
2023 Build-Off Entrant
2023 Build-Off Entrant
Age : 34
Join date : 2013-11-02
Points : 7169
Posts : 2910
Location : New Jersey USA
 |  Subject: Re: BAJA SEARS BUILD Subject: Re: BAJA SEARS BUILD  January 1st 2014, 8:35 pm January 1st 2014, 8:35 pm | |
| Thanks. It's just a bunch of used junk that no one else wanted. You know, the stuff I always use! I think the exhaust pipe is from a mini van, I can't remember. I like to save the resonators off of cars if they aren't too rusty. Pretty much like a glass pack except no packing. I also try to save tubing if it has a nice bend in it since I don't have a tubing bender.
Notice I wrote "save" on that brake rotor so it doesn't get thrown into the scrap pile...again.
Last edited by mr.modified on January 1st 2014, 8:42 pm; edited 1 time in total (Reason for editing : Should be check boxes, Forgot something, mispelled somthing, why else?) | |
|
  | |
camomanusa
Member

2014 Build-Off Entrant
2014 Build-Off Entrant
Age : 25
Join date : 2013-09-15
Points : 4579
Posts : 467
Location : Greensburg, PA
 | |
  | |
TroyBilt Pony
Established Member


2014 Build-Off Entrant
2014 Build-Off Entrant
Join date : 2013-06-01
Points : 4810
Posts : 578
Location : West Virginia
 |  Subject: Re: BAJA SEARS BUILD Subject: Re: BAJA SEARS BUILD  January 3rd 2014, 8:22 pm January 3rd 2014, 8:22 pm | |
| I spy with my little eye, wait a second. Where the hell is the trapter  | |
|
  | |
LAWN MOWER MUDDER
Established Member


2014 Build-Off Top 3 Winner
2014 Build-Off Top 3 Winner
Age : 23
Join date : 2013-04-08
Points : 5209
Posts : 913
Location : Central Pa
 | |
  | |
mr.modified
Veteran Member


2015 Build-Off Top 3 Winner
2015 Build-Off Top 3 Winner
2016 Build-Off Top 3 Winner
2016 Build-Off Top 3 Winner
2018 Build-Off Finalist
2018 Build-Off Finalist
2022 Build-Off Entrant
2022 Build-Off Entrant
1st Place Build-Off 2014
1st Place Build-Off Winner 2014
2023 Build-Off Entrant
2023 Build-Off Entrant
Age : 34
Join date : 2013-11-02
Points : 7169
Posts : 2910
Location : New Jersey USA
 |  Subject: Re: BAJA SEARS BUILD Subject: Re: BAJA SEARS BUILD  January 4th 2014, 8:24 pm January 4th 2014, 8:24 pm | |
| Thanks for the comments. Finally got the right rear hub free and off the axle (Last thing I was working on before the build off). Looks like the rear brake rotor I have would fit about where I wanted it too. The problem is the caliper I have won't fit in close enough with the frame in the way. It's too long with the E-brake mechanism in the way. These brakes might be overkill, but I wanted to have this whole project just about indestructible. Also, they'll never need to be adjusted or wear out. 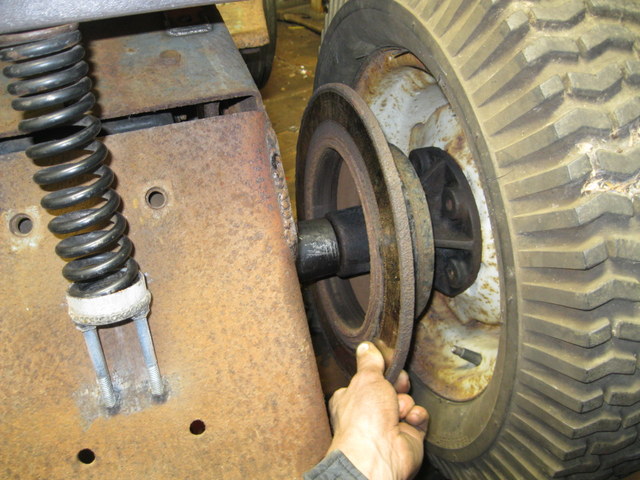 Under here, the caliper would just fit with the transmission in the way, but it's too exposed. I'm sure to smash it into a million pieces on the first rock I drive over. Not only that, But it would be nice to have it where it's easy to get to. 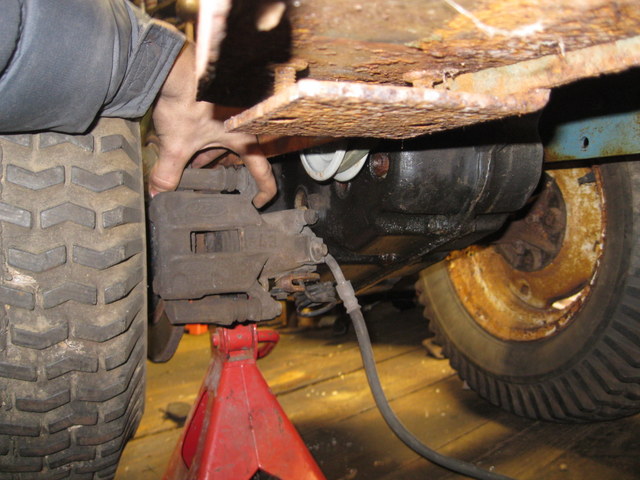 Here's about where I imagined it going when I was unbolting it off a junk lincoln. If from where my thumb is to the left was gone, It might be short enough to make it between the frame and the tire. In theory, I could cut the frame out of the way to make it fit, but that would make it kind of a hack job. Looks like I need a different caliper. 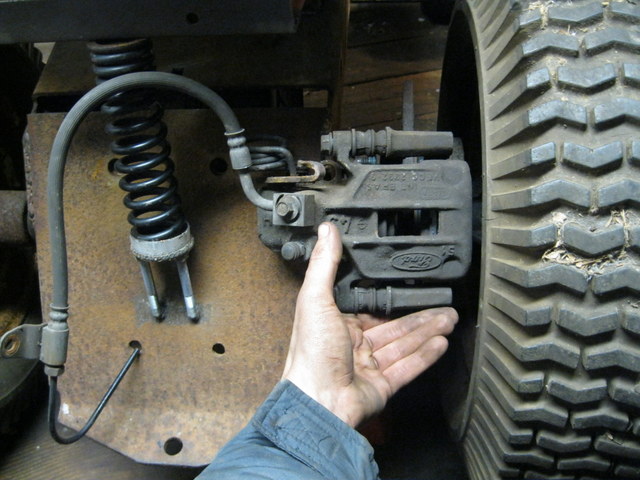 Next thing to do is finish up the clutch. I have it mostly figured out, just need to weld it up. | |
|
  | |
mr.modified
Veteran Member


2015 Build-Off Top 3 Winner
2015 Build-Off Top 3 Winner
2016 Build-Off Top 3 Winner
2016 Build-Off Top 3 Winner
2018 Build-Off Finalist
2018 Build-Off Finalist
2022 Build-Off Entrant
2022 Build-Off Entrant
1st Place Build-Off 2014
1st Place Build-Off Winner 2014
2023 Build-Off Entrant
2023 Build-Off Entrant
Age : 34
Join date : 2013-11-02
Points : 7169
Posts : 2910
Location : New Jersey USA
 |  Subject: Re: BAJA SEARS BUILD Subject: Re: BAJA SEARS BUILD  January 5th 2014, 7:31 pm January 5th 2014, 7:31 pm | |
| I have just about everything tacked together for my new clutch setup. I used the clutch from a junk simplicity and the linkage rod is the original sears rod shortened by about 6" or so. I'll probably brace up the simplicity clutch a little and add a grease fitting. The clutch spring will hook on the bottom of the angle iron piece I added. 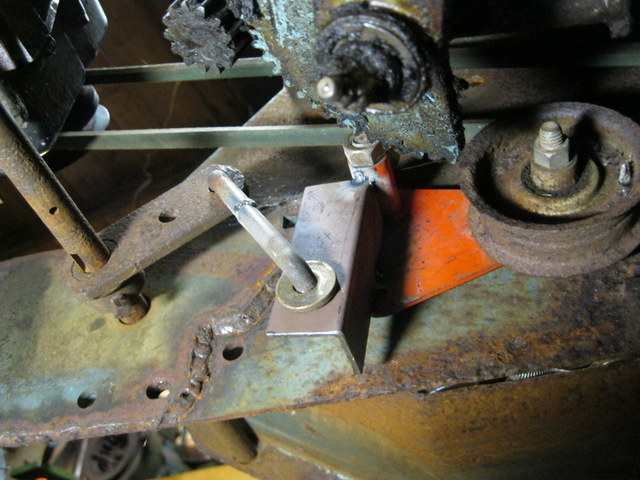 The original cast iron 12hp engine that was on the sears. I had it running about a year ago, nothing wrong with it as far as I know except how heavy it is. Fairly early mower engine to have electronic ignition. Sometime when I get the 11hp aluminum briggs back off, I'll weigh them to see what the difference is. 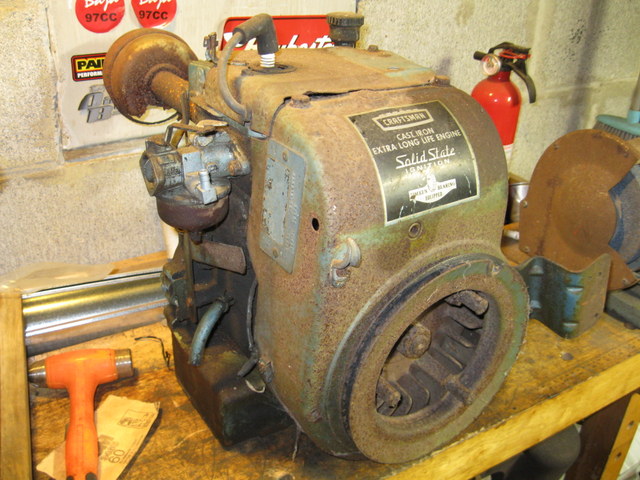 You can see the original clutch which is bolted to the engine 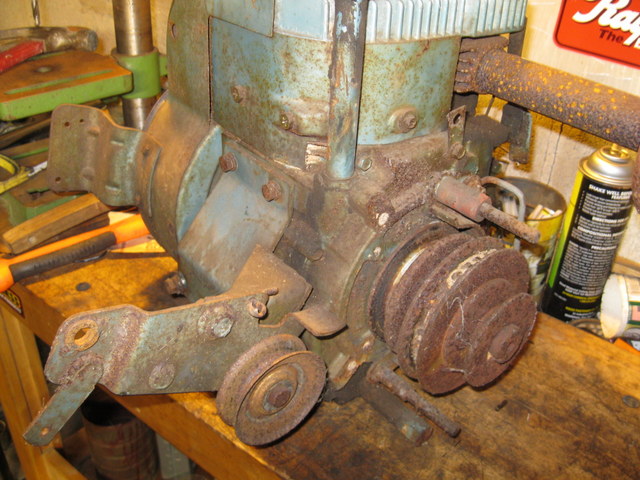 | |
|
  | |
mr.modified
Veteran Member


2015 Build-Off Top 3 Winner
2015 Build-Off Top 3 Winner
2016 Build-Off Top 3 Winner
2016 Build-Off Top 3 Winner
2018 Build-Off Finalist
2018 Build-Off Finalist
2022 Build-Off Entrant
2022 Build-Off Entrant
1st Place Build-Off 2014
1st Place Build-Off Winner 2014
2023 Build-Off Entrant
2023 Build-Off Entrant
Age : 34
Join date : 2013-11-02
Points : 7169
Posts : 2910
Location : New Jersey USA
 |  Subject: Re: BAJA SEARS BUILD Subject: Re: BAJA SEARS BUILD  January 11th 2014, 8:41 pm January 11th 2014, 8:41 pm | |
| I more or less finished the seat bracket. The corners of the angle iron piece on the back need to be rounded off a little for looks and I need a couple of carriage bolts for the seat so I don't have to sit on the bolt heads sticking up. I also finished welding up the clutch, added a grease fitting, and primed it. Once I get the clutch on, I'll get a belt and give it a test run. 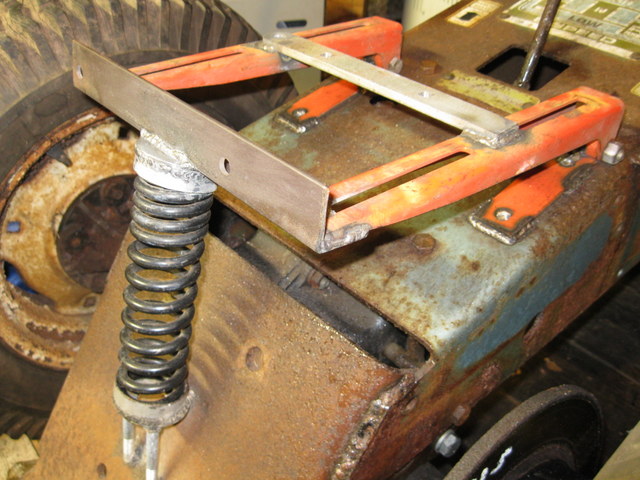 Here's another idea that I was thinking about but probably won't use. I think they're a little too big to look good, not to mention the weight issue (they would be mounted on spare rims). Also I wouldn't have any room for the gas tank back there should I decide that's where it's going. 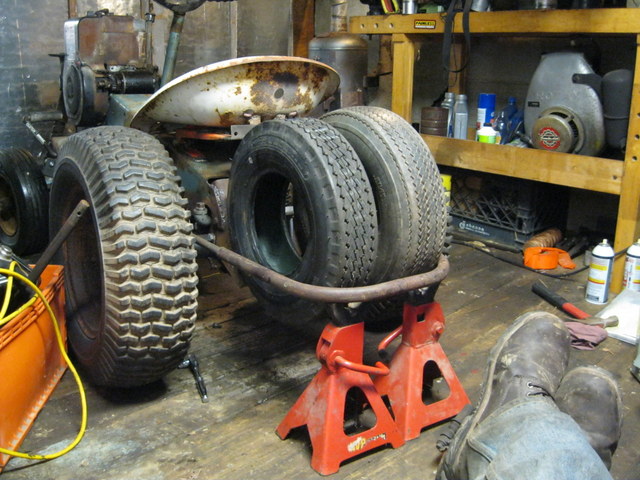 | |
|
  | |
mr.modified
Veteran Member


2015 Build-Off Top 3 Winner
2015 Build-Off Top 3 Winner
2016 Build-Off Top 3 Winner
2016 Build-Off Top 3 Winner
2018 Build-Off Finalist
2018 Build-Off Finalist
2022 Build-Off Entrant
2022 Build-Off Entrant
1st Place Build-Off 2014
1st Place Build-Off Winner 2014
2023 Build-Off Entrant
2023 Build-Off Entrant
Age : 34
Join date : 2013-11-02
Points : 7169
Posts : 2910
Location : New Jersey USA
 |  Subject: Re: BAJA SEARS BUILD Subject: Re: BAJA SEARS BUILD  January 13th 2014, 9:51 pm January 13th 2014, 9:51 pm | |
| I didn't get as much done on this project as I thought I was going to over the weekend. However, I did get all the clutch parts painted up. Welded on a washer where the linkage rod pulls the clutch to give it a wider surface to wear on since the angle iron is too thin. Sears did the same thing from the factory on their clutch. I thought the pulley was the original clutch pulley from this tractor, but I guess it isn't. It must have been an adjustable idler or something. I know it was off of this tractor somewhere. I have a couple ideas about how to get my brakes going, hopefully I'll be getting the whole brake system done by this coming sunday night...(Yeah right). 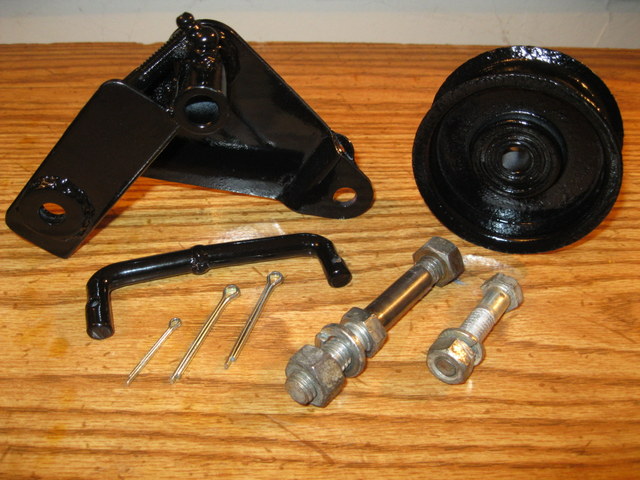 | |
|
  | |
redlinemotorsportts
Moderator


2014 Build-Off Entrant
2014 Build-Off Entrant
Age : 27
Join date : 2013-03-18
Points : 7483
Posts : 3131
Location : raleigh nc
 |  Subject: Re: BAJA SEARS BUILD Subject: Re: BAJA SEARS BUILD  January 13th 2014, 10:32 pm January 13th 2014, 10:32 pm | |
| Yea i just saw the tire rack, its unfortunate that its just to unproportonal with the rest of the mower. I stil def dig the rally-baja styling Q's youve done with it. cant wait to see more. | |
|
  | |
WellThatsSurprising
Member


Age : 27
Join date : 2012-04-30
Points : 5007
Posts : 407
Location : East Bethel, MN
 |  Subject: Re: BAJA SEARS BUILD Subject: Re: BAJA SEARS BUILD  January 13th 2014, 11:30 pm January 13th 2014, 11:30 pm | |
| If you ever need parts for that HH120 I've got a ton. | |
|
  | |
T-Dub13
Established Member

Age : 55
Join date : 2013-12-06
Points : 4572
Posts : 540
Location : Central MA
 | |
  | |
mr.modified
Veteran Member


2015 Build-Off Top 3 Winner
2015 Build-Off Top 3 Winner
2016 Build-Off Top 3 Winner
2016 Build-Off Top 3 Winner
2018 Build-Off Finalist
2018 Build-Off Finalist
2022 Build-Off Entrant
2022 Build-Off Entrant
1st Place Build-Off 2014
1st Place Build-Off Winner 2014
2023 Build-Off Entrant
2023 Build-Off Entrant
Age : 34
Join date : 2013-11-02
Points : 7169
Posts : 2910
Location : New Jersey USA
 |  Subject: Re: BAJA SEARS BUILD Subject: Re: BAJA SEARS BUILD  January 14th 2014, 1:10 pm January 14th 2014, 1:10 pm | |
| - redlinemotorsportts wrote:
- Yea i just saw the tire rack, its unfortunate that its just to unproportonal with the rest of the mower. I stil def dig the rally-baja styling Q's youve done with it. cant wait to see more.
Thanks. Yeah, they look better on a full size truck/buggy. - WellThatsSurprising wrote:
- If you ever need parts for that HH120 I've got a ton.
I'll keep it in mind, thanks. I might use it for something one of these days. - T-Dub13 wrote:
- You should be running that old Rotax sled motor. One of my all time favorite motors right there...
It's supposed to go back on a 67 ski doo Olympic if I ever get it back together. I've been working (slowly) on it for a couple years. You can see the chassis and hood in the background in a few pictures. | |
|
  | |
mr.modified
Veteran Member


2015 Build-Off Top 3 Winner
2015 Build-Off Top 3 Winner
2016 Build-Off Top 3 Winner
2016 Build-Off Top 3 Winner
2018 Build-Off Finalist
2018 Build-Off Finalist
2022 Build-Off Entrant
2022 Build-Off Entrant
1st Place Build-Off 2014
1st Place Build-Off Winner 2014
2023 Build-Off Entrant
2023 Build-Off Entrant
Age : 34
Join date : 2013-11-02
Points : 7169
Posts : 2910
Location : New Jersey USA
 |  Subject: Re: BAJA SEARS BUILD Subject: Re: BAJA SEARS BUILD  January 18th 2014, 7:32 pm January 18th 2014, 7:32 pm | |
| Finally made some decent progress. The brake rotor is mounted. Brake pedal mostly done except rod to master cyl. Welded on some steering stops. I didn't put the clutch back on yet. It's interesting how it takes hours to work on something fairly simple, then you look at the stuff when your done and think, "It took that long to make a brake pedal out of two pieces of metal?" I guess it would take less time if you knew right where everything was going to go. I really just want to weld up the exhaust, but anyway... Cutting the new wheel studs to length. I'll have to adjust the nuts behind the rotor to get the rotor to turn without wobbling later.  The nuts you can see here behind the hub are welded to the stud. Stud can be locked in place by tightening the nuts against the hub. 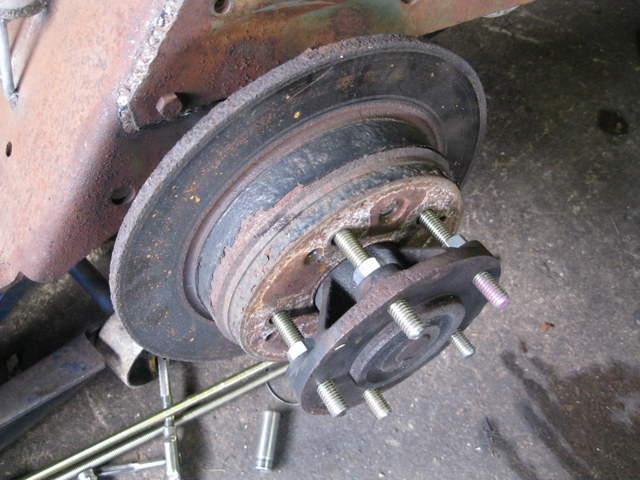 Overly rugged steering stops. I put them on the steering arm instead of hanging them down off the axle so they don't catch a rock and get bent, even though that would be unlikely that close to the wheel. Note the sears tires. Too bad they're junk, I think the ribbed tread looks neat. 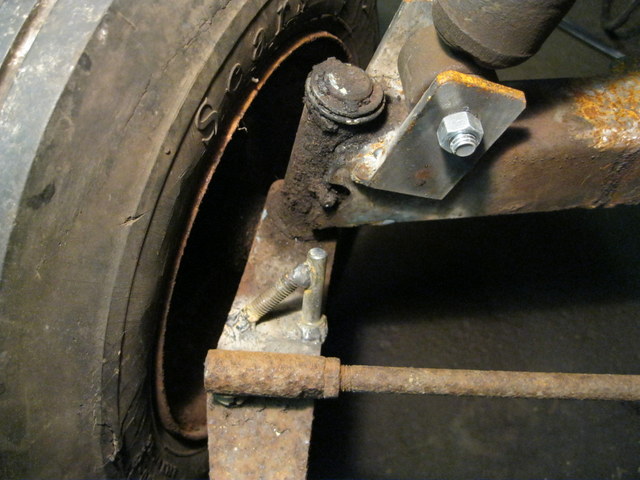 Nifty piece of metal with some holes in it makes a cool brake pedal. The rest is 1" square steel. It sits about as high as the clutch pedal on the other side. I was wondering if I should cut the stock clutch pedal up and make it match the brake pedal, but I'll wait and think about it. The gas pedal will be off to the right. I don't know if I'll make my own or use a bicycle handbrake. 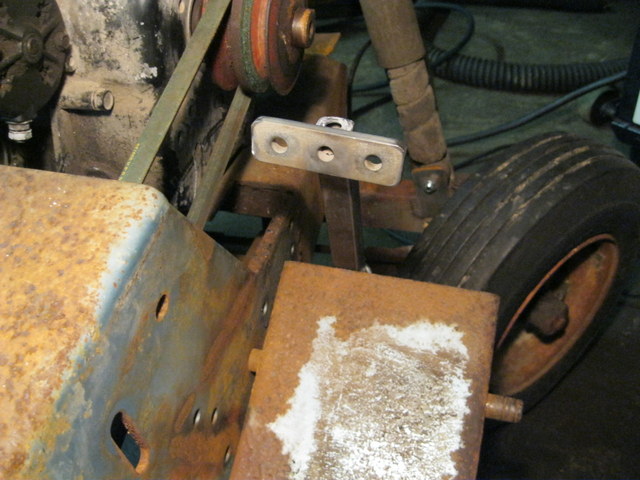 Mocked up the bracket for the master cylinder out of card board. Front wheel seems to clear good at all positions. I plan on hooking both brake lines into one before heading back to the caliper. Still didn't decide what caliper I'm going to use. 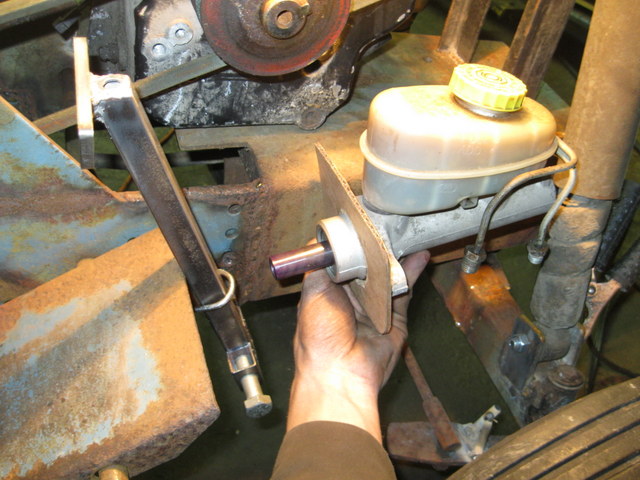
Last edited by mr.modified on January 20th 2014, 10:12 pm; edited 1 time in total | |
|
  | |
redlinemotorsportts
Moderator


2014 Build-Off Entrant
2014 Build-Off Entrant
Age : 27
Join date : 2013-03-18
Points : 7483
Posts : 3131
Location : raleigh nc
 |  Subject: Re: BAJA SEARS BUILD Subject: Re: BAJA SEARS BUILD  January 18th 2014, 9:09 pm January 18th 2014, 9:09 pm | |
| those brakes will be good enough to lock your tires up! hydrolic brakes, sweet. good work. Little things eh? | |
|
  | |
mr.modified
Veteran Member


2015 Build-Off Top 3 Winner
2015 Build-Off Top 3 Winner
2016 Build-Off Top 3 Winner
2016 Build-Off Top 3 Winner
2018 Build-Off Finalist
2018 Build-Off Finalist
2022 Build-Off Entrant
2022 Build-Off Entrant
1st Place Build-Off 2014
1st Place Build-Off Winner 2014
2023 Build-Off Entrant
2023 Build-Off Entrant
Age : 34
Join date : 2013-11-02
Points : 7169
Posts : 2910
Location : New Jersey USA
 |  Subject: Re: BAJA SEARS BUILD Subject: Re: BAJA SEARS BUILD  January 18th 2014, 9:18 pm January 18th 2014, 9:18 pm | |
| Should be able to get some neat videos with this thing when it's done. That is if I don't get crushed under it or something. | |
|
  | |
mrkadage
Member


2014 Build-Off Entrant
2014 Build-Off Entrant
Age : 35
Join date : 2014-01-12
Points : 4078
Posts : 103
Location : queensland, Australia
 |  Subject: Re: BAJA SEARS BUILD Subject: Re: BAJA SEARS BUILD  January 18th 2014, 10:04 pm January 18th 2014, 10:04 pm | |
| I'm lovin watchin this build  I'ts really unique, and frikken awesome | |
|
  | |
mr.modified
Veteran Member


2015 Build-Off Top 3 Winner
2015 Build-Off Top 3 Winner
2016 Build-Off Top 3 Winner
2016 Build-Off Top 3 Winner
2018 Build-Off Finalist
2018 Build-Off Finalist
2022 Build-Off Entrant
2022 Build-Off Entrant
1st Place Build-Off 2014
1st Place Build-Off Winner 2014
2023 Build-Off Entrant
2023 Build-Off Entrant
Age : 34
Join date : 2013-11-02
Points : 7169
Posts : 2910
Location : New Jersey USA
 |  Subject: Re: BAJA SEARS BUILD Subject: Re: BAJA SEARS BUILD  January 19th 2014, 10:46 pm January 19th 2014, 10:46 pm | |
| Thanks. I worked on the master cylinder bracket a little today and got it pretty much done except for drilling the holes to hold the master cyl. Right now it looks just like the cardboard template. | |
|
  | |
jsisti845
Member


Join date : 2013-09-26
Points : 4191
Posts : 88
 |  Subject: Re: BAJA SEARS BUILD Subject: Re: BAJA SEARS BUILD  January 19th 2014, 11:19 pm January 19th 2014, 11:19 pm | |
| that thing is sweet I love the whole over build idea good work keep it up!! | |
|
  | |
MowBandit
Member


2014 Build-Off Entrant
2014 Build-Off Entrant
Age : 28
Join date : 2013-03-16
Points : 4749
Posts : 477
Location : Haddock,Georgia
 |  Subject: Re: BAJA SEARS BUILD Subject: Re: BAJA SEARS BUILD  January 20th 2014, 9:04 am January 20th 2014, 9:04 am | |
| Hey hey hey now do i see a set of gas shock on that front end  looks like you did a better job then me for sure i just welded a bolt to the axle and bolted them to the axle.  Keep up the great work | |
|
  | |
mr.modified
Veteran Member


2015 Build-Off Top 3 Winner
2015 Build-Off Top 3 Winner
2016 Build-Off Top 3 Winner
2016 Build-Off Top 3 Winner
2018 Build-Off Finalist
2018 Build-Off Finalist
2022 Build-Off Entrant
2022 Build-Off Entrant
1st Place Build-Off 2014
1st Place Build-Off Winner 2014
2023 Build-Off Entrant
2023 Build-Off Entrant
Age : 34
Join date : 2013-11-02
Points : 7169
Posts : 2910
Location : New Jersey USA
 |  Subject: Re: BAJA SEARS BUILD Subject: Re: BAJA SEARS BUILD  January 20th 2014, 10:10 pm January 20th 2014, 10:10 pm | |
| - MowBandit wrote:
- Hey hey hey now do i see a set of gas shock on that front end :Dlooks like you did a better job then me for sure i just welded a bolt to the axle and bolted them to the axle. :)Keep up the great work
Quicker to just weld on a bolt, that's for sure. Thanks. Master cylinder bracket done. Steel from a gas powered air compressor. Now I just have to line it up with the brake pedal when I get a chance and weld it to the frame. Also a short linkage rod needs to be made. The blue is a pen cap holding things straight for the picture. 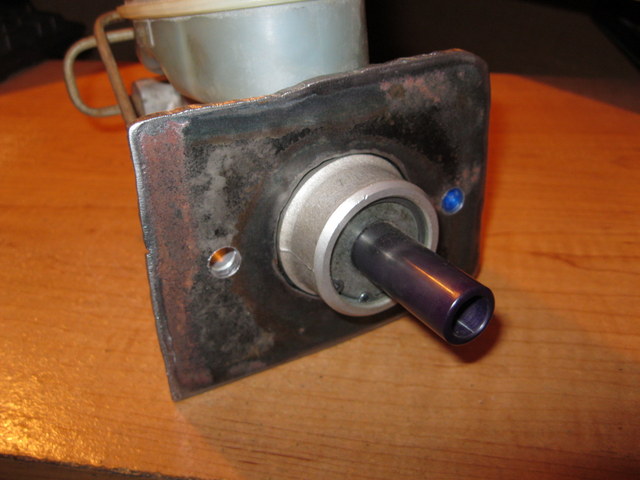 | |
|
  | |
LAWN MOWER MUDDER
Established Member


2014 Build-Off Top 3 Winner
2014 Build-Off Top 3 Winner
Age : 23
Join date : 2013-04-08
Points : 5209
Posts : 913
Location : Central Pa
 | |
  | |
mr.modified
Veteran Member


2015 Build-Off Top 3 Winner
2015 Build-Off Top 3 Winner
2016 Build-Off Top 3 Winner
2016 Build-Off Top 3 Winner
2018 Build-Off Finalist
2018 Build-Off Finalist
2022 Build-Off Entrant
2022 Build-Off Entrant
1st Place Build-Off 2014
1st Place Build-Off Winner 2014
2023 Build-Off Entrant
2023 Build-Off Entrant
Age : 34
Join date : 2013-11-02
Points : 7169
Posts : 2910
Location : New Jersey USA
 |  Subject: Re: BAJA SEARS BUILD Subject: Re: BAJA SEARS BUILD  January 25th 2014, 7:33 pm January 25th 2014, 7:33 pm | |
| Master cylinder bracket and linkage rod to pedal done. The rod is held in by the master cyl being bolted into place. 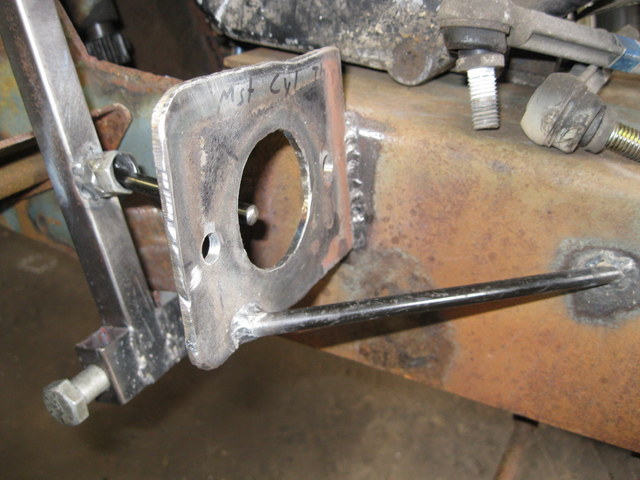 Master cylinder is from 98 Jeep Cherokee. 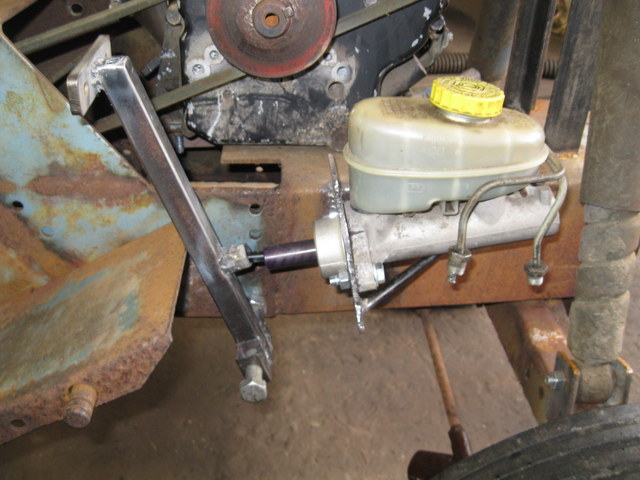 I decided to just use the caliper that I had and bolt it in front of the rotor. I made a bracket out of angle iron. An extention from the transmission skid plate or a extra shield can protect it if nessesary. It's a close fit but I think it will work. 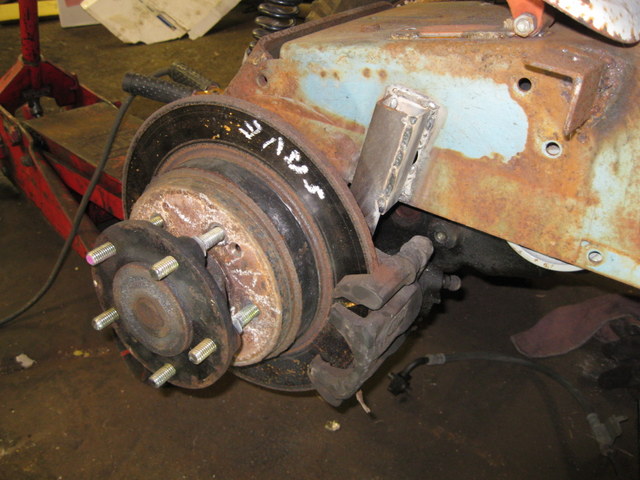 I didn't put the pads in yet, washers space the caliper out to where it needs to be.  It's a little early for the hood, but I wanted to see how this would look. 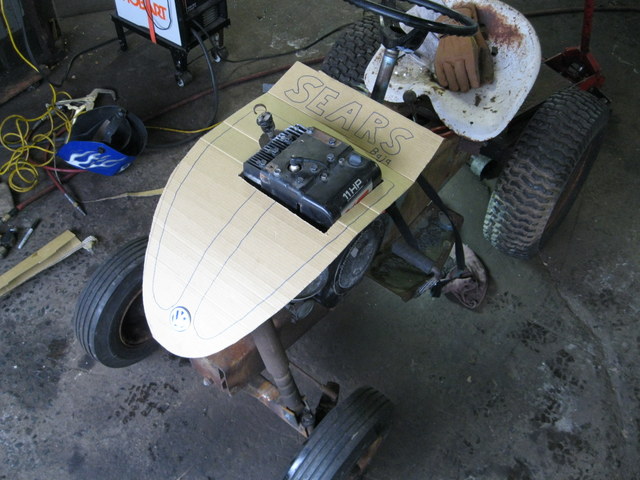 With the bumpers on to make the tractor look longer and lower, it might look closer to being the right size. As it is now, it looks a little too high and too wide. Just an idea. 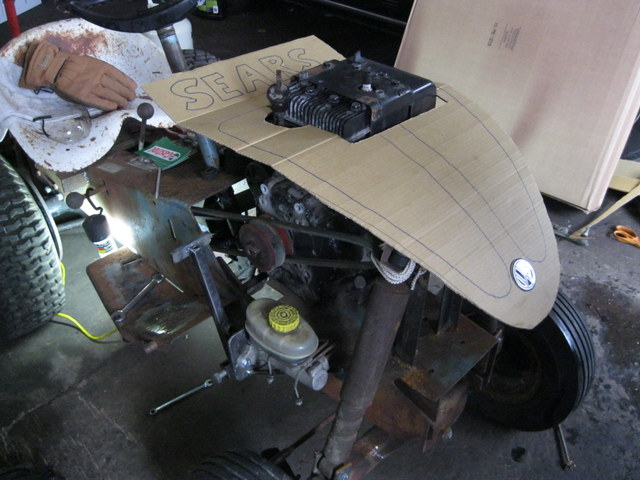 | |
|
  | |
Sponsored content
 | |
  | |
| | BAJA SEARS BUILD |  |
|


