|
| | Homemade tools and stuff from junk laying around |  |
|
+11CraftsmanQuad19 TourMax muckmudd AllisKidD21 MightyRaze frostypaws RichieRichOverdrive MatthewD TheBeal Crazy_Carl prancstaman 15 posters | |
| Author | Message |
|---|
prancstaman
Veteran Member


Join date : 2015-02-02
Points : 5096
Posts : 1412
Location : Cleveland,Ohio
 |  Subject: Homemade tools and stuff from junk laying around Subject: Homemade tools and stuff from junk laying around  March 4th 2018, 9:50 pm March 4th 2018, 9:50 pm | |
| Hay People, Still winter time but the weather is warming up. Since I made the "Have a nice day" faces, just been in the mood to start making things. I should be videoing this for my You Tube channel since I have a playlist just for it but that takes time and the new camera batteries are not charged yet and tired of propping up my phone to video. Anyways..... To the project  I want a drill press stand, so I can get my little drill press off my crowded work bench. I see those table and stools made out of car rims all the time on car shows. I got some junk rims laying around and a little stool frame too. Just stack the junk and weld it all together to make a stand, and clean up my yard to boot, LOL. The way I did it too, it can be flipped upside down and still be a stand, just happened that way. Making this took about 4 hours. To the pics.. Simple build. The black rims are steel car donuts on top and bottom. The rim in the middle, some fancy shmancy steel rim for looks. and the steel bar stool frame turned upside down. Everything stacked pretty easy. The donut rims are set in place as the insides of the rims are the stand top and bottom because the mounting flange sides stick out past the rims edge. 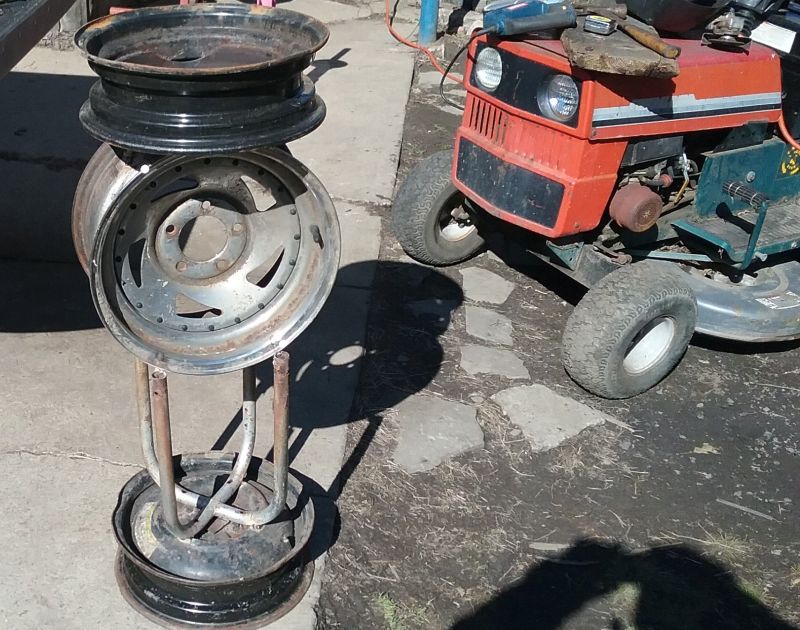 Next 2 pics are spots I reinforced with bolts so the center area and stand top welds don't break from weight. Bolts were used so I didn't have to cut anything and I got a crap load of them. 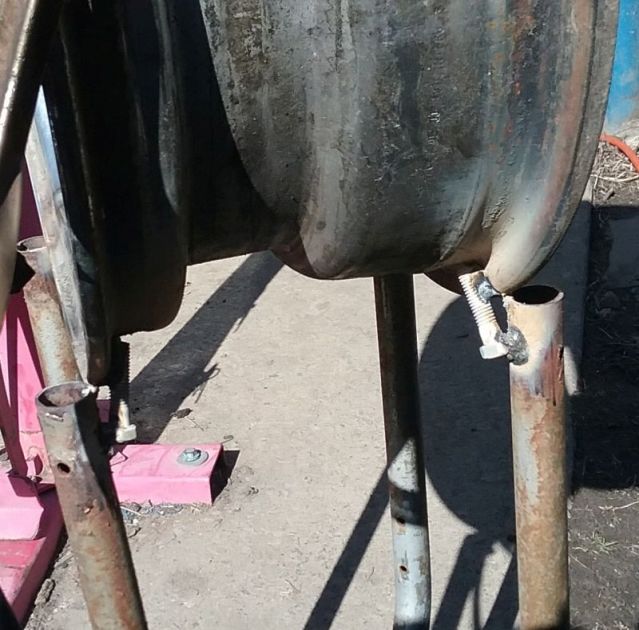 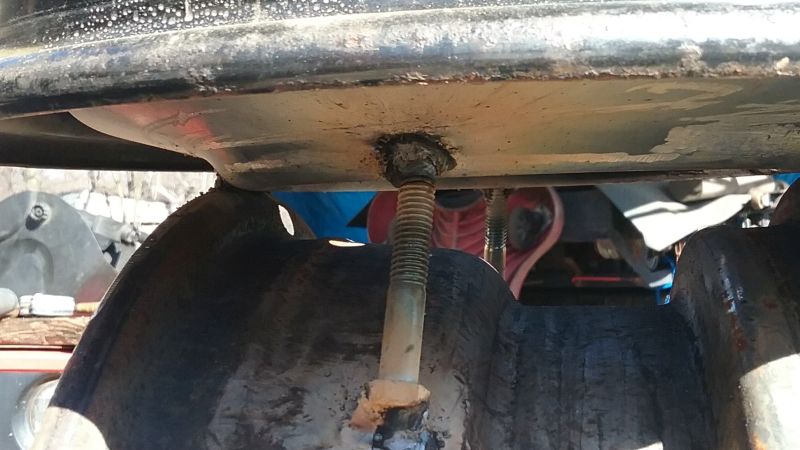 The top is a piece of plywood cut to fit inside the rim lip and can be lifted out to clean. To get the pattern right and done quick, I set the plywood on top and hit it with a hammer, then cut it inside the mark with a jigsaw. Yah I know, string and a screw with a little measuring would have done a better job but would have took longer and since I didn't care how it looked I just pounded on it with a hammer, LOL. But I did do measuring to insure the top and bottom donut rims are squared and had a flat top. From top donut rim lip to bottom donut rim lip is 31 7/8 inches all the way around the rims, measured every time I put a weld on the top rim. Took 2 times to make sure the top was level with the very bottom of the stand.  The stand top donut rim, was welded in place so the valve stem is in front and to the right a little bit, since I'm right handed. I cut the valve stem out and makes a great place to hold the drill press chuck key. If I flip the stand over, the valve stem hole is on the left side for a left handed person, LOL. That part just happened that way. 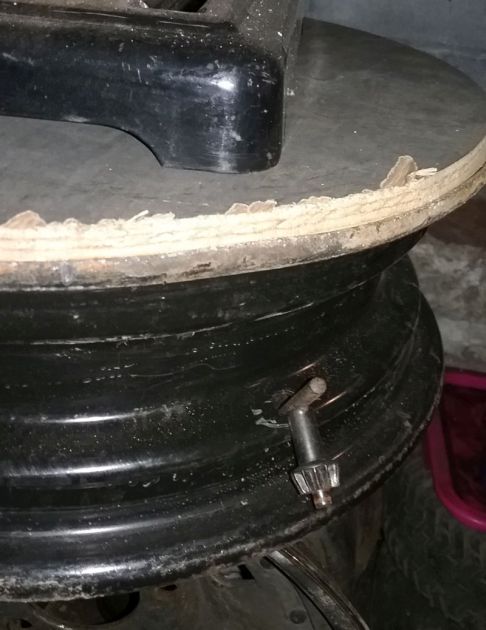 Done.... I could have done a couple more features, like holders for the bits on the sides and what knots but I didn't feel like carrying it back out of my basement. It's actually heavy you know, LOL. I will be keeping an eye out for more steel rims because this turned out great. The drill press is at a perfect height for me. It's a simple concept but there seems to be a few steps where attention to detail pays off. 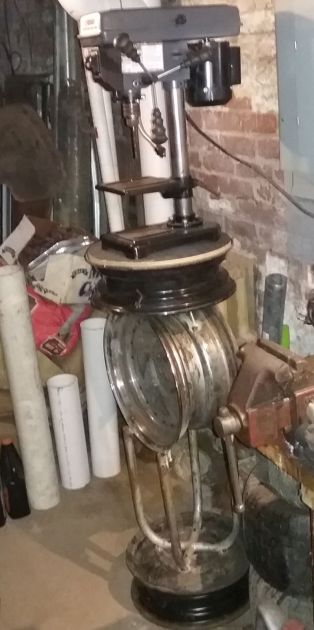 As soon as I got this together I started using it. I will post that project next in this post in a couple days. I made it for work. | |
|   | | Crazy_Carl
Veteran Member


2018 Build-Off Entrant
2018 Build-Off Entrant
2024 Build-Off Entrant
2024 Build-Off Entrant
Age : 35
Join date : 2017-10-30
Points : 5333
Posts : 2561
Location : Rochester, New York
 | |   | | TheBeal
Veteran Member


Age : 30
Join date : 2013-06-06
Points : 5717
Posts : 1402
Location : Central PA
 |  Subject: Re: Homemade tools and stuff from junk laying around Subject: Re: Homemade tools and stuff from junk laying around  March 5th 2018, 9:34 am March 5th 2018, 9:34 am | |
| Heres a tool made to put a little divot in sheet metal. Thats 3/4in chunks with a 1/2in fine thread bolt. 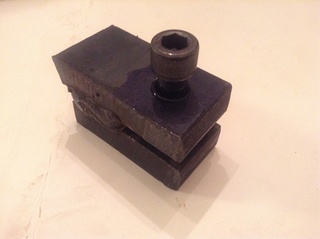 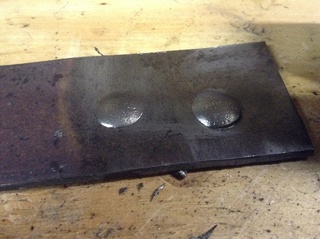 And, re-purposed bolt cutters Im turning into rivet crushers. It has some homemade bits on it. The bolt will allow for some adjustment for material thickness. Atleast, I hope thats how it will work out. Also for sheet metal. 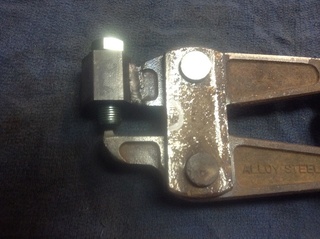 | |
|   | | prancstaman
Veteran Member


Join date : 2015-02-02
Points : 5096
Posts : 1412
Location : Cleveland,Ohio
 |  Subject: Re: Homemade tools and stuff from junk laying around Subject: Re: Homemade tools and stuff from junk laying around  March 5th 2018, 8:50 pm March 5th 2018, 8:50 pm | |
| - Crazy_Carl wrote:
- That is a really good way to recycle old junk that is laying around.
Yes!! The rims been laying around for about a year and the bar stool seat pad was chewed up so I took it off and threw it away and kept the legs, which was sitting around a couple years. All now being used to do something. Now I just need to collect some more rims to make more. | |
|   | | prancstaman
Veteran Member


Join date : 2015-02-02
Points : 5096
Posts : 1412
Location : Cleveland,Ohio
 | |   | | prancstaman
Veteran Member


Join date : 2015-02-02
Points : 5096
Posts : 1412
Location : Cleveland,Ohio
 |  Subject: Air tool hanger Subject: Air tool hanger  March 6th 2018, 9:12 pm March 6th 2018, 9:12 pm | |
| Hay People, Here's the project I made right after the drill press stand. It's an air tool hanger. Seen them here and there, not a new idea but a good one. I made this for work with my own twist. I use 10 air tools to do my job at my work bench and I use all of them on a daily bases too, so my work bench is always cluttered from me throwing them down. Sucks, and I'm always getting yelled at for it being cluttered. I'll probably make another or two for my basement too. I got a bunch of air tools that I never touch because they are stored and hard to get too. Plus they are getting seized up because I never use them either. Probably about 15 air tools, if not more at home. OK, to the project................ There you go, The black piece of tubing that is bolted to the pole, that is. If you count the air tools, there are 9 of them hanging there. I still got the air blower to hang up. When I made it, I forgot to count out 10 spots. Atleast I got 9 of them hanging, happy about that. I could have used angle iron which would be stronger but then the quick disconnect connectors wouldn't be covered to keep the dirt out of the guns, them hanging like they are. It's pretty strong though, doesn't feel like it will break from the weight. Everybody else who grabs my tools love it also because they see right away where they're at. 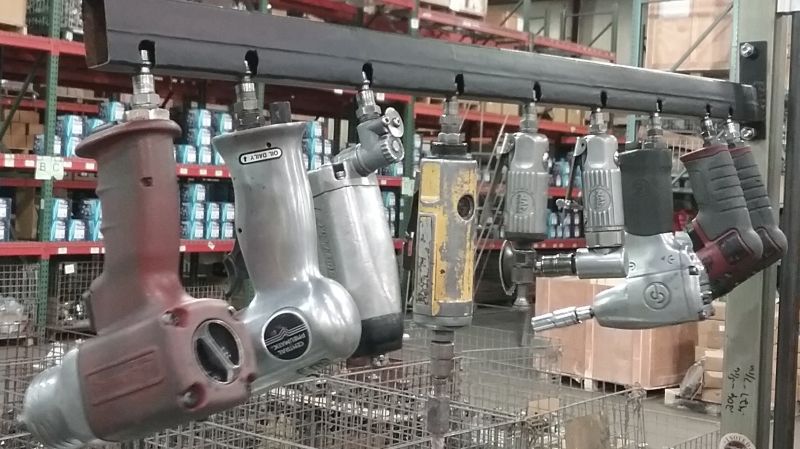 The next 2 pics show how they hang on the hanger. To make this, I drilled a hole on the bottom side 5/16". The hole on the side, the center of the hole that is 7/16" is 3/4 the way down from the top, you want a space under this hole, this space will be used for something. After both holes are drilled, a slot that is 5/16" wide needs to be made from the bottom hole to the top hole, keep it 5/16" wide the whole distance. This slot will hold the quick release fitting. The 7/16" hole is big enough for the locking ring to fit through of the quick release fitting on the tool and the locking slot will fit in between the slot and slide it down and turn the tool so it is hanging, will be hanging by the locking ring of the quick release fitting. Since you have to insert the tool sideways, then slide it down the slot to turn it for it to hang, the tool is locked in by its own weight. The tool will not fall out if shook or bumped, which is a common occurrence by the shippers working at the next table over from them and their skids. If you look real close at both holes drilled, the slot made to connect them isn't perfectly aligned on some of them, so it still works pretty good even if it's not perfectly made. I test fitted each hanger with a fitting and some were tight, so I used a file to widen the slot on the hanger a couple of swipes with the file. Cleaned out all the burrs so no metal shavings would fall into the tools through the fittings while hanging them. Then painted it.  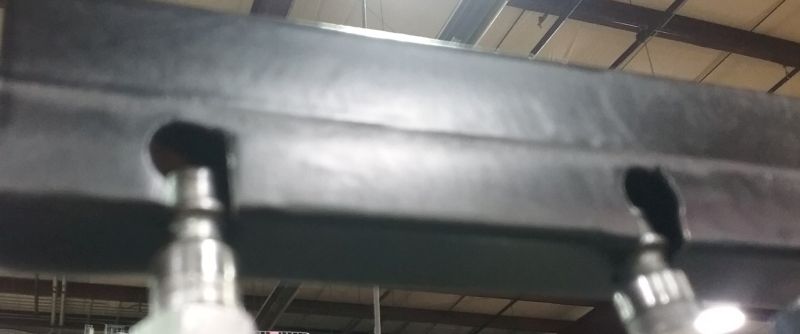 | |
|   | | Crazy_Carl
Veteran Member


2018 Build-Off Entrant
2018 Build-Off Entrant
2024 Build-Off Entrant
2024 Build-Off Entrant
Age : 35
Join date : 2017-10-30
Points : 5333
Posts : 2561
Location : Rochester, New York
 | |   | | TheBeal
Veteran Member


Age : 30
Join date : 2013-06-06
Points : 5717
Posts : 1402
Location : Central PA
 |  Subject: Re: Homemade tools and stuff from junk laying around Subject: Re: Homemade tools and stuff from junk laying around  March 6th 2018, 9:54 pm March 6th 2018, 9:54 pm | |
| - prancstaman wrote:
Pretty good idea in the dimple maker. But what would you use that for?
And the rivet crusher, would that be used to remove or set rivets? The dimple maker is for making a dimple (lol) in a sheet metal gun receiver. Keeps the ejector tight in the bolt. As it turns out... I didnt need it. Rivet thing will just be for setting mild steel rivets. | |
|   | | prancstaman
Veteran Member


Join date : 2015-02-02
Points : 5096
Posts : 1412
Location : Cleveland,Ohio
 |  Subject: Re: Homemade tools and stuff from junk laying around Subject: Re: Homemade tools and stuff from junk laying around  June 4th 2018, 12:44 am June 4th 2018, 12:44 am | |
| Hay People, Been working so I stay out of trouble, you know, free time is for causing trouble, LOL. Chaos brings order... Anywho... Been rebuilding this motor for a while now. Just an old Chevy 3.1 with mild porting to the heads for a little boost. Hopefully the fuel injection can handle it, the OBD1 setup is notorious for running lean after mods to the engine but we shall see. Cleaned up and now putting it back together. Think it's been sitting for over a year all apart and packed up. Now and then I work on it. I got the block back together with pistons, rods, camshaft, and crank in place and got as far as putting the oil pan on for the bottom end. Inside is clean enough to eat out of it. 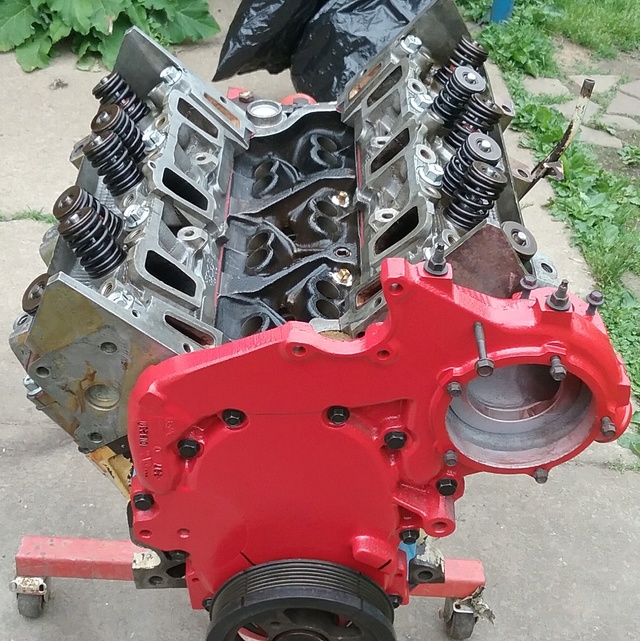 So, most of the parts are organized, most of them. Which brings me to the reason for this post. The valve train has been sitting in my basement for a very long time. Before I pulled the motor I bought all new pushrods, lifters, and rockers because I thought that was the reason for the knock in the motor. Started it up and didn't fix it, still knocking. Took a listen underneath and was worse. Great  Not what I actually said but great. So car sat for a while, then pulled the motor to see what was going on. Expected it to be a bad rod on the bottom end but no. Turned out timing chain jumped 2 teeth and the valves was hitting the pistons. Checked everything out, to my amazement everything was good but the chain. Pistons, valves, heads, block, rods, bearings, was all good.  So I packed everything up for storage because winter was coming and worked on cleaning the parts in my spare time. Anyways. I packed up the newly bought valve train parts. You just can't throw these parts in a box or bag loose. They need to go in the motor the same spot they came out of or they go bad quick wrecking the motor. So I put them in a couple of holders I made out of wood. I've used these before and had the holders for over 10 years. made them when I was rebuilding my Jeep engine, hence the extra holes to hold parts. The parts in the pic been sitting in these holders for over a year on a table in my basement. Worked perfect. Parts went back in in the same spots they came out of with no question to what spot they came out of. 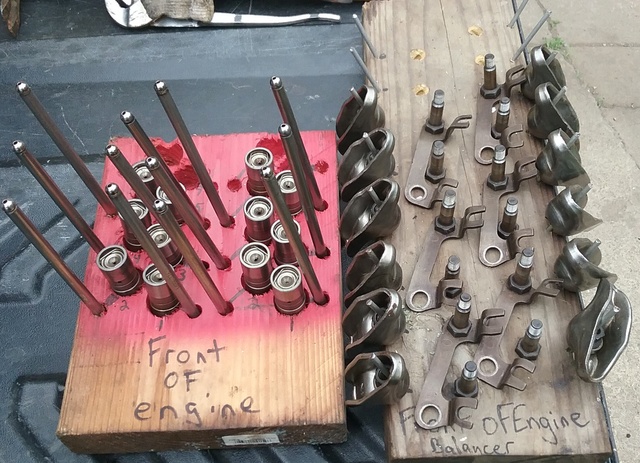 Here is a closer look on how they are made. Just a couple pieces of 2 by's with holes drilled in them and nails to hold parts. Here is the rocker arm holder. At one end I wrote harmonic balancer as a point of reference for front of motor. Then nails with the heads cut off hammered in at an angle to slide the rockers, pivot balls, and nuts on. The inner holes I used for the pushrod guides and studs but can also be used for pushrods only. And the holes are not drilled through, just counter sunk 3/4 of the thickness of the wood. I also staggered the holders like how they are staggered on the motor to help the organization of things visually. 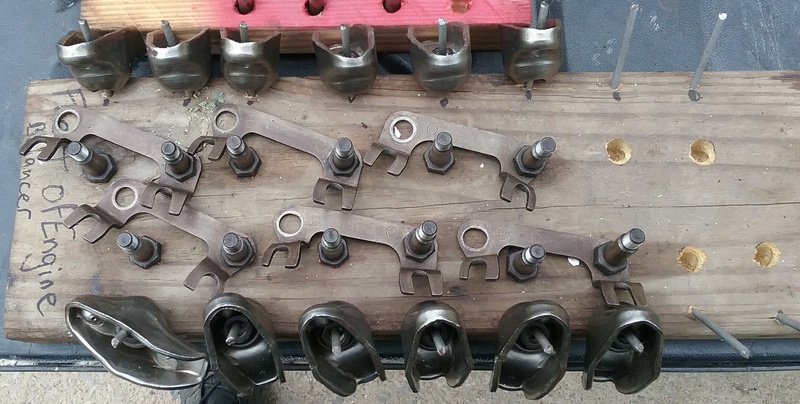 The lifter holder. Point of reference on the front written in. The holes countersunk with those flat wood bits for the lifters to sit in and added little countersunk holes for the pushrods to sit in. Markings to show orientation of parts.  No question as to how the valve train goes back in, even after more then a year out of the engine. I think I made these as a spare of the moment thing. I seen it on those car shows but used what was on hand at the moment and just used the idea and adapted the idea for what I needed. 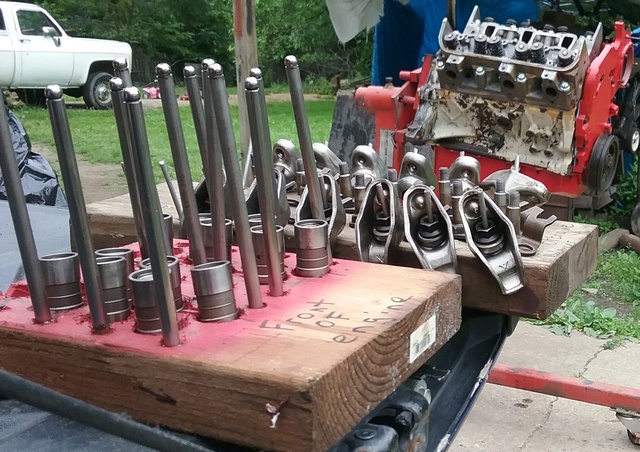 Here is a bonus of doing this. I didn't remember the pushrods was 2 different lengths until I started putting parts in the motor, then compared them. I really didn't have to compare them since I was going to put them back in the same way they came out, but if they was in a bag mixed up then I would have to figure this part out somehow. I checked the order on the holder and compared the order to the motor and notice that the intake pushrod was shorter. I would have noticed if they was mixed up in a bag but one less aggravation. 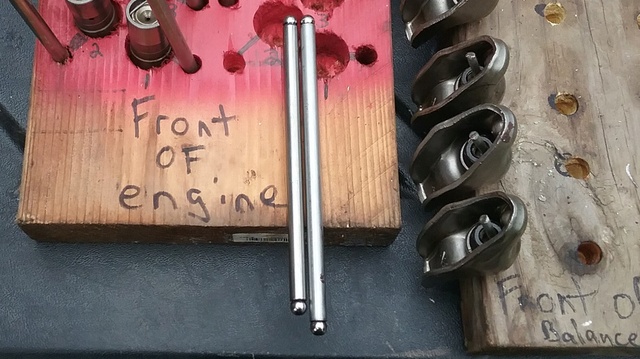 You can see the different part numbers on the pushrods but they are in the right spots. If I didn't see this or known this and put them in the wrong spots then I would be back to square one. I'm sure I would have noticed somehow, but messing up the motor would be a worse case scenario which brings me to my luck which is a whole other post, LOL.  So. The idea is visually organizing the parts for ease of reassembly. Just need to know how to set up the visual part by laying the parts out a certain way, preferably how the parts come off the motor, and make a holder to, well, hold the parts. Always helps when I remember to do this. My bad habit is throwing everything in a bucket and figuring it out later, very slow. I can see someone making a holder like this for a Briggs motor or God forbid a clone motor (Yuck). Will help big time on cleaning the parts and reassembly of the motor. Can go as far as the bolt placements too. I always loose the bolts, LOL. | |
|   | | MatthewD
Veteran Member


2015 Build-Off Entrant
2015 Build-Off Entrant
2016 Build-Off Entrant
2016 Build-Off Entrant
Age : 23
Join date : 2014-11-16
Points : 5753
Posts : 1993
Location : Northern Ireland
 | |   | | prancstaman
Veteran Member


Join date : 2015-02-02
Points : 5096
Posts : 1412
Location : Cleveland,Ohio
 |  Subject: Re: Homemade tools and stuff from junk laying around Subject: Re: Homemade tools and stuff from junk laying around  June 4th 2018, 10:40 pm June 4th 2018, 10:40 pm | |
| Sure thing. Got another one brewing. Just don't quite know how to do it yet but involves junk car rotors I got stashed in my basement that I been collecting by doing brake jobs, LOL. Should be real heavy too. | |
|   | | RichieRichOverdrive
Moderator


2018 Build-Off Entrant
2018 Build-Off Entrant
2024 Build-Off Entrant
2024 Build-Off Entrant
Age : 22
Join date : 2016-10-29
Points : 7221
Posts : 4020
Location : Lewisburg, KY
 |  Subject: Re: Homemade tools and stuff from junk laying around Subject: Re: Homemade tools and stuff from junk laying around  June 5th 2018, 12:10 am June 5th 2018, 12:10 am | |
| Good idea on the valvetrain organizer thingy.
Sooner or later here I'm gonna make a pedestal for my bench grinder outta some big ol I beam. I'll post that up here when I make it. | |
|   | | prancstaman
Veteran Member


Join date : 2015-02-02
Points : 5096
Posts : 1412
Location : Cleveland,Ohio
 |  Subject: Re: Homemade tools and stuff from junk laying around Subject: Re: Homemade tools and stuff from junk laying around  June 5th 2018, 10:07 pm June 5th 2018, 10:07 pm | |
| - RichieRichOverdrive wrote:
- Good idea on the valvetrain organizer thingy.
Sooner or later here I'm gonna make a pedestal for my bench grinder outta some big ol I beam. I'll post that up here when I make it. Thanks. And that would look really cool Rich. | |
|   | | prancstaman
Veteran Member


Join date : 2015-02-02
Points : 5096
Posts : 1412
Location : Cleveland,Ohio
 |  Subject: Re: Homemade tools and stuff from junk laying around Subject: Re: Homemade tools and stuff from junk laying around  June 26th 2018, 10:57 pm June 26th 2018, 10:57 pm | |
| Hay People, Got 2 ideas coming to life here. I started one and right now I am more then half way through it. I am not going to post what is made till it is done which will be in a day or two. I got most of it cut out, mocked up, and ready for the final assembly. The other tool that I'll be making from this will probably take some time so I won't give any info on what I'll be doing with it till it's done, LOL. 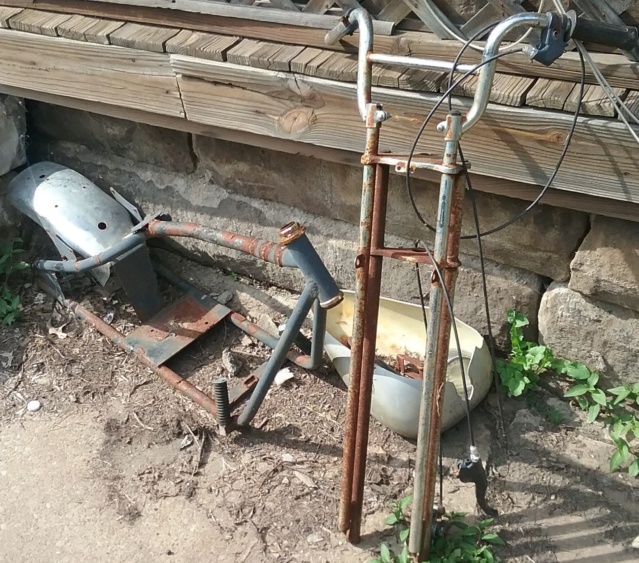 OK, Lets talk about what I got for the junk. It's this Chinese mini bike chopper frame that someone brought to me to weld in a backbone to be able to fit an 8 hp Briggs engine in. I fixed the backbone and got a home made bench grinder for payment. Seemed like a good deal. Bench grinder worked great for being an electric motor on a board with a shaft bolted to the board too for the grinding wheels. I liked it. He wanted more work done and made a deal that was never followed through because he was broke. I kept the mini bike at my house till he could get some money together. Next thing I know he traded it to his friend so his friend wants me to do work on it, make a deal, and waited. No money so no parts and no work done. So this thing has been sitting in this spot for over 2 years and tried to contact new owner of bike to come get it and he said if it's not built and done then he won't come get it. Yah, right. He'll only pay me if the bike is done. Well looks like I got a FREE mini bike frame.  So this frame has been sitting here for around 2 years, rusting up and getting in the way. Owner doesn't want it unless it's done. I'll never build this hunk of Chinese junk into another bike either, not even close to my style of frame. So Just been looking at it and thinking out of the box on what to do with it and came up with 2 ideas. Will post in a day or so on the first tool I make from this hunk of junk frame, LOL. To be continued........ | |
|   | | prancstaman
Veteran Member


Join date : 2015-02-02
Points : 5096
Posts : 1412
Location : Cleveland,Ohio
 |  Subject: Re: Homemade tools and stuff from junk laying around Subject: Re: Homemade tools and stuff from junk laying around  July 1st 2018, 2:44 am July 1st 2018, 2:44 am | |
| Hay People, Got the first project, well mostly done, good enough to use anyways, and you can see where I'm going with it for the final goal of this project. I'll be doing another post of the finished tool later too, right now I'm just using it. OK, the finish'ished tool is at the end of the post if you want a looksee and this will be a pretty long of a post so you people who can't wait can zoom ahead if you like, lol. Onto the work....... This tool will be made from the chopper forks. Looks like someone hit something with it, LOL. I'll be using the forks for the main part.  Now you can see what I am building. This is part of the home made bench grinder I got for payment from the original owner of the mini bike. I had this bench grinder sitting on my back porch since I got it for payment on fixing the backbone of the frame. So I'll be clearing off my back porch a little too, LOL. I cut angle iron to make a holder for the grinder shaft. Looks old but I don't think it is too old though. The casting isn't too worn out but I still need to make a self lubricator for the shaft because mounting it on it's side the grease fitting holes are on the side too. I lost the caps making this thing so I'll get some zerk fittings for it for grease to lube it. 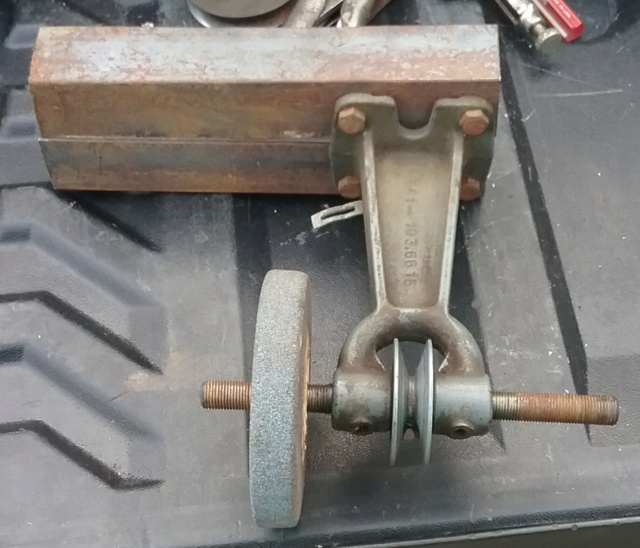 The motor is an induction motor. These motors are very simple on the inside, no brushes so they run forever until the bearings blow. I pull it apart and blow out the stator wires and the rest of it too. I make brackets to mount the motor to the forks. The forks have fake springer rods on it (figures, I would have made real ones), so from the trees to the wheel is unobstructed which gives the motor plenty of adjustment for the belt. Plus, I don't have to use the same size belt when this one breaks, plenty of adjustment so there will be plenty of belts I can use. Since I didn't weld in the brackets for the motor, I can switch motors easily. I can put the same size motor back on or I can put a bigger and stronger one on. I think this motor is about a 1/2 or 1/3 hp.  I do a quick mock up of the grinder part. You can see where I'm going with it. This is where I stopped for the night. While I was about to go to bed, I was thinking which way did the motor spin? LOL. The way I had the parts layed out is wrong, the motor spun to where the grinding wheel was spinning up. So I had to move everything to the other side so the motor was spinning downward in front. No big deal since both sides of the forks are the same.  Onto the feet..... Angle iron cut to 45 degrees on the ends to widen the footprint past the grinding wheel that is sticking out the side, since that will be the main wheel I will probably be using. I give the feet an angled cut so I don't trip over them. And all the main parts layed out. 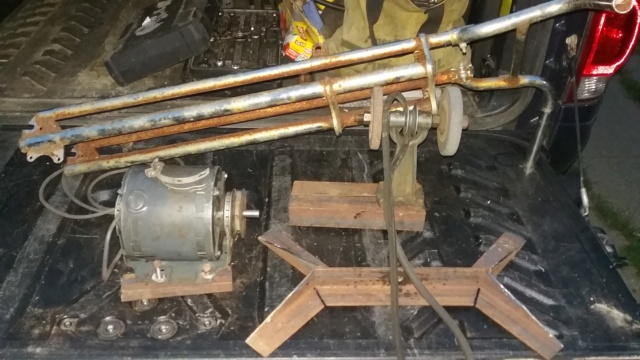 Now I start welding things up. I weld the cuts in the feet up. Drill a hole in the center of the feet to mount the feet onto the forks. I want to be able to remove the feet when I need to. I use the wheel mount with those little washers that have tabs to lock the wheel on the mounts so you don't loose the wheel, to hold the feet on. I weld spacers onto the feet to move them away from the bars and a spacer on the bolt on the inside too. The feet will tilt when loose and then tighten the bolts to hold the angle when needed. I figure if I push real hard on the grinder wheel and the frame being tilted forward then it won't tip over or backwards and fall over while using it. I also cut a flat spot on the bottom part of the forks so the feet won't hit the forks and be at some weird angle. And last of all the goals for the feet are, I want to be able to not have to mount it to the floor to use it. I want to be able to pick it up and move it to where I need to use it, you know, keep it mobile. Later, I can drill holes in the feet to mount it to the floor if I need to. 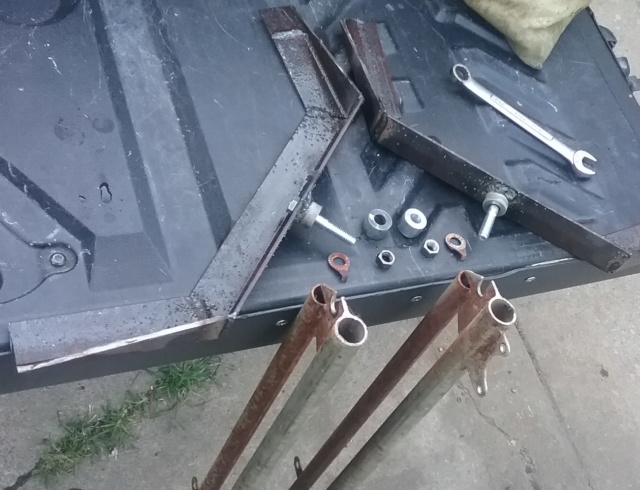 Attention!! 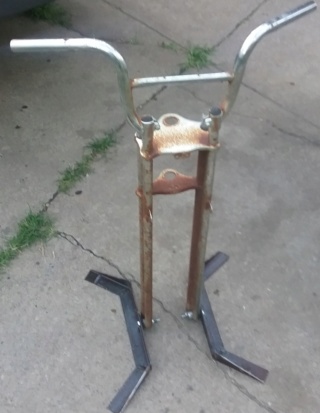 I weld in the grinding wheel mounting brackets. Also note the wheels are on the other side of the forks and will be spinning the correct way and that is the front part of the wheel will be going downwards.  I test fit everything to check belt alignment. I weld a steel electrical box on the cross over bar on the handle bars for the switch. 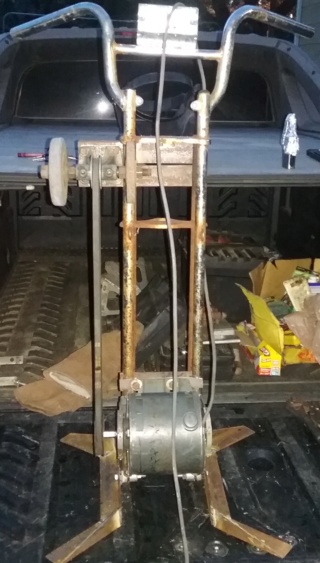 OK, I need this thing working asap. Right now all the main parts are mounted on the forks and I am using it, not testing it but using it. I fixed a couple flathead screw drivers and a part for the feet I was grinding on. Right after I wired the switch in, a piece for a brace, which is that piece sitting on the grinding wheel in the pic, I needed to clean up the threads so I plugged it in and used it while it was sitting on its side, LOL.  This is the last piece I made. The adjustable bracket for one of the feet. It is on the side with the grinding wheel. I figure if I just have the bolts holding the feet on then they will come loose from this thing dancing eventually. So the brace is adjustable so I can tilt it forward and lock it into that angle. Even if the bolts for the feet come loose it will still stay standing. Hopefully I will notice it dancing more then normal while using it and retighten the feet then. 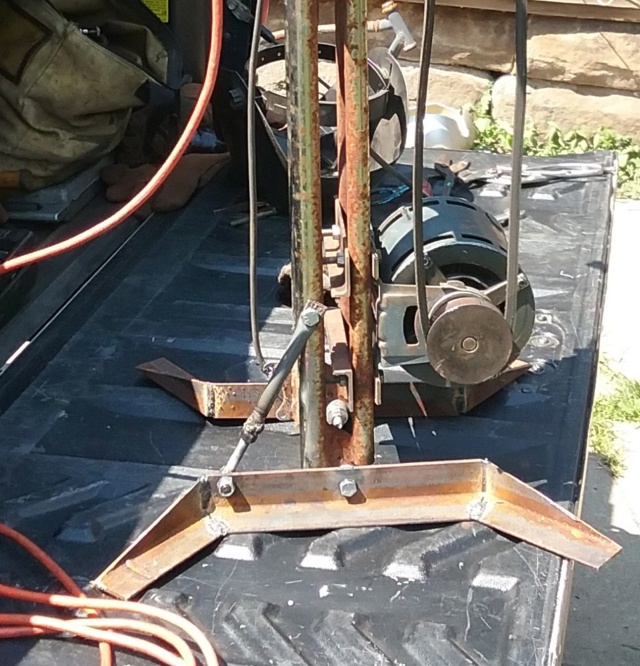 There ya go. A tool made from junk. So when I wired it up, I put a switch and an outlet in the box. The switch controls the motor only and the outlet stays on. Idea here is I will have a hand grinder plugged into it with a cut off wheel on it and will be eventually making a place to hang the hand grinder on the right side. That way I can cut and grind without changing wheels on the hand grinder. 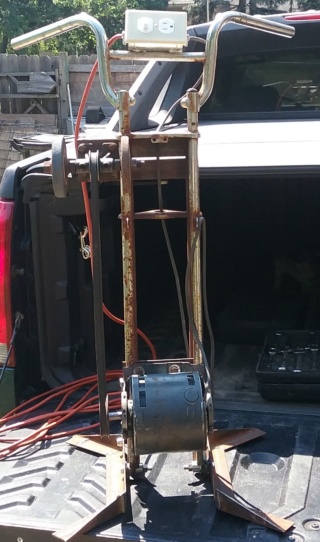 Here is the back side showing the workings and how I ran the wiring. Used a 20 foot extension cord for the plug end and will be making brackets to hold the cord when not being used (like a vacuum cleaner, lol) 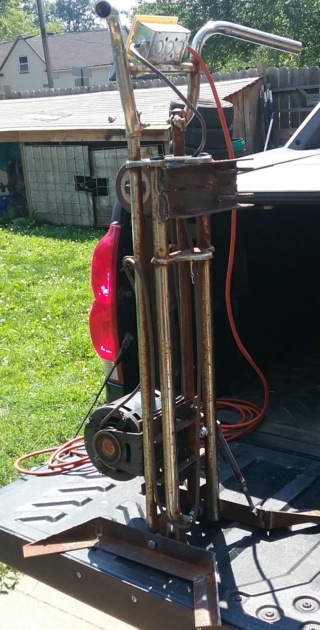 So far on this thing I have tilting feet, on/off switch with a power outlet, can use a wide range of belts, is portable and mobile. What else will I be doing to this, LOL. Right now I just needed it working. Stay tuned for the rest........ As for the frame, well I have something planed totally different for that. Going to be very useful I think but that will be a while from now. Since the frame project will take some time to do I will need to clear my schedule for it. To be continued also................ | |
|   | | Crazy_Carl
Veteran Member


2018 Build-Off Entrant
2018 Build-Off Entrant
2024 Build-Off Entrant
2024 Build-Off Entrant
Age : 35
Join date : 2017-10-30
Points : 5333
Posts : 2561
Location : Rochester, New York
 | |   | | prancstaman
Veteran Member


Join date : 2015-02-02
Points : 5096
Posts : 1412
Location : Cleveland,Ohio
 |  Subject: Re: Homemade tools and stuff from junk laying around Subject: Re: Homemade tools and stuff from junk laying around  July 1st 2018, 10:52 pm July 1st 2018, 10:52 pm | |
| Hay Carl, I might add the tool rest to it on one side (the inboard side). The grinding wheel that is outboard will be kept open mainly. I was showing this project to a buddy of mine, he suggested a light on top and a bucket holder for water for the hot parts. Don't think I will do both of those to this. reason being is it will be adding weight to it and I want this one to stay mobile meaning I need to pick it up. Among the additions I won't say yet, I will say that it needs a shield around both wheels. Definitely a safety factor here for the shield, I can't stand getting pelted in the face and chest with sharp metal and sand. OSHA did get that part right, The shield will be made from the rear fender of the frame, it's actually thick chrome plated steel and will stop a pretty big object if needed. I got a drill doctor for sharpening bits, love that thing. I have a Harbor Freight 6 inch bench grinder I will be making a stand from old rotors. This one will be kept in the basement since it will weigh like a million pounds from the rotors. I can add the light, bucket holder, tool rests on both sides, but not a drill bit sharpener though, I just suck at that, LOL. But please keep the suggestions flowing, I am listening. The goal here is to make the best tool possible and be useful to use the hell out of it. That air tool hanger I made in an earlier post, I think I'm a wear that thing out inside of 2 years from now and have to make another one.  | |
|   | | Crazy_Carl
Veteran Member


2018 Build-Off Entrant
2018 Build-Off Entrant
2024 Build-Off Entrant
2024 Build-Off Entrant
Age : 35
Join date : 2017-10-30
Points : 5333
Posts : 2561
Location : Rochester, New York
 |  Subject: Re: Homemade tools and stuff from junk laying around Subject: Re: Homemade tools and stuff from junk laying around  July 2nd 2018, 3:38 pm July 2nd 2018, 3:38 pm | |
| water holder meh, you can always just grab a cup of water or cool the part down in some snow
a light would be great if you plan to use to inside or outside at night, outside during the daytime is pretty pointless
I would however put the light on the same switch as the motor, I hate turning on two switches when it could just be one | |
|   | | prancstaman
Veteran Member


Join date : 2015-02-02
Points : 5096
Posts : 1412
Location : Cleveland,Ohio
 |  Subject: Re: Homemade tools and stuff from junk laying around Subject: Re: Homemade tools and stuff from junk laying around  July 2nd 2018, 11:18 pm July 2nd 2018, 11:18 pm | |
| Yah, I was thinking that too, motor and light on the same switch or maybe a double switch. One for power from motor and one for on and off, that way I have a choice to use the light. I'll probably never use this one at night in the summer time because of the bugs will eat me alive but in fall, winter and spring most definitely be used at night at times. I guess I will be putting a little light on it after all. Sounds like maybe a plastic or sheet metal one, we shall see what I can do. Thanks, you talked me into it, LOL. | |
|   | | Crazy_Carl
Veteran Member


2018 Build-Off Entrant
2018 Build-Off Entrant
2024 Build-Off Entrant
2024 Build-Off Entrant
Age : 35
Join date : 2017-10-30
Points : 5333
Posts : 2561
Location : Rochester, New York
 | |   | | prancstaman
Veteran Member


Join date : 2015-02-02
Points : 5096
Posts : 1412
Location : Cleveland,Ohio
 |  Subject: Re: Homemade tools and stuff from junk laying around Subject: Re: Homemade tools and stuff from junk laying around  July 29th 2018, 11:00 pm July 29th 2018, 11:00 pm | |
| Hay People, Did another tool, yes this is a tool. This devise is used to grease the wheels of the upper corporate suit, LOL. For all you young ones out there, this is the equivalent to giving your supervisor a 12 pack for that unknown reason not mentioned yet. Since I am head of my department at work, my boss is the Chief of Operations who sits at a desk half the day and comes down to the shop the other half of the day to yell at people. Getting the idea yet, LOL. This devise will be sitting on his desk where he will see it everyday and be thinking "Hay, that guy is a pretty good guy, I'll go easy on him today". Yah, I get yelled at alot for doing dumb stuff not related to work, LOL. Maybe tomorrow I won't. Ok, onto the project............. Made from a old timing chain tensioner off of that 3.1 I been building up. I threw it in the tool box for some reason like this and was looking for something to make the 8 that was big enough. I was digging through the tool box and looky what was right next to the tensioner, two left over clips from when I rebuilt my steering box in my Jeep, LOL. Yes, they was extra clips, LOL. 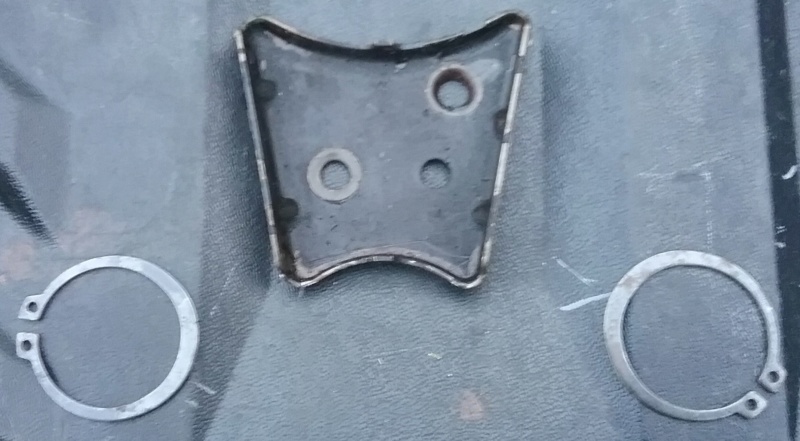 This little project went pretty quick, I had my welder, helmet, and gloves in my truck and just yanked them out and plugged in the welder and I was hot. Tacked the two clips together where they touched on the back side to hide the weld. Scraped off a couple clean spots on the tensioner where I can lay the clips on, tacked the top clip in and the top part of the clip melted off, Oops! Stood there a minute thinking, I can fix this, LOL. And fixed it, just a little extra cleaning up to do for that. Then turned the heat down and finished tacking it in place with 1 more tack. And finally, it needs to stand up so I grabbed a little steel pipe plug that I swapped out for a brass one on the 3.1 and tacked it on the back. Wallah........ 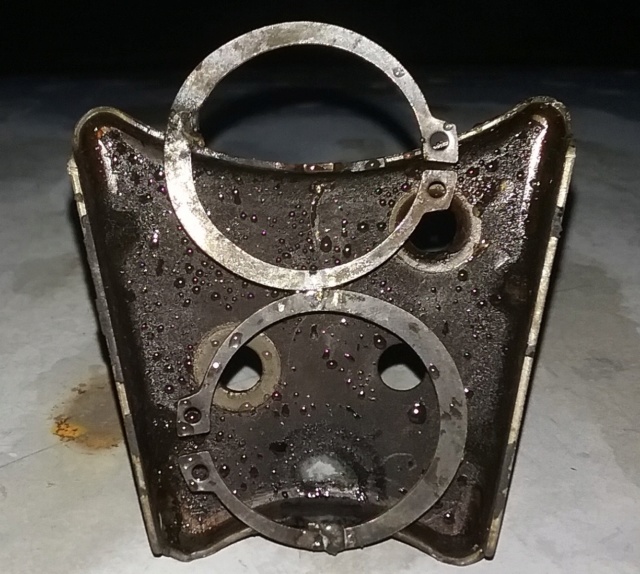 And the back side. 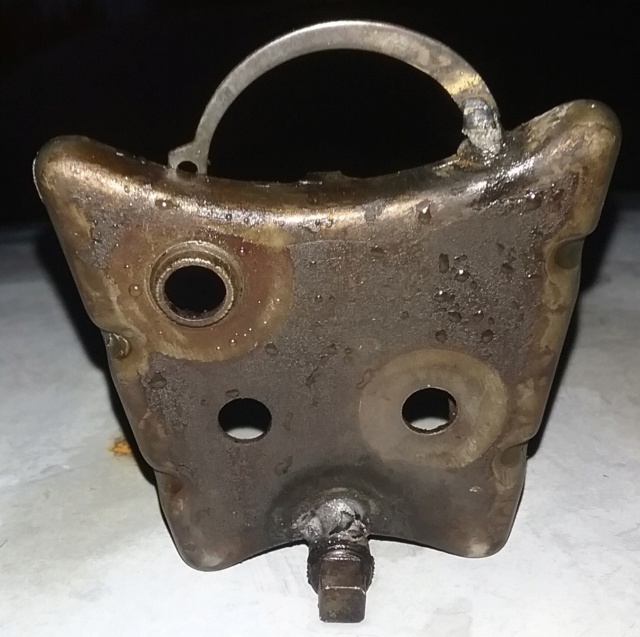 So When I get to work tomorrow, I will plastic blast this (don't want it staining his desk and getting yelled at again), clean up the welds with an air angle grinder, and paint the whole thing Satin Black. Then give it to the Chief of Operations. And this is how you grease the wheels of the upper Corporate Suit. Done!! | |
|   | | Crazy_Carl
Veteran Member


2018 Build-Off Entrant
2018 Build-Off Entrant
2024 Build-Off Entrant
2024 Build-Off Entrant
Age : 35
Join date : 2017-10-30
Points : 5333
Posts : 2561
Location : Rochester, New York
 | |   | | prancstaman
Veteran Member


Join date : 2015-02-02
Points : 5096
Posts : 1412
Location : Cleveland,Ohio
 | |   | | prancstaman
Veteran Member


Join date : 2015-02-02
Points : 5096
Posts : 1412
Location : Cleveland,Ohio
 |  Subject: Making a hydraulic press from scrap and from scratch. Subject: Making a hydraulic press from scrap and from scratch.  October 6th 2018, 1:32 am October 6th 2018, 1:32 am | |
| Hay People, Been working on yet another project, with stuff just laying around my yard and basement with stuff I just got from doing a job. This project is one of those luxury tools that you just can't justify to buy because you would use it so little or is too expensive (like at or over $100) or if you have one is because it was given to you or it was broke when you bought it cheap and had to fix it to use it. And that is a hydraulic press. I've got so use to using 2 hammers that I gave up at buying one because of the cost mainly. I think I will use the crap out of it though, LOL. I work on an electric powered hydraulic press at my job everyday for over 20 years and it's about time I own my own now, LOL. This is such a big deal for me and is something I will use to make more projects from, (tools making more tools), that I am going all out to make this tool as accurately as possible with a bunch of options built into it. So far I got like 29 pics explaining how I am building it (still not done), so this write up will be in multiple posts in over a couple of weeks time. With that said, onto the project at hand............. OK, I'll start out with the junk I will be using. A friend from work gave me a coffee can full of 3/8 and 1/2 inch bolts which will be used and I will be buying the bolts that I do not have. That's the hardware being used. Next is a long piece of 1/4" thick, 3" wide angle iron I got from my brother-in-law, that he got from taking apart a gate from a bank parking lot. And lastly, I got 4 pieces of 1/4" thick, 4" wide C-channel in around 2 1/2 feet lengths, that I got from my boss that he was just going to scrap. These first few posts will be on the framing of the press. I'll get to the hydraulic parts later. If i use anything else, I'll post that later too. 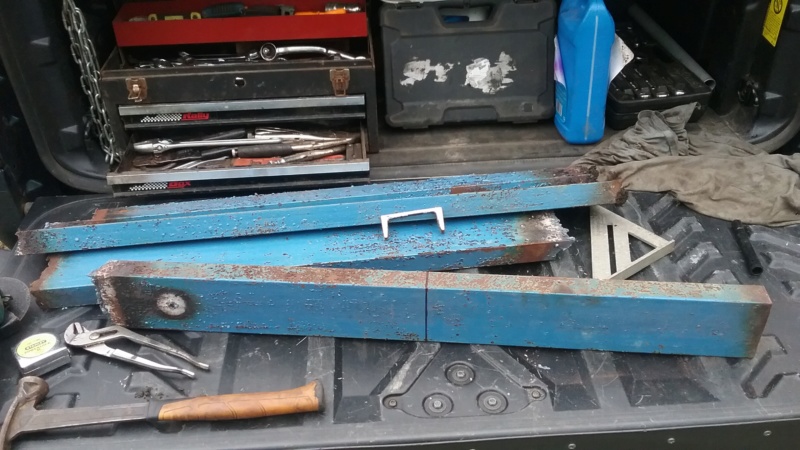  The dimensions of the press will be 2 feet tall and 18 inches wide. I can't see using a really tall press for anything, but anything I will be putting inside this will probably be no more then a foot wide. If I can't fit the part inside this press then I am probably over my head anyways, LOL. I used the C-channel for the legs, the adjustable cross bars, and cross bars that sit on the cross bars (jigs)for the work area. I'll be making other pieces for the work area also later on. The legs are 2 feet tall. the adjustable height cross bars are 18 inches long, while the jigs are 7 inches long. I forgot the pic of the feet and top cut from the angle iron but 4 pieces cut to 18 inches long. That is everything to be used for the frame and dropped it in a milk crate. Usually what my projects start out in, or a bucket, LOL. All this steel, it's going to be real heavy. Tried to move the crate but couldn't because of the weight, WOW. 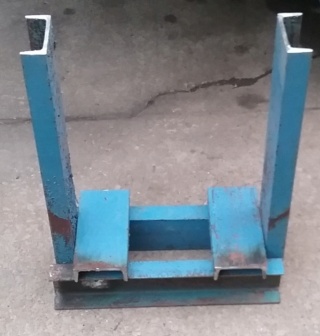 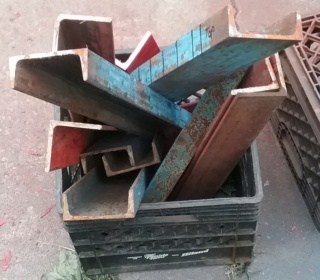 Waist not, want not. What is left of the angle iron (6 1/2 foot long orange piece) and what is left of 3 out of 4 C-channels. I'll be making more jigs from that orange piece of angle iron later too. What is left of the C-channel is just scrap. 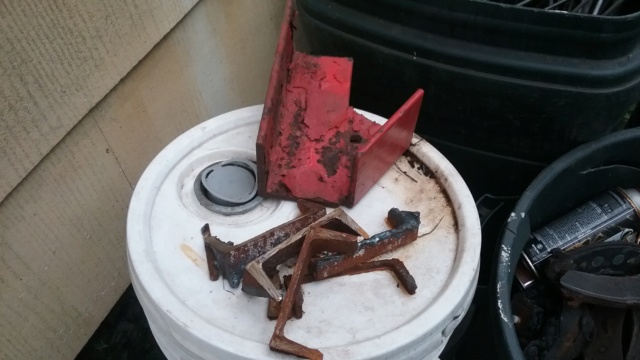 So far I got the pieces of the frame cut out. Next is drilling holes, alot of holes. I'ma take a minute to show how to setup a drill press. Yes I bought it, it's a harbor freight one, a little crappy too but it gets me by, and was under $70 with a coupon, LOL. I will show how to set up the table on it and adjust the spindle to keep it from moving side to side while drilling for a somewhat accurate hole. First you need to extend the chuck all the way down but don't bottom it out and hold it there. Bottoming out the shaft will kick it to the side and jam it there, so almost to the bottom will keep any looseness in the shaft to where you can detect it. With your other hand grab the chuck and see if it will move from side to side. If it does move side to side, there is a screw with a locking nut on the side of the housing of the drill press to adjust and remove the side to side movement (note the red arrow in pic) of the drilling shaft. On the Harbor Freight models the adjusting screw is here. Other models (better one's) will be in this general area. Purpose of this screw is to push the shaft to the side and hold slight pressure on the shaft to keep it from moving for a straight down push. 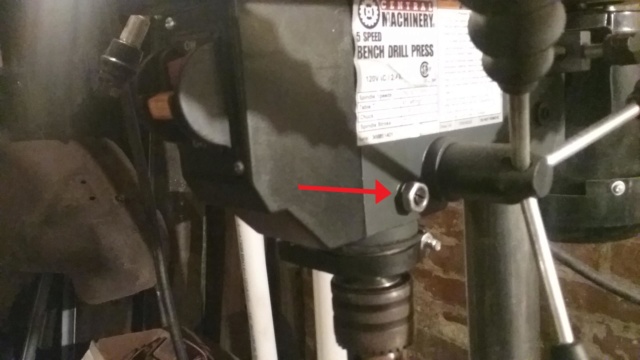 Now you got a straight down push with a spinning drill bit in it. Now you need a drill bit that doesn't wobble or isn't bent. Chuck up a drill bit and turn on the drill press, look at the very tip of the drill bit to see if it is wobbling. if it is a noticeable wobble, find a different drill bit. Next, drill a hole through something thick like steel. If the steel moves or vibrates then something is bent, change the drill bit again, drill another hole. If the steel is still moving or vibrating and you know the drill bit is straight, then there is a bent chuck, bent shaft, or bad bearing on the drill press and the next step won't be accurate. Next, you need a carpenter's square, or something with a right angle (90 degrees) to put on the table and can lay on the drill bit without hitting anything. Even a corner piece of paper will work because the corners are 90 degrees and you can cut out a sizable piece to fit easily. I've done this too. If the table is tiltable, loosen the bolt so there is light pressure to hold the table in place but can still move it. You want to check if the drill bit is 90 degrees from the table by sitting the square on the table and against the drill bit on 3 different spots. First spot will be coming in from the side, then from a 45 degree angle from the side, then straight in from the front. You should see if the square is flat against the drill bit and flat on the table at the same time as shown in the pic. This is checking the built in degree scale of the table to see if it is accurate also.  Looks like my degree scale was off by a degree or so. Glad I checked it. Since it was a sticker I ripped it off and threw it in the garbage. 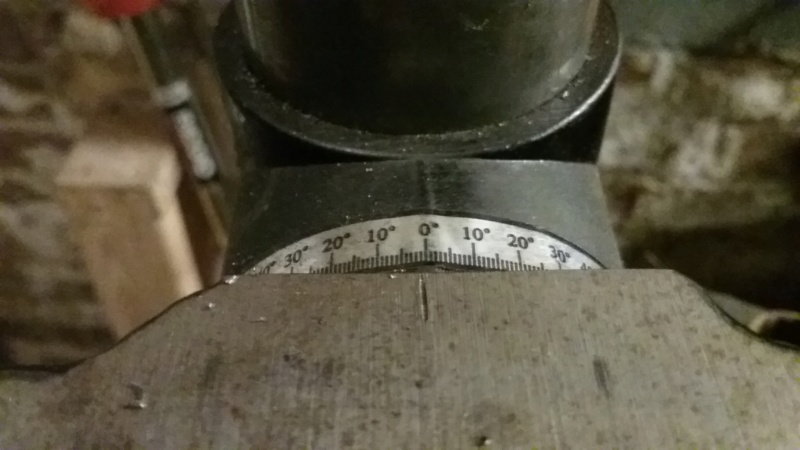 OK, that's it for tonight. To be continued People..................................... | |
|   | | Crazy_Carl
Veteran Member


2018 Build-Off Entrant
2018 Build-Off Entrant
2024 Build-Off Entrant
2024 Build-Off Entrant
Age : 35
Join date : 2017-10-30
Points : 5333
Posts : 2561
Location : Rochester, New York
 | |   | | Sponsored content
 | |   | | | | Homemade tools and stuff from junk laying around |  |
|
Similar topics |  |
|
| | Permissions in this forum: | You cannot reply to topics in this forum
| |
| |
| | Who is online? | In total there are 81 users online :: 0 Registered, 0 Hidden and 81 Guests
None
Most users ever online was 412 on January 7th 2023, 7:59 am
|
|


